Love this? Save it for later!
Share the inspiration with your friends
There used to be a tiny bakery on the corner of Elm and 4th in my old neighborhood, a place called The Frosted Slipper, that made the most beautiful sugar cookies I have ever seen. When they closed overnight—just a sign on the door saying “Thank you for the sweet years”—I honestly felt a little hollow. Those cookies were my December ritual. After about seven attempts—some too crumbly, others so sweet they made my teeth ache—I finally cracked the code. And I made them lighter, because honestly, who needs a sugar crash before wrapping presents?
I remember standing in my kitchen at 10 p.m., covered in flour, staring at a tray of slightly lopsided stars. The first batch spread too much. The second tasted like cardboard. But the third? That was the one where I swapped in a few smarter ingredients without losing that soft, buttery bite. The royal icing finally set with that satisfying snap. I mean, I actually texted my sister a photo at midnight with the caption “We’re back.” She didn’t get it, but the cookies understood.
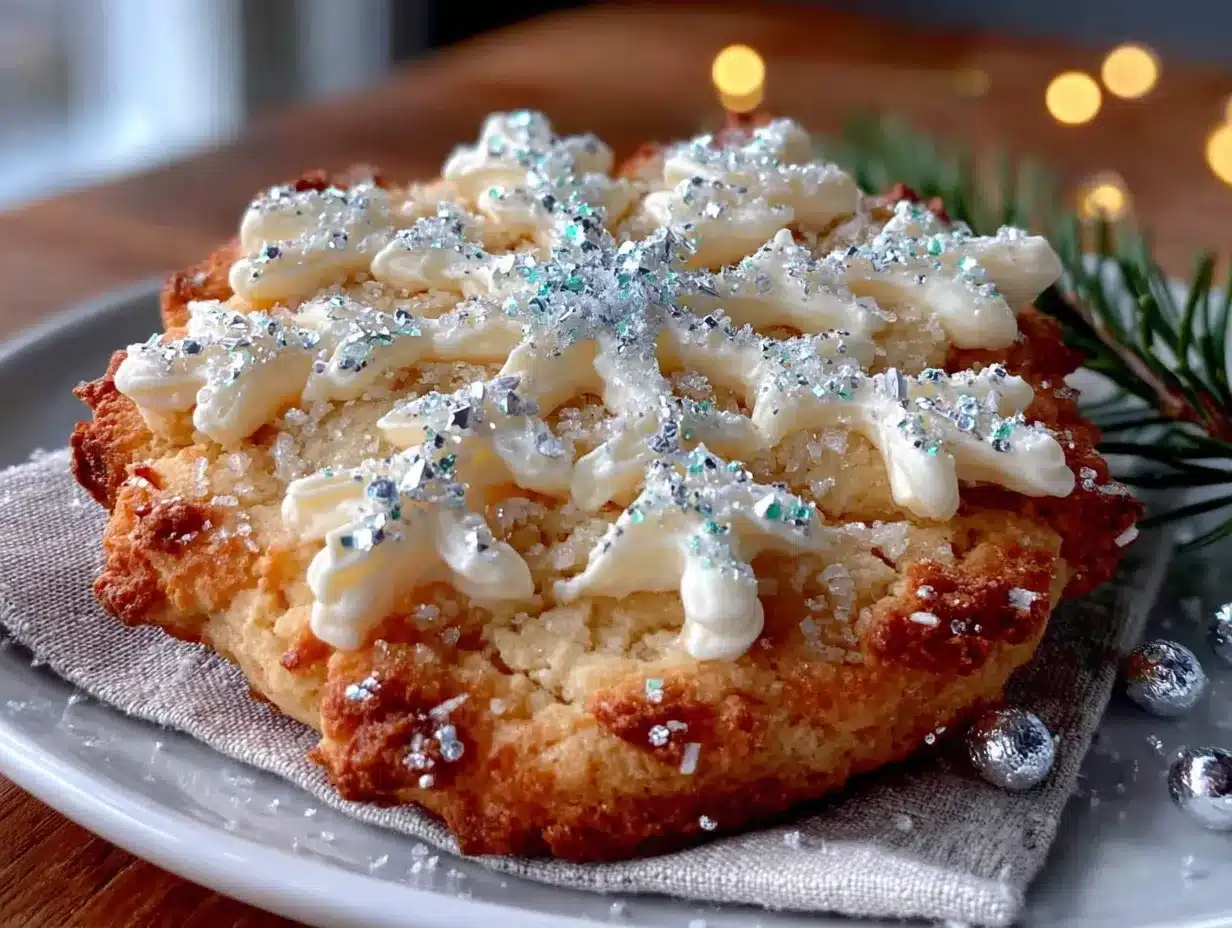
Maybe you’ve been there—chasing a memory of a perfect cookie from a bakery that no longer exists. Or maybe you just want a holiday cookie that doesn’t leave you feeling like you ate a whole bag of sugar. Either way, these lighter decorated Christmas sugar cookies are the answer. They’re soft in the middle, slightly crisp at the edges, and the royal icing is just sweet enough to make you smile. No store-bought mix, no guilt, just the kind of cookie that makes the whole kitchen smell like Christmas morning.
The best part? You don’t need a pastry degree. I’m barely coordinated with a piping bag, and I still managed to make little snowflakes that actually looked like snowflakes. If I can do it, you absolutely can. Let me show you how.
Why You’ll Love This Recipe
These lighter decorated Christmas sugar cookies aren’t just another holiday recipe. They’re the result of real kitchen testing, a few happy accidents, and a serious commitment to making cookies that taste indulgent without the heavy feeling afterward.
- Quick & Easy: From mixing to decorating, you can have a batch ready in under 90 minutes. Perfect for those December evenings when you suddenly remember you need cookies for the school party.
- Simple Ingredients: No weird flours or hard-to-find extracts. You probably have most of this in your pantry right now. I swapped in a touch of whole wheat pastry flour and reduced the sugar slightly, but you’d never know it.
- Perfect for Holiday Baking: These hold their shape beautifully, so you can cut out trees, stars, snowmen, and even tiny reindeer without them puffing into blobs.
- Crowd-Pleaser: I brought a plate to my neighbor’s holiday gathering, and three people asked for the recipe. One person thought they were from a bakery. That’s the kind of compliment you frame.
- Unbelievably Delicious: The texture is that perfect middle ground—soft but sturdy enough to hold royal icing. And the flavor? Buttery, slightly vanilla-kissed, with just enough sweetness to feel like a treat.
What makes this version different is the balance. I tested four different butter-to-flour ratios before landing on one that gives you that classic sugar cookie taste with about 30% less sugar than traditional recipes. The royal icing uses a touch of meringue powder for stability, but I cut back on the powdered sugar so it’s still bright and glossy without being cloying. It’s not a health food—let’s be real—but it’s a cookie you can feel good about eating three of. Probably four. No judgment.
This is the recipe that makes you close your eyes after the first bite. It’s Christmas comfort food, reimagined for anyone who wants the joy of decorating without the sugar hangover. Whether you’re baking with kids or trying to impress your in-laws, these cookies deliver every single time.
What Ingredients You Will Need
This recipe uses simple, wholesome ingredients to deliver that classic sugar cookie flavor and perfect texture. I’ve tested every single swap and substitution so you don’t have to.
For the Cookies
- Unsalted butter, 1 cup (2 sticks), softened to room temperature (I prefer Kerrygold for the richness, but any good-quality butter works)
- Granulated sugar, ¾ cup (reduced from the typical 1 cup—trust the process)
- Large egg, 1, room temperature
- Vanilla extract, 2 teaspoons (use pure, not imitation, for the best flavor)
- Almond extract, ½ teaspoon (optional but adds that bakery taste—I never skip it)
- All-purpose flour, 2 cups
- Whole wheat pastry flour, ½ cup (adds a tiny bit of nuttiness and fiber without changing the texture)
- Baking powder, 1 teaspoon
- Salt, ½ teaspoon (fine sea salt is best)
For the Royal Icing
- Powdered sugar, 2 cups (sifted to avoid lumps)
- Meringue powder, 2 tablespoons (stabilizes the icing and gives that professional finish)
- Water, 3 to 4 tablespoons (add slowly—you want a thick but flowable consistency)
- Vanilla extract, ½ teaspoon (or clear vanilla if you want pure white icing)
- Gel food coloring (I use Americolor or Wilton—liquid coloring will thin the icing too much)
I tested this recipe with all-purpose flour only, and it works fine—just a slightly less tender crumb. The whole wheat pastry flour is my secret weapon. It’s not the same as regular whole wheat flour; it’s finer and lighter, so it blends right in. Bob’s Red Mill makes a good one, and it lasts forever in the pantry.
For the meringue powder, I’ve used both Wilton and CK Products with great results. If you can’t find it, you can use 1 pasteurized egg white instead, but the shelf life shortens and you’ll need to refrigerate the decorated cookies.
One note on the almond extract: it’s optional, but it gives that subtle “bakery” flavor that makes people think you spent hours. A little goes a long way—don’t be tempted to add more.
Equipment Needed
You don’t need a professional bakery setup for these lighter decorated Christmas sugar cookies. Here’s what you’ll actually use:
- Stand mixer or hand mixer: A stand mixer makes creaming butter and sugar effortless, but a hand mixer works perfectly. I’ve used both. My old hand mixer from college lasted through five moves.
- Rolling pin: A standard rolling pin is fine. If you have adjustable rings, they help keep the dough even, but I’ve rolled plenty of cookies with just my hands and a prayer.
- Cookie cutters: Christmas shapes—stars, trees, snowflakes, gingerbread men. Go wild. I found a set of vintage copper cutters at a thrift store that are my absolute favorites.
- Baking sheets: Two or three, preferably light-colored. Dark sheets can over-brown the bottoms.
- Parchment paper or silicone baking mats: Silpat mats are my go-to. They’re non-stick and reusable, and cleanup takes two seconds.
- Piping bags or squeeze bottles: For the royal icing. I prefer small squeeze bottles for flooding and piping bags with a #2 or #3 tip for details. Wilton makes a decent starter set.
- Cooling racks: Essential for letting cookies cool completely before icing. Stacking warm cookies is a disaster.
- Small offset spatula: Not strictly necessary, but helpful for spreading icing if you’re not using piping bags.
If you’re just starting out, don’t buy everything at once. A rolling pin, a cookie cutter, and a zip-top bag with the corner snipped off will get the job done. I decorated my first batch of Christmas cookies with a butter knife and a lot of optimism.
Preparation Method
Let’s make these lighter decorated Christmas sugar cookies. I’ll walk you through every step so you feel confident, even if it’s your first time working with royal icing.
Make the Cookie Dough
- In a stand mixer fitted with the paddle attachment (or a large bowl with a hand mixer), beat the softened butter and granulated sugar together on medium speed until light and fluffy, about 3 minutes. Scrape down the sides once. You want it pale and airy—this is where the tenderness starts.
- Add the egg, vanilla extract, and almond extract (if using). Beat on medium until fully combined, about 30 seconds. The mixture might look slightly curdled—that’s fine, don’t panic.
- In a separate bowl, whisk together the all-purpose flour, whole wheat pastry flour, baking powder, and salt. This ensures even distribution of the leavening.
- With the mixer on low, gradually add the dry ingredients to the wet mixture. Mix just until the dough comes together. You should see no dry streaks, but don’t overmix—that’s what makes cookies tough. The dough will be soft but not sticky.
- Turn the dough out onto a lightly floured surface. Divide it in half, shape each half into a disc about 1 inch thick, wrap tightly in plastic wrap, and refrigerate for at least 1 hour. I’ve chilled mine overnight before, and it only gets easier to work with.
Roll and Cut
- Preheat your oven to 350°F (175°C). Line two baking sheets with parchment paper or silicone mats.
- Take one disc of dough out of the fridge. Let it sit at room temperature for 5 minutes—if it’s too cold, it will crack when you roll it. Lightly flour your rolling pin and work surface.
- Roll the dough to about ¼-inch thickness. I use two wooden dowels as guides to keep it even, but you can eyeball it. Rotate the dough occasionally to prevent sticking.
- Cut out your shapes using cookie cutters. Dip the cutters in flour between cuts to keep them from sticking. Place the cutouts on the prepared baking sheets, leaving about 1 inch between each cookie.
- Gather the scraps, gently press them together, and reroll. You can reroll once or twice before the dough gets tough. After that, I just bake the scraps as “tester cookies”—they never last long.
Bake
- Bake for 8 to 10 minutes, or until the edges are just barely golden. The centers should look set but not browned. For smaller cookies, start checking at 7 minutes.
- Let the cookies cool on the baking sheet for 5 minutes. This allows them to firm up. Then transfer to a wire rack to cool completely. Do not ice warm cookies—the icing will slide right off and you’ll have a sticky mess. I learned this the hard way.
Make and Apply Royal Icing
- In a clean bowl, combine the sifted powdered sugar and meringue powder. Add 3 tablespoons of water and the vanilla extract. Beat on low until combined, then increase to medium-high and beat for 3 to 4 minutes. The icing should be thick, glossy, and hold a stiff peak when you lift the beater.
- For flooding (covering the cookie base), thin the icing by adding water one teaspoon at a time until it flows like honey. A ribbon of icing should settle back into itself within 5 seconds. For piping details, leave the icing thick.
- Divide the icing into small bowls and color with gel food coloring. Use a toothpick to add tiny amounts—a little goes a long way.
- Transfer icing to piping bags or squeeze bottles. Outline each cookie with the thicker icing, then flood the inside with the thinner icing. Use a toothpick to spread it into corners and pop any air bubbles.
- Let the iced cookies dry at room temperature for at least 4 hours, preferably overnight. The icing should be hard to the touch. Stacking too soon will ruin all your hard work.
Cooking Tips & Techniques
I’ve made plenty of mistakes with sugar cookies over the years. Here’s what I’ve learned so you don’t have to repeat my errors.
Chill the dough thoroughly. This is non-negotiable. Warm dough spreads in the oven, and you’ll end up with one giant cookie blob instead of distinct trees and stars. If your kitchen is warm, pop the cut cookies back in the fridge for 10 minutes before baking.
Don’t overwork the dough. When you reroll scraps, handle them as little as possible. The more you work the dough, the more gluten develops, and the tougher the cookies get. I’ve had batches that were practically hockey pucks. Not my finest moment.
Use a light touch with flour. Too much flour on your work surface makes the cookies dry. Use just enough to prevent sticking, and brush off any excess from the cutouts before baking.
Royal icing consistency is everything. Too thick, and it won’t spread. Too thin, and it drips off the edges. The “10-second rule” is your friend: lift your spatula or spoon, and the icing should take about 10 seconds to smooth out. Adjust with water or more powdered sugar as needed.
Work in batches. Don’t try to ice all the cookies at once if you’re new to this. I do a dozen at a time. By the time I finish, the first ones are set enough to add details.
Keep a damp paper towel over your piping bags. Royal icing dries quickly, and a crust can form in the tip. If that happens, just wipe the tip clean and keep going.
One more thing— I once tried to speed up drying with a fan. Don’t. It creates a crust on top while the inside stays sticky. Just be patient. Good things take time, and these cookies are worth the wait.
Variations & Adaptations
These lighter decorated Christmas sugar cookies are flexible. Here are a few ways to make them your own.
Gluten-Free Version: Substitute the all-purpose flour and whole wheat pastry flour with a good gluten-free baking blend. I’ve used King Arthur Measure for Measure with great results. Add ½ teaspoon xanthan gum if your blend doesn’t include it. The texture will be slightly more delicate, so handle gently.
Vegan Option: Use vegan butter (I like Miyoko’s or Earth Balance) and a flax egg (1 tablespoon ground flaxseed mixed with 3 tablespoons water, let sit for 5 minutes). For the royal icing, replace meringue powder with aquafaba—the liquid from a can of chickpeas. Whip 3 tablespoons of aquafaba with the powdered sugar until stiff peaks form. It works like magic.
Citrus Twist: Add 1 tablespoon of fresh lemon or orange zest to the dough along with the vanilla. It brightens the flavor beautifully and pairs wonderfully with the royal icing. I made a batch with lemon zest last year, and they disappeared at the office party.
Spiced Sugar Cookies: Add 1 teaspoon of cinnamon, ½ teaspoon of ginger, and ¼ teaspoon of nutmeg to the dry ingredients. These taste like a softer version of gingerbread and are perfect for fall baking.
Chocolate-Dipped: Skip the royal icing and dip half of each cooled cookie in melted dark chocolate. Let set on parchment paper. It’s faster than piping and feels just as special.
Mini Cookie Version: Use tiny cookie cutters and reduce baking time to 5 to 7 minutes. These are perfect for cookie platters or gift bags. I made mini snowflakes last year and tied them with ribbon—adorable.
Serving & Storage Suggestions
These lighter decorated Christmas sugar cookies are best served at room temperature. The royal icing should be completely set—hard and glossy. Arrange them on a festive platter or tiered stand for maximum holiday cheer.
Pairing Ideas: Serve with a cup of hot cocoa, a spiced chai latte, or a glass of cold milk. For an adult gathering, they’re lovely alongside a cup of coffee or a dessert wine like Moscato. I’ve also crumbled them over vanilla ice cream for a quick holiday sundae—highly recommended.
Storage: Store undecorated cookies in an airtight container at room temperature for up to 1 week. Place a slice of bread in the container to keep them soft—replace the bread every couple of days. Once decorated, let the icing set completely before stacking. Layer between sheets of parchment paper. They’ll keep for 2 to 3 weeks, though I doubt they’ll last that long.
Freezing: You can freeze the unbaked dough discs, wrapped tightly in plastic wrap and placed in a freezer bag, for up to 3 months. Thaw overnight in the refrigerator before rolling and cutting. Baked, undecorated cookies also freeze well for up to 3 months. Thaw at room temperature before icing. I always keep a batch in the freezer for unexpected guests.
Flavor Development: These cookies actually taste better the next day. The flavors meld, and the texture softens slightly. If you can resist eating them all on day one, you’ll be rewarded.
Nutritional Information & Benefits
One lighter decorated Christmas sugar cookie (about 2 inches, with royal icing) contains approximately:
- Calories: 110
- Fat: 5g
- Saturated Fat: 3g
- Carbohydrates: 15g
- Sugar: 9g
- Protein: 1g
- Fiber: 0.5g
Compared to traditional sugar cookie recipes, this version has about 30% less sugar and uses whole wheat pastry flour for a small fiber boost. The butter provides vitamin A and healthy fats, while the egg adds a bit of protein. The royal icing, while still sweet, uses less powdered sugar than standard recipes thanks to the stabilizing effect of the meringue powder.
These cookies are not gluten-free in their standard form, but the variation above addresses that. They contain dairy (butter) and eggs, so they’re not suitable for vegan diets without the substitutions listed. The almond extract is optional for those with nut allergies—just leave it out.
My personal philosophy? A cookie should be a treat, not a guilt trip. These are designed to let you enjoy the holidays without feeling like you’ve overdone it. One or two with a cup of tea is the perfect way to end a December day.
Conclusion
These lighter decorated Christmas sugar cookies with royal icing are everything I wanted when I first walked into The Frosted Slipper all those years ago. They’re beautiful enough to give as gifts, simple enough to make with kids, and light enough to enjoy without regret. That bakery may be gone, but the memory lives on in every batch I bake.
I hope you make these your own. Change the colors, try different cutters, experiment with flavors. The best recipes are the ones that evolve with you. Maybe you’ll discover your own secret ingredient—a pinch of cardamom, a splash of orange extract, a little extra love.
If you try these cookies, I’d love to hear about it. Drop a comment below and tell me how they turned out, what shapes you used, or if you discovered a new favorite variation. Share a photo on Pinterest and tag me—I love seeing your creations. And if you’re looking for another holiday treat, try my soft gingerbread cookies or these easy peppermint bark for more festive baking.
Happy baking, friend. May your kitchen smell like vanilla, your icing stay smooth, and your holidays be filled with sweet moments.
Frequently Asked Questions
Can I use all-purpose flour instead of the whole wheat pastry flour?
Yes, absolutely. Just use 2 ½ cups of all-purpose flour total. The cookies will still be delicious, though they’ll be slightly less tender. I like the whole wheat pastry flour for the subtle nutty flavor and a tiny bit of fiber, but it’s not required.
My royal icing is too runny. How do I fix it?
Add more sifted powdered sugar, one tablespoon at a time, and beat well. The icing should hold a stiff peak before you thin it for flooding. If it’s already runny, don’t worry—just thicken it back up and adjust the consistency again. I’ve saved many batches this way.
How far in advance can I make these cookies?
You can make the dough up to 3 days ahead and keep it refrigerated. Baked, undecorated cookies can be stored for up to a week at room temperature or frozen for 3 months. Decorated cookies keep for 2 to 3 weeks if stored properly. I often bake the cookies one weekend and decorate them the next.
Why did my cookies spread in the oven?
Most likely, the dough wasn’t chilled enough. Make sure you chill the dough for at least 1 hour before rolling, and if your kitchen is warm, pop the cut cookies back in the fridge for 10 to 15 minutes before baking. Also, check that your butter wasn’t too soft when you started—it should be room temperature, not melted.
Can I freeze the decorated cookies?
Yes, but with caution. Make sure the royal icing is completely set—overnight drying is best. Layer the cookies between sheets of parchment paper in an airtight container. Thaw at room temperature with the container slightly open to prevent condensation. The icing might lose a bit of its shine, but they’ll still taste wonderful.
Pin This Recipe!

Lighter Decorated Christmas Sugar Cookies with Royal Icing – Easy Holiday Recipe

These lighter decorated Christmas sugar cookies are soft in the middle, slightly crisp at the edges, and topped with a perfectly sweet royal icing. Made with reduced sugar and a touch of whole wheat pastry flour, they’re a guilt-free holiday treat that tastes just like the bakery version.
- Prep Time: 20 minutes
- Cook Time: 10 minutes
- Total Time: 90 minutes (includes chilling and drying time)
- Yield: 24 cookies 1x
- Category: Dessert
- Cuisine: American
Ingredients
- 1 cup (2 sticks) unsalted butter, softened to room temperature
- ¾ cup granulated sugar
- 1 large egg, room temperature
- 2 teaspoons pure vanilla extract
- ½ teaspoon almond extract (optional)
- 2 cups all-purpose flour
- ½ cup whole wheat pastry flour
- 1 teaspoon baking powder
- ½ teaspoon fine sea salt
- 2 cups powdered sugar, sifted
- 2 tablespoons meringue powder
- 3 to 4 tablespoons water
- ½ teaspoon vanilla extract (or clear vanilla)
- Gel food coloring (optional)
Instructions
- In a stand mixer fitted with the paddle attachment (or a large bowl with a hand mixer), beat the softened butter and granulated sugar together on medium speed until light and fluffy, about 3 minutes. Scrape down the sides once.
- Add the egg, vanilla extract, and almond extract (if using). Beat on medium until fully combined, about 30 seconds.
- In a separate bowl, whisk together the all-purpose flour, whole wheat pastry flour, baking powder, and salt.
- With the mixer on low, gradually add the dry ingredients to the wet mixture. Mix just until the dough comes together. Do not overmix.
- Turn the dough out onto a lightly floured surface. Divide it in half, shape each half into a disc about 1 inch thick, wrap tightly in plastic wrap, and refrigerate for at least 1 hour.
- Preheat your oven to 350°F (175°C). Line two baking sheets with parchment paper or silicone mats.
- Take one disc of dough out of the fridge. Let it sit at room temperature for 5 minutes. Lightly flour your rolling pin and work surface.
- Roll the dough to about ¼-inch thickness. Cut out shapes using cookie cutters. Place the cutouts on the prepared baking sheets, leaving about 1 inch between each cookie.
- Gather the scraps, gently press them together, and reroll. Repeat once or twice.
- Bake for 8 to 10 minutes, or until the edges are just barely golden. For smaller cookies, start checking at 7 minutes.
- Let the cookies cool on the baking sheet for 5 minutes, then transfer to a wire rack to cool completely.
- In a clean bowl, combine the sifted powdered sugar and meringue powder. Add 3 tablespoons of water and the vanilla extract. Beat on low until combined, then increase to medium-high and beat for 3 to 4 minutes until thick, glossy, and holding a stiff peak.
- For flooding, thin the icing by adding water one teaspoon at a time until it flows like honey. For piping details, leave the icing thick.
- Divide the icing into small bowls and color with gel food coloring.
- Transfer icing to piping bags or squeeze bottles. Outline each cookie with the thicker icing, then flood the inside with the thinner icing. Use a toothpick to spread it into corners and pop any air bubbles.
- Let the iced cookies dry at room temperature for at least 4 hours, preferably overnight.
Notes
Chill the dough thoroughly to prevent spreading. Do not overwork the dough when rerolling scraps. Royal icing consistency is key: use the 10-second rule. Keep a damp paper towel over piping bags to prevent drying. Do not use a fan to speed up drying.
Nutrition
- Serving Size: 1 cookie (2 inches,
- Calories: 110
- Sugar: 9
- Sodium: 50
- Fat: 5
- Saturated Fat: 3
- Carbohydrates: 15
- Fiber: 0.5
- Protein: 1
Keywords: Christmas sugar cookies, lighter sugar cookies, royal icing cookies, holiday cookies, decorated cookies, easy sugar cookies


