Love this? Save it for later!
Share the inspiration with your friends
I was standing in line at the hardware store—of all places—on a gray December afternoon, clutching a replacement lightbulb for the kitchen, when the woman ahead of me turned around and started talking about cookies. Not just any cookies, but these cookies. She was probably in her seventies, wearing a coat with a fur-lined hood that made her look like a very determined marshmallow, and she was telling the cashier about her annual “Grinch cookie” tradition. I wasn’t trying to eavesdrop, but honestly, you couldn’t help it. She had this way of talking that made everything sound important.
“The trick,” she said, “is the peppermint extract. And you have to chill the dough until it’s firm enough to hold the green. Otherwise, they spread into blobs.” She laughed and added, “I learned that the hard way last year. My grandkids called them Grinch blobs.”
I bought my lightbulb and left, but I couldn’t stop thinking about those cookies. The next week, I ran into her again—same hardware store, same fur-lined hood—and I did something I normally never do. I asked her for the recipe. She looked at me for a second, then smiled and said, “Follow me.” She pulled a crumpled index card out of her wallet, covered in stains and scribbles, and handed it to me. “Make them on a cold night,” she said. “They taste better when it’s cold.”
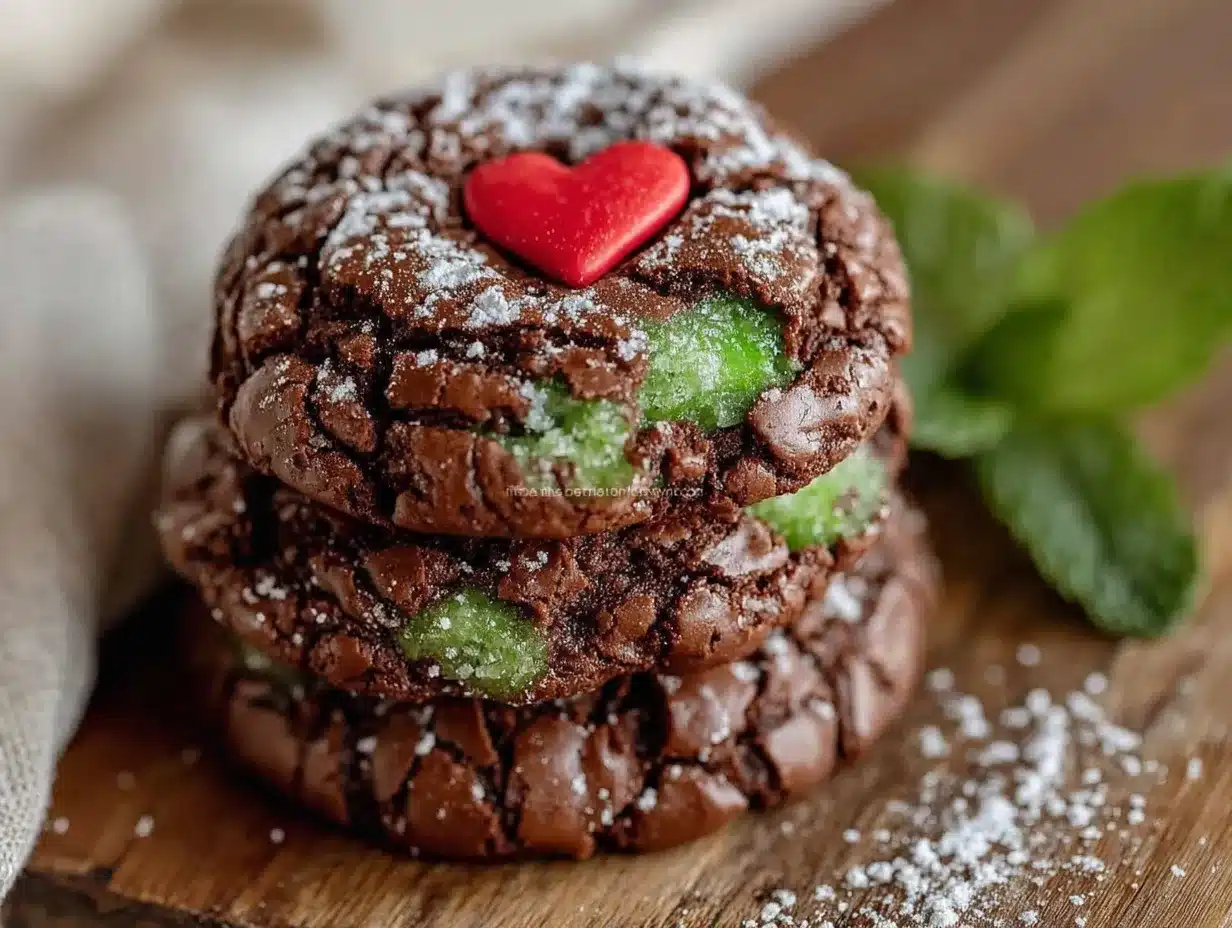
So I did. And let me tell you—these Cozy Mint Chocolate Grinch Crinkle Cookies are everything you want from a holiday cookie. They’re soft, chewy, with that perfect crackled top that looks like snow-covered ground, but they’re green. Bright, cheerful green. The mint is cool and refreshing, the chocolate is rich and dark, and the whole thing feels like a hug in cookie form. I’ve made them every December since, and they never last more than two days in my house. Maybe you’ve been there—standing in an unexpected place, overhearing something that changes your whole baking season. That’s how this recipe found me. And I’m so glad it did.
Why You’ll Love This Recipe
These aren’t just pretty cookies. They’re the kind that disappear from the plate before you’ve even poured yourself a glass of milk. Here’s why they work so well:
- Quick & Easy: From start to finish, you’re looking at about 30 minutes of active work. The dough needs to chill for an hour, but that’s hands-off time. Perfect for busy holiday evenings when you’re trying to do twelve things at once.
- Simple Ingredients: Nothing fancy here. You probably already have butter, sugar, flour, and eggs in your kitchen. The only special items are green gel food coloring and peppermint extract—both easy to find at any grocery store.
- Perfect for Holiday Baking: These are made for cookie swaps, Christmas parties, or just a cozy night in with hot cocoa. They’re festive without being fussy.
- Crowd-Pleaser: Kids love the bright green color. Adults love the sophisticated mint-chocolate combo. Everyone loves the soft, chewy texture. I’ve never seen a plate of these go untouched.
- Unbelievably Delicious: The combination of cool mint and rich chocolate is next-level comfort food. It’s like a peppermint patty, but better—because it’s a cookie.
What makes this recipe different from the rest is the balance. I tested this six times before I got it right. The first batch was too cakey. The second was too flat. The third had too much mint—it tasted like toothpaste, honestly. But this version? It’s perfect. The dough is sturdy enough to hold its shape, the crinkle is dramatic, and the flavor is just right. It’s comfort food reimagined—faster than homemade truffles, but with the same soul-soothing satisfaction. Perfect for impressing guests without stress, or turning a simple Tuesday night into something memorable.
What Ingredients You Will Need
This recipe uses simple, wholesome ingredients to deliver bold flavor and satisfying texture without the fuss. Most of these are pantry staples, so you probably already have everything except the peppermint extract and green food coloring.
For the Cookie Dough
- 1 cup (226g) unsalted butter, softened to room temperature (I use Kerrygold for the richest flavor)
- 1 cup (200g) granulated sugar
- 1 large egg, room temperature
- 1 teaspoon vanilla extract
- 1/2 teaspoon peppermint extract (don’t use more—it’s potent)
- 2 cups (250g) all-purpose flour, spooned and leveled
- 1/2 cup (50g) unsweetened cocoa powder (I recommend Ghirardelli for deep chocolate flavor)
- 1 teaspoon baking soda
- 1/2 teaspoon salt
- Green gel food coloring (about 1/2 teaspoon, or more for deeper color—avoid liquid food coloring, it makes the dough too wet)
For Rolling
- 1/2 cup (60g) powdered sugar, for coating the dough balls
Ingredient Tips: Use gel food coloring, not liquid. Liquid coloring will change the dough’s consistency and make the cookies spread too much. For the peppermint extract, stick with pure extract if you can find it—imitation peppermint can taste artificial. If you’re out of unsalted butter, you can use salted butter and just reduce the added salt to 1/4 teaspoon. And here’s a trick I learned from my hardware store friend: room temperature ingredients really matter. Cold butter won’t cream properly, and cold egg will make the dough seize up. Take them out an hour before you start baking.
Equipment Needed
You don’t need anything fancy for these cookies, which is part of why I love making them. Here’s what you’ll need:
- Stand mixer or hand mixer: For creaming the butter and sugar. A hand mixer works fine, but a stand mixer makes it easier.
- Large mixing bowl: For combining dry ingredients.
- Medium mixing bowl: For the wet ingredients.
- Whisk: To sift together flour, cocoa powder, baking soda, and salt.
- Rubber spatula: For folding the dough and scraping the bowl.
- Baking sheets: Two standard half-sheet pans work best.
- Parchment paper or silicone baking mats: Parchment is easier for cleanup; silicone mats give slightly more even browning.
- Cookie scoop or tablespoon: For portioning dough. I use a 1.5-tablespoon scoop for consistent cookies.
- Small bowl: For the powdered sugar coating.
- Cooling rack: Essential for getting that perfect crinkle texture.
Budget Tip: If you don’t have a stand mixer, a hand mixer works just as well. I made these for years with a $20 hand mixer from the grocery store. And if you don’t have a cookie scoop, just use two spoons—one to scoop, one to scrape. It’s not as fast, but it gets the job done.
Preparation Method
Here’s how to make these cookies step by step. I’ve included all the little details I wish someone had told me the first time.
- Cream the butter and sugar: In a large mixing bowl, beat the softened butter and granulated sugar together on medium speed until light and fluffy—about 2 to 3 minutes. You want it to look pale and airy. Scrape down the sides of the bowl with a spatula halfway through.
- Add the wet ingredients: Beat in the egg, vanilla extract, and peppermint extract until fully combined. The mixture might look slightly curdled at this point—don’t worry, that’s normal. It will come together once you add the dry ingredients.
- Add the green food coloring: Add about 1/2 teaspoon of green gel food coloring and beat until the color is evenly distributed. If you want a deeper green, add more in small increments—about 1/8 teaspoon at a time. I usually end up using about 3/4 teaspoon total. The dough should look like Grinch-green, bright and cheerful.
- Combine dry ingredients: In a separate medium bowl, whisk together the flour, cocoa powder, baking soda, and salt. Make sure there are no lumps—cocoa powder loves to clump.
- Mix dry into wet: Gradually add the dry ingredients to the wet mixture, mixing on low speed just until combined. Don’t overmix. Stop as soon as you no longer see streaks of flour. The dough will be thick and slightly sticky.
- Chill the dough: Cover the bowl with plastic wrap and refrigerate for at least 1 hour. This step is non-negotiable. Chilled dough holds its shape better and gives you those beautiful crinkle cracks. I’ve tried skipping this step, and the cookies spread into flat, sad discs. Trust me on this one.
- Preheat and prepare: About 15 minutes before the dough is done chilling, preheat your oven to 350°F (175°C). Line two baking sheets with parchment paper or silicone mats.
- Roll the dough balls: Place the powdered sugar in a small bowl. Using a cookie scoop or tablespoon, portion out about 1.5 tablespoons of dough per cookie. Roll each portion into a smooth ball between your palms. Then roll each ball in the powdered sugar until completely coated. Don’t skimp on the sugar—the coating is what creates the crinkle effect.
- Arrange on baking sheets: Place the coated dough balls on the prepared baking sheets, spacing them about 2 inches apart. They will spread, so give them room. I fit about 9 cookies per standard sheet.
- Bake: Bake for 10 to 12 minutes. The cookies should look set around the edges but still soft and slightly underdone in the center. They will continue to cook on the hot baking sheet after you take them out. For softer, chewier cookies, bake for 10 minutes. For slightly crispier edges, bake for 12 minutes.
- Cool on the baking sheet: Let the cookies rest on the baking sheet for 5 minutes. This is crucial—if you try to move them too soon, they’ll fall apart. You’ll see the crinkle pattern develop as they cool.
- Transfer to cooling rack: After 5 minutes, carefully transfer the cookies to a wire cooling rack to cool completely. They will firm up as they cool.
Sensory Cue: When the cookies are done, the kitchen will smell like a peppermint patty crossed with a brownie. The tops will be crackled with white powdered sugar against the bright green dough. The edges will be set, but the centers will still look slightly puffy.
Cooking Tips & Techniques
I’ve made these cookies more times than I can count, and I’ve learned a few things the hard way. Here are my best tips:
- Don’t skip the chill time: I know it’s tempting to rush, but chilled dough is the secret to perfect crinkle cookies. Warm dough spreads too much and loses the crackled effect. If you’re in a hurry, you can chill the dough for 30 minutes in the freezer instead of 1 hour in the fridge.
- Use a light hand with the peppermint extract: Peppermint is strong. Start with 1/2 teaspoon, taste the dough (it’s safe to eat a tiny bit), and add more only if you want a stronger mint flavor. I once added a full teaspoon and the cookies tasted like mouthwash. Not my finest baking moment.
- Roll the dough balls twice in powdered sugar: For the most dramatic crinkle effect, roll each ball in powdered sugar, then roll it again. The double coating creates a thicker sugar crust that cracks beautifully as the cookie spreads.
- Watch the oven temperature: Every oven runs slightly different. If your cookies are browning too fast on the bottom, your oven might be running hot. Use an oven thermometer to check. I learned this after burning three batches in a row.
- Space them properly: These cookies spread more than you think. Leave at least 2 inches between each dough ball. If you crowd the pan, the cookies will merge into one giant cookie. Which isn’t the worst thing in the world, but it’s not what we’re going for here.
Variations & Adaptations
One of the best things about this recipe is how easily it adapts. Here are some variations I’ve tried and loved:
- Double Chocolate Mint: Add 1/2 cup (90g) of semi-sweet chocolate chips or chopped dark chocolate to the dough before chilling. The extra chocolate makes them even richer. My husband says these are his favorite version.
- Gluten-Free Version: Substitute the all-purpose flour with a 1:1 gluten-free baking flour blend (I like Bob’s Red Mill). The texture will be slightly more tender, but the crinkle effect still works beautifully.
- Vegan Adaptation: Use vegan butter (like Earth Balance) and a flax egg (1 tablespoon ground flaxseed mixed with 3 tablespoons water, let sit for 5 minutes). The cookies will be a bit less chewy, but still delicious.
- White Chocolate Drizzle: After the cookies cool, drizzle them with melted white chocolate. It adds a pretty contrast against the green and makes them look extra festive for holiday parties.
- Extra Minty: Crush a few peppermint candies and sprinkle them on top of the cookies right after baking. The heat will melt them slightly, creating little minty pockets. Just don’t add too many—it can get overwhelming.
Serving & Storage Suggestions
These cookies are best served at room temperature, straight from the cooling rack. The texture is soft and chewy, with that satisfying crinkle top. Here’s how to serve and store them:
- Serving Temperature: Room temperature is ideal. If you’ve stored them in the fridge, let them sit out for 10 minutes before serving.
- Presentation: Arrange them on a festive plate or a wooden board. A sprinkle of powdered sugar on the plate adds a snowy effect. They look gorgeous next to a glass of cold milk or a mug of hot cocoa.
- Storage: Store in an airtight container at room temperature for up to 5 days. Place a slice of bread in the container to keep them soft—the cookies will absorb the moisture from the bread.
- Freezing: These cookies freeze beautifully. You can freeze the baked cookies for up to 3 months. Layer them between sheets of parchment paper in a freezer-safe container. Thaw at room temperature for 30 minutes before serving.
- Freezing Dough: You can also freeze the dough balls before baking. Roll them into balls, coat them in powdered sugar, and place them on a baking sheet in the freezer for 1 hour. Then transfer to a freezer bag. Bake from frozen, adding 2 to 3 extra minutes to the baking time.
Flavor Note: These cookies actually taste better the next day. The mint and chocolate flavors meld together overnight, creating a more balanced taste. So if you can resist eating them all on day one, you’re in for a treat on day two.
Nutritional Information & Benefits
Here’s the estimated nutritional breakdown per cookie (based on 24 cookies):
| Nutrient | Amount Per Cookie |
|---|---|
| Calories | 145 |
| Total Fat | 7g |
| Saturated Fat | 4g |
| Cholesterol | 25mg |
| Sodium | 95mg |
| Total Carbohydrates | 20g |
| Dietary Fiber | 1g |
| Sugars | 11g |
| Protein | 2g |
Health Highlights: The cocoa powder in these cookies is rich in antioxidants called flavonoids, which can support heart health. Peppermint has been traditionally used to aid digestion. While these are definitely a treat, they’re made with real ingredients—no artificial preservatives or weird additives. If you’re watching your sugar intake, you can reduce the granulated sugar to 3/4 cup, though the texture will be slightly less tender.
Dietary Considerations: These cookies contain wheat (gluten), dairy, and eggs. For a gluten-free or vegan version, see the variations section above. They are nut-free as written, making them a safe option for school bake sales or parties with allergy concerns.
Conclusion
If there’s one cookie you make this holiday season, let it be these Cozy Mint Chocolate Grinch Crinkle Cookies. They’re festive without being fussy, delicious without being complicated, and they have a story—one that started in a hardware store with a woman in a fur-lined hood and ended in my kitchen, where I’ve made them every December since.
What I love most about this recipe is how it brings people together. I’ve made them for cookie swaps, for neighbors, for my kids’ teachers, and for quiet nights when I just needed something sweet. Every time, someone asks for the recipe. And every time, I think of that woman in the hardware store, handing me a stained index card with a smile.
So go ahead—make a batch. Customize them however you like. Add chocolate chips, drizzle white chocolate, or keep them classic. Share them with someone you love. And if you make them, come back and tell me how they turned out. I’d love to hear your story.
Have you tried these cookies? Leave a comment below and let me know your favorite variation. And don’t forget to pin this recipe for later!
Frequently Asked Questions
Can I use liquid food coloring instead of gel?
I don’t recommend it. Liquid food coloring adds extra moisture to the dough, which can cause the cookies to spread too much and lose their crinkle effect. Gel food coloring is more concentrated and won’t affect the dough’s consistency. You can find it at most grocery stores in the baking aisle.
Why did my cookies not crinkle?
The most common reason is that the dough wasn’t chilled long enough. The dough needs to be firm so that the powdered sugar coating stays on top as the cookie spreads. If the dough is too warm, the powdered sugar dissolves into the dough instead of cracking. Also, make sure you’re rolling the dough balls generously in powdered sugar—a thin coating won’t create a dramatic crinkle.
Can I make the dough ahead of time?
Absolutely. You can prepare the dough up to 3 days in advance and keep it covered in the refrigerator. You can also freeze the dough balls for up to 3 months (see storage section above). This is actually one of my favorite make-ahead holiday recipes.
How do I get the green color brighter?
Use more gel food coloring. Start with 1/2 teaspoon and add more in small increments until you reach your desired shade. Keep in mind that the color will fade slightly during baking, so make the dough a shade darker than you want the finished cookies to be. I usually use about 3/4 teaspoon total for a vibrant Grinch green.
Can I use mint extract instead of peppermint extract?
Technically yes, but the flavor will be different. Peppermint extract is made from peppermint leaves and has that classic cool, sharp mint flavor. Mint extract is usually a blend of spearmint and peppermint, which gives a softer, sweeter mint taste. I prefer peppermint for this recipe because it pairs better with the dark chocolate, but mint extract works in a pinch.
Pin This Recipe!

Cozy Mint Chocolate Grinch Crinkle Cookies

Soft, chewy cookies with a bright green color, cool mint flavor, and rich dark chocolate, topped with a crackled powdered sugar crust. Perfect for holiday baking and cookie swaps.
- Prep Time: 30 minutes
- Cook Time: 12 minutes
- Total Time: 1 hour 42 minutes
- Yield: 24 cookies 1x
- Category: Dessert
- Cuisine: American
Ingredients
- 1 cup (226g) unsalted butter, softened to room temperature
- 1 cup (200g) granulated sugar
- 1 large egg, room temperature
- 1 teaspoon vanilla extract
- 1/2 teaspoon peppermint extract
- 2 cups (250g) all-purpose flour, spooned and leveled
- 1/2 cup (50g) unsweetened cocoa powder
- 1 teaspoon baking soda
- 1/2 teaspoon salt
- Green gel food coloring (about 1/2 teaspoon, or more for deeper color)
- 1/2 cup (60g) powdered sugar, for coating
Instructions
- Cream the butter and sugar: In a large mixing bowl, beat the softened butter and granulated sugar together on medium speed until light and fluffy—about 2 to 3 minutes. Scrape down the sides of the bowl with a spatula halfway through.
- Add the wet ingredients: Beat in the egg, vanilla extract, and peppermint extract until fully combined. The mixture might look slightly curdled—this is normal.
- Add the green food coloring: Add about 1/2 teaspoon of green gel food coloring and beat until evenly distributed. Add more in small increments (about 1/8 teaspoon at a time) for a deeper green. I usually use about 3/4 teaspoon total.
- Combine dry ingredients: In a separate medium bowl, whisk together the flour, cocoa powder, baking soda, and salt until no lumps remain.
- Mix dry into wet: Gradually add the dry ingredients to the wet mixture, mixing on low speed just until combined. Do not overmix. The dough will be thick and slightly sticky.
- Chill the dough: Cover the bowl with plastic wrap and refrigerate for at least 1 hour. This step is non-negotiable for perfect crinkle cookies.
- Preheat and prepare: About 15 minutes before the dough is done chilling, preheat your oven to 350°F (175°C). Line two baking sheets with parchment paper or silicone mats.
- Roll the dough balls: Place the powdered sugar in a small bowl. Using a cookie scoop or tablespoon, portion out about 1.5 tablespoons of dough per cookie. Roll each portion into a smooth ball between your palms, then roll each ball in the powdered sugar until completely coated.
- Arrange on baking sheets: Place the coated dough balls on the prepared baking sheets, spacing them about 2 inches apart. I fit about 9 cookies per standard sheet.
- Bake: Bake for 10 to 12 minutes. The cookies should look set around the edges but still soft and slightly underdone in the center. For softer, chewier cookies, bake for 10 minutes. For slightly crispier edges, bake for 12 minutes.
- Cool on the baking sheet: Let the cookies rest on the baking sheet for 5 minutes. The crinkle pattern will develop as they cool.
- Transfer to cooling rack: After 5 minutes, carefully transfer the cookies to a wire cooling rack to cool completely.
Notes
Don’t skip the chill time—chilled dough is essential for the crinkle effect. Use gel food coloring, not liquid, to avoid altering the dough’s consistency. Peppermint extract is potent; start with 1/2 teaspoon. For the most dramatic crinkle, roll the dough balls twice in powdered sugar. These cookies taste even better the next day as the flavors meld.
Nutrition
- Serving Size: 1 cookie
- Calories: 145
- Sugar: 11
- Sodium: 95
- Fat: 7
- Saturated Fat: 4
- Carbohydrates: 20
- Fiber: 1
- Protein: 2
Keywords: Grinch cookies, mint chocolate cookies, crinkle cookies, holiday cookies, Christmas cookies, peppermint cookies


