Love this? Save it for later!
Share the inspiration with your friends
The other day, I was sorting through the fridge, trying to make sense of my half-empty jars and forgotten containers when the sharp scent of garlic and dill suddenly hit me — and just like that, I was ten again, standing barefoot on the cool tile floor of my aunt’s cluttered kitchen. She was bustling around, her hands always sticky from something briny or sweet, and on this particular June afternoon, the air was thick with vinegar and fresh dill. I remember her cracking a jar with a satisfying pop, the kind that promises something crisp and tangy inside. It wasn’t just the smell or the tangy taste that stuck with me — it was the whole experience, the way the pickles snapped between my teeth and the quiet pause afterward, when the flavors settled in. I honestly forgot to grab the jar opener that day and ended up wrestling with the lid for a good five minutes, which just made that first bite even sweeter when I finally got in.
Maybe you’ve been there — chasing a taste or scent that’s just out of reach, trying to catch a moment from childhood that feels more like a whisper than a memory. That’s why this recipe for Easy Quick Garlic Dill Refrigerator Pickles means more to me than just a side dish. It’s an attempt to bottle that exact feeling — the crunch, the garlicky punch, the gentle dill and vinegar kiss — all in a jar that’s ready quicker than you’d expect. Let me tell you, it’s the kind of recipe that sneaks up on you, not just with flavor but with the nostalgia of something simple and real. And honestly, after one bite, you might find yourself making these pickles again and again, just to keep that moment alive.
Why You’ll Love This Recipe
I’m not supposed to play favorites with recipes, but these garlic dill refrigerator pickles have earned a top spot in my kitchen repertoire. They’re fast, fuss-free, and deliver that unmistakable crunch that sometimes gets lost in the long, slow pickle-making process. Here’s why you’ll want to keep this one handy:
- Quick & Easy: Ready to eat in just 24 hours — perfect for those spontaneous pickle cravings or last-minute BBQs.
- Simple Ingredients: No exotic spices or hard-to-find items. You probably have everything needed in your pantry already.
- Perfect for Summer Gatherings: Brilliant on sandwiches, burgers, or just straight from the jar as a tangy snack.
- Crowd-Pleaser: Kids and adults alike love the familiar garlic and dill combo, with a nice punch of vinegar tang.
- Unbelievably Delicious: The balance of fresh dill, pungent garlic, and crisp cucumbers is just right — not too sour, not too soft.
What sets this recipe apart? It’s the easy refrigerator method that skips the long canning wait but still delivers a pickle that’s satisfyingly crunchy and bright. Plus, I’ve tested it over many summer weeks, tweaking the garlic-to-dill ratio until it felt just like those childhood memories but with a modern twist — no fuss, no fancy gear. Honestly, it’s the kind of recipe that makes you close your eyes after the first bite and say, “Yep, that’s the one.” Whether you’re new to pickling or just looking for a reliable go-to, this recipe has you covered.
What Ingredients You Will Need
This recipe uses simple, wholesome ingredients to deliver that bold flavor and crisp texture without any fuss. The ingredients are pantry staples or easy to find at your local grocery store, and there’s plenty of room to swap or adjust based on what you have.
- Fresh Cucumbers: About 4 cups (about 4-5 medium Kirby cucumbers or pickling cucumbers), sliced into spears or rounds depending on preference. Kirby cucumbers hold their crunch best.
- Garlic Cloves: 4-6 cloves, peeled and smashed or thinly sliced for maximum garlic punch.
- Fresh Dill: 3-4 sprigs, including stems if you like a stronger herb flavor. Dill heads or seeds can substitute if fresh isn’t available.
- White Vinegar: 1 cup (240 ml), for that classic tang — I prefer Heinz for consistent acidity.
- Water: 1 cup (240 ml), to balance the vinegar’s strength.
- Kosher Salt: 1 tablespoon, ideally without iodine to avoid cloudiness and off-flavors.
- Granulated Sugar: 1 teaspoon, just enough to balance the sharpness without sweetness.
- Black Peppercorns: 1 teaspoon, whole for subtle heat and aroma.
- Optional Red Pepper Flakes: A pinch if you want a little kick.
For variations, you can easily swap the white vinegar with apple cider vinegar for a fruitier note or try using dried dill if fresh isn’t in season. Also, if you’re watching sodium, reduce the salt slightly but know it impacts preservation and crunch. Honestly, I’ve found these little ingredient tweaks can make the recipe feel completely new — which keeps it interesting.
Equipment Needed
- Glass Jars: Two quart-sized (1-liter) jars with lids work perfectly for this recipe. I like the classic Mason jars with screw-top lids.
- Mixing Bowl: For preparing the brine and tossing cucumbers before packing.
- Measuring Cups and Spoons: Precision helps with the perfect balance of vinegar and salt.
- Knife and Cutting Board: For slicing cucumbers and crushing garlic.
- Small Saucepan: To warm the brine ingredients slightly, which helps dissolve salt and sugar faster.
If you don’t have Mason jars handy, any clean, food-safe container with a tight seal will do — just avoid metal lids that might react with the vinegar. I once used a plastic container in a pinch, but the jars definitely keep the pickles tasting fresher longer.
Preparation Method
- Prepare the Cucumbers: Wash 4-5 Kirby cucumbers thoroughly. Slice into spears about 3-4 inches (7-10 cm) long or into 1/4-inch (6 mm) thick rounds, depending on your preference. This step takes about 5 minutes.
- Crush the Garlic: Peel 4-6 cloves and smash them lightly with the flat side of your knife to release flavor. Thin slices work too if you prefer a milder garlic presence.
- Make the Brine: In a small saucepan, combine 1 cup (240 ml) white vinegar, 1 cup (240 ml) water, 1 tablespoon kosher salt, and 1 teaspoon granulated sugar. Warm over medium heat, stirring until salt and sugar dissolve completely — about 3-5 minutes. Remove from heat and let cool slightly.
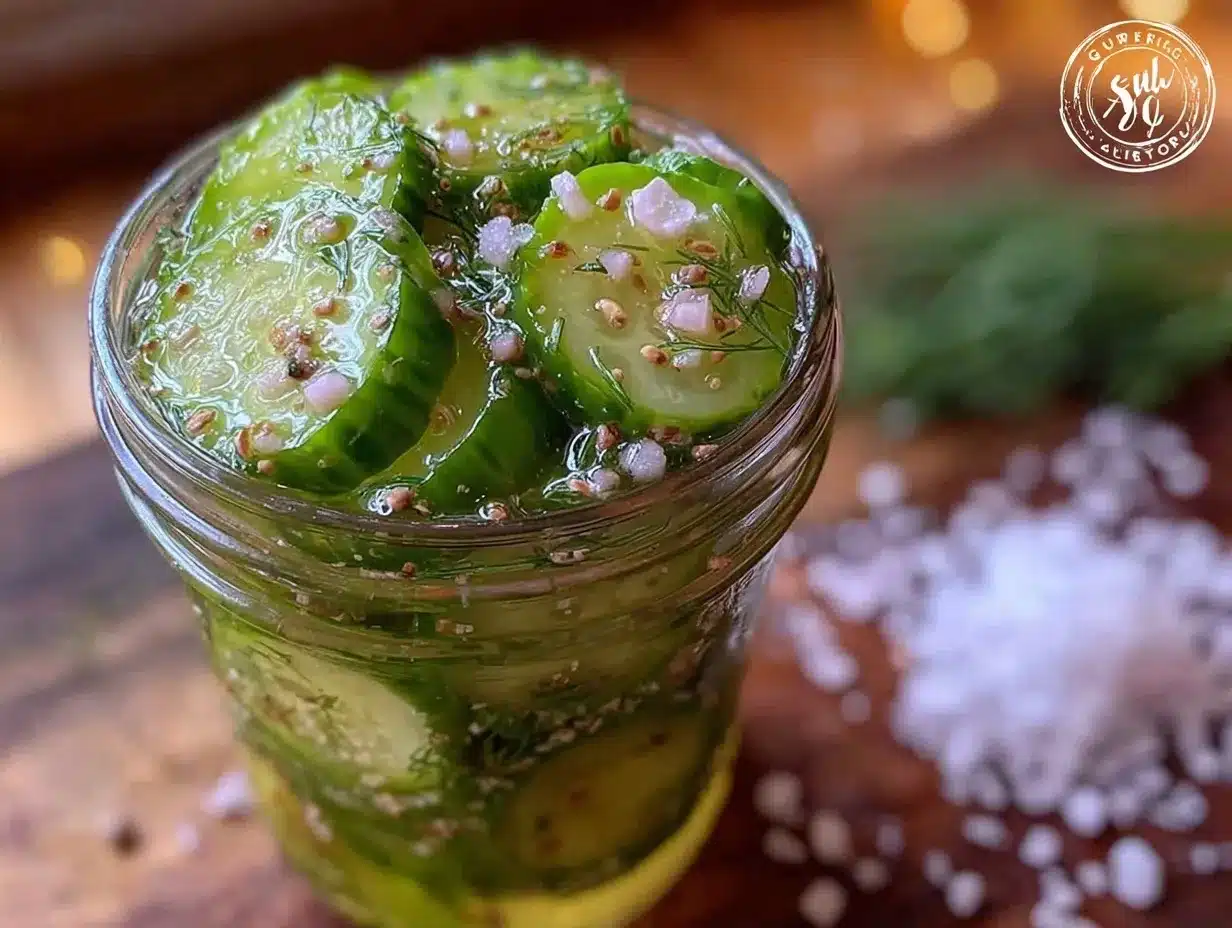
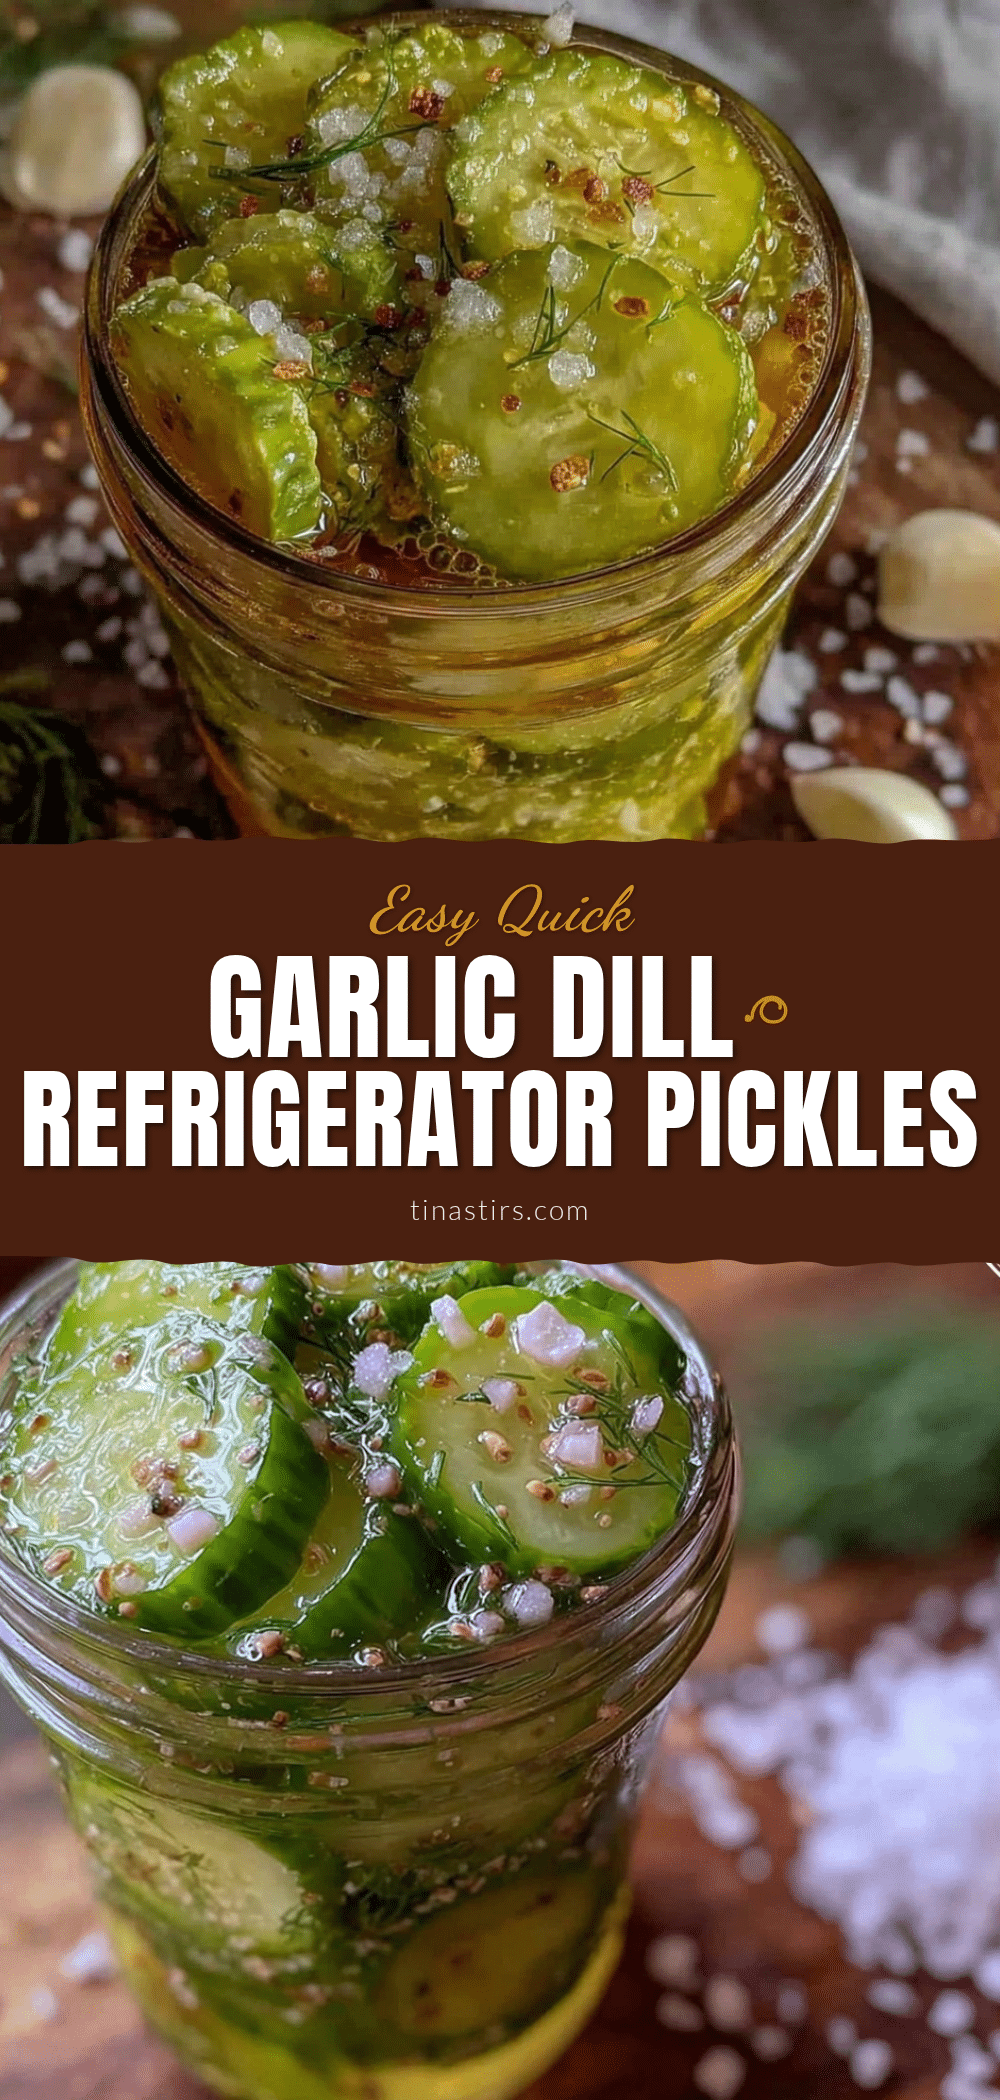
- Pack the Jars: Place the cucumber slices or spears into your jars, layering in the smashed garlic, 3-4 sprigs of fresh dill, 1 teaspoon whole black peppercorns, and optional pinch of red pepper flakes. Pack snug but don’t crush the cucumbers.
- Pour the Brine: Carefully pour the warm brine over the cucumbers until fully submerged, leaving about 1/2 inch (1.25 cm) of headspace at the top. Gently tap the jar on the counter to release any air bubbles.
- Seal and Refrigerate: Screw on the lids tightly and place the jars in the refrigerator. Let them chill for at least 24 hours before tasting; the flavor improves if you wait 48 hours or more.
Pro tip: If you notice any floating cucumbers, press them down with a clean utensil to keep them submerged. This keeps the pickles crunchy and prevents spoilage. Also, if the brine isn’t covering the cucumbers fully after a day or two, add a bit of extra vinegar-water mix to top it off.
Cooking Tips & Techniques
Honestly, the trick to perfect refrigerator pickles is all about the balance — between vinegar, salt, and the drying of the cucumbers before brining. I once skipped drying the cucumbers and ended up with soggy pickles, which was disappointing. Patting them dry with a towel before packing helps keep that satisfying snap.
Here’s a few tips that have saved me from common pitfalls:
- Use fresh, firm cucumbers: Older or overripe cucumbers tend to turn mushy fast. Kirby or pickling cucumbers are your best bet.
- Don’t rush the brine dissolving: Heating the vinegar, salt, and sugar until fully dissolved ensures uniform flavor and prevents graininess.
- Keep everything submerged: Cucumbers exposed to air can get slimy or discolored. Use small glass weights or a clean utensil if needed.
- Refrigerate promptly: This method isn’t shelf-stable, so keep your jars chilled to maintain crunch and freshness.
- Experiment with garlic intensity: Crushing garlic releases more flavor but can get strong fast. Adjust the quantity based on your taste.
One time, I left a jar out accidentally overnight — the pickles were still edible but lost a bit of their crispness. Lesson learned: keep those jars cold and sealed tight.
Variations & Adaptations
One of the best things about this recipe is how flexible it is. Here are a few ways you can switch things up to suit your taste or diet:
- Spicy Kick: Add more red pepper flakes or a sliced jalapeño for heat. I once made a batch with extra chili that disappeared in a day.
- Low-Sodium: Reduce the salt to 1/2 tablespoon but extend marinating time to 48 hours for flavor development.
- Herbal Twist: Swap dill for fresh tarragon or add a few mustard seeds for a different flavor profile.
- Vinegar Variations: Use apple cider vinegar for a milder, fruitier tang or rice vinegar for a slightly sweeter taste.
- Garlic-Free: If you’re not a garlic fan or sensitive, omit it and add extra dill and peppercorns instead.
I tried a version with lemon zest once, and while unexpected, it gave the pickles a bright citrus note that was surprisingly refreshing — a fun change for summer picnics.
Serving & Storage Suggestions
These refrigerator pickles are best served cold straight from the jar. They’re fantastic alongside sandwiches, burgers, or even chopped into potato salad or tuna melts for added zing. Honestly, they bring that perfect crunchy contrast that makes any meal more interesting.
Store them in the refrigerator for up to 3 weeks. Over time, the flavors mellow and deepen, so sometimes I make a batch early in the week to enjoy later when they’re fully developed. To re-crisp slightly if they soften, just drain the brine, pat the pickles dry, and soak them in ice water for 30 minutes before serving.
They pair beautifully with rich or creamy dishes — think pulled pork, smoked brisket, or even alongside a creamy garlic mashed potatoes for a balanced bite. And if you’re planning a potluck, these pickles always spark conversations — maybe because they’re so straightforward yet so satisfying.
Nutritional Information & Benefits
Per serving (about 2 spears): approximately 10 calories, 0 grams fat, 2 grams carbs, and 0.5 grams protein. These pickles are naturally low in calories and fat, making them a guilt-free snack or condiment.
The cucumbers provide hydration and small amounts of vitamin K, while the garlic adds immune-boosting compounds. Dill is also rich in antioxidants and offers digestive benefits. Because this is a refrigerator pickle recipe, it’s lower in sodium than traditionally canned pickles, especially if you reduce the salt slightly.
Note: This recipe contains garlic and vinegar, which some people may need to avoid due to allergies or dietary restrictions. For a low-FODMAP version, consider omitting garlic and using a mild vinegar alternative.
Conclusion
If you’re looking for a quick, no-fuss way to get crunchy, flavorful pickles on your table, this Easy Quick Garlic Dill Refrigerator Pickles recipe is exactly what you need. It’s a simple reminder that sometimes the best flavors come from the closest ingredients and the smallest efforts. You can tweak it to fit your taste, try different herbs, or turn up the heat — the kitchen is yours to play in.
I keep coming back to this recipe whenever I want that satisfying crunch and garlicky dill bite that feels like a little moment of calm in a busy day. If you give it a try, drop a comment below with your own twists or memories — I’d love to hear how it turns out for you!
Frequently Asked Questions About Easy Quick Garlic Dill Refrigerator Pickles
How long do refrigerator pickles last in the fridge?
Stored properly in sealed jars, they usually keep well for up to 3 weeks. Always check for off smells or mold before eating.
Can I use regular cucumbers instead of Kirby or pickling cucumbers?
You can, but regular slicing cucumbers tend to be less firm and may result in softer pickles.
Do I have to cook the brine for refrigerator pickles?
Warming the brine helps dissolve salt and sugar quickly and blends flavors better, but you can skip heating if you stir thoroughly.
Can I can these pickles for longer storage?
This recipe is designed for quick refrigerator pickling and isn’t suitable for traditional canning. For shelf-stable pickles, follow a tested canning recipe.
What’s the best way to make pickles extra crunchy?
Using fresh, firm cucumbers and patting them dry before pickling helps. Adding a few grape leaves or a pinch of calcium chloride can also improve crunch.
Pin This Recipe!
Easy Quick Garlic Dill Refrigerator Pickles

A quick and easy recipe for crunchy, garlicky dill refrigerator pickles that are ready in 24 hours and perfect for summer gatherings.
- Prep Time: 10 minutes
- Cook Time: 5 minutes
- Total Time: 24 hours 15 minutes
- Yield: 2 quart jars (about 8 servings) 1x
- Category: Condiment
- Cuisine: American
Ingredients
- 4–5 medium Kirby cucumbers (about 4 cups), sliced into spears or rounds
- 4–6 garlic cloves, peeled and smashed or thinly sliced
- 3–4 sprigs fresh dill (including stems if desired)
- 1 cup (240 ml) white vinegar
- 1 cup (240 ml) water
- 1 tablespoon kosher salt (without iodine)
- 1 teaspoon granulated sugar
- 1 teaspoon whole black peppercorns
- Pinch of red pepper flakes (optional)
Instructions
- Wash 4-5 Kirby cucumbers thoroughly and slice into spears about 3-4 inches long or into 1/4-inch thick rounds.
- Peel 4-6 garlic cloves and smash them lightly with the flat side of a knife or thinly slice.
- In a small saucepan, combine 1 cup white vinegar, 1 cup water, 1 tablespoon kosher salt, and 1 teaspoon granulated sugar. Warm over medium heat, stirring until salt and sugar dissolve completely (about 3-5 minutes). Remove from heat and let cool slightly.
- Place cucumber slices or spears into two quart-sized glass jars, layering in smashed garlic, 3-4 sprigs fresh dill, 1 teaspoon whole black peppercorns, and optional red pepper flakes. Pack snugly but do not crush cucumbers.
- Pour the warm brine over the cucumbers until fully submerged, leaving about 1/2 inch of headspace at the top. Tap jars gently to release air bubbles.
- Seal jars tightly with lids and refrigerate for at least 24 hours before tasting. Flavor improves if left 48 hours or more.
Notes
Use fresh, firm Kirby cucumbers for best crunch. Pat cucumbers dry before packing to avoid sogginess. Keep cucumbers fully submerged in brine to prevent spoilage. Refrigerate promptly as this recipe is not shelf-stable. Adjust garlic quantity to taste. For low sodium, reduce salt to 1/2 tablespoon and extend marinating time to 48 hours.
Nutrition
- Serving Size: About 2 cucumber spe
- Calories: 10
- Carbohydrates: 2
- Protein: 0.5
Keywords: garlic dill pickles, refrigerator pickles, quick pickles, homemade pickles, crunchy pickles, easy pickles, summer pickles