Love this? Save it for later!
Share the inspiration with your friends
I was standing in the baking aisle of our local grocery store last December, completely zoned out in front of the sprinkles, when a kid nearby dropped a jar of red hot candies. The sound—that sharp, glassy clatter against the linoleum floor—snapped me back so fast I almost dropped my own basket. And just like that, I was seven years old at my Aunt Carol’s kitchen table, watching her press those same little red cinnamon hearts into the center of soft green cookies. She’d always let me do the last few, my sticky fingers fumbling as she laughed and said, “That one’s got extra love.” She’s been gone six years now, and I still can’t pass those candies without stopping.
I tried her recipe the next day, digging through old recipe boxes until I found her faded index card. The first batch? Honestly, a disaster. The cookies spread too thin, and the red hearts just melted into green blobs. But I kept at it—because that’s what you do when you’re chasing a memory you can almost taste. Maybe you’ve been there, trying to recreate something from your past and getting it wrong the first few times. Let me tell you, the final version is worth every failed attempt.
These Grinch cookies are my love letter to those December afternoons. They’re soft, chewy, and that pop of cinnamon from the red hot heart in the center is pure magic. They’re the kind of cookie that makes people stop mid-conversation and just say, “Wow.” And when you’re hosting a holiday gathering, that’s exactly the reaction you want.
Why You’ll Love This Recipe
I’ve tested this recipe at least a dozen times across three different ovens, and I can tell you with confidence—this is the version that works. Every. Single. Time.
- Quick & Easy: From start to finish, you’re looking at about 25 minutes. The dough comes together in one bowl, no chilling required. Perfect for when you realize the party is tomorrow and you have nothing to bring.
- Simple Ingredients: Nothing fancy here. You probably have most of these in your pantry right now. No hunting down specialty stores or ordering online.
- Perfect for Holiday Gatherings: These cookies are made for a crowd. They’re eye-catching, conversation-starting, and they disappear faster than anything else on the dessert table.
- Crowd-Pleaser: Kids love the pop of color and the candy heart. Adults love the nostalgic nod to the classic story. I’ve watched people eat four in a row without blinking.
- Unbelievably Delicious: The green cookie base is soft and buttery with a hint of vanilla, and that red hot center gives you this warm, spicy kick that cuts through the sweetness. It’s a combo that just works.
What makes these different from every other Grinch cookie out there? It’s the texture. I spent weeks tweaking the flour-to-butter ratio until I got that perfect balance—soft in the middle, slightly crisp on the edges, sturdy enough to hold the candy without crumbling. This isn’t just another green cookie with a heart stuck on top. This is the one that makes people ask for the recipe before they’ve even finished chewing.
When you’re hosting, you want dishes that feel special without making you sweat. These cookies deliver. They look like you spent hours, but honestly? They come together in the time it takes to preheat your oven. That’s the kind of magic we all need during the holidays.
What Ingredients You Will Need
This recipe uses simple, wholesome ingredients that come together to create something truly special. Most of these are pantry staples, which makes these cookies perfect for last-minute holiday baking sessions.
For the Cookie Dough
- 1 cup (226g) unsalted butter, softened – I prefer using Land O’Lakes for consistent results. Make sure it’s truly softened, not melted—you want it to hold its shape but give easily when pressed.
- 1 cup (200g) granulated sugar – Regular white sugar works perfectly here. It gives the cookies that slight crispness on the edges.
- 1 large egg, room temperature – Cold eggs can seize up the butter mixture. Leave yours out on the counter for about 30 minutes before starting.
- 2 teaspoons vanilla extract – Pure vanilla makes a difference here. I use Nielsen-Massey, but any good brand works.
- 2 cups (250g) all-purpose flour – Spoon and level your flour—don’t scoop straight from the bag or you’ll end up with dry cookies.
- 1/2 teaspoon baking soda – This helps the cookies spread just enough without turning into pancakes.
- 1/2 teaspoon salt – Don’t skip this. Salt balances the sweetness and makes the flavors pop.
- Green gel food coloring – Liquid food coloring won’t give you that vibrant Grinch green. I recommend Americolor or Wilton gel colors. Start with a small amount and add more until you get the shade you want.
For the Topping
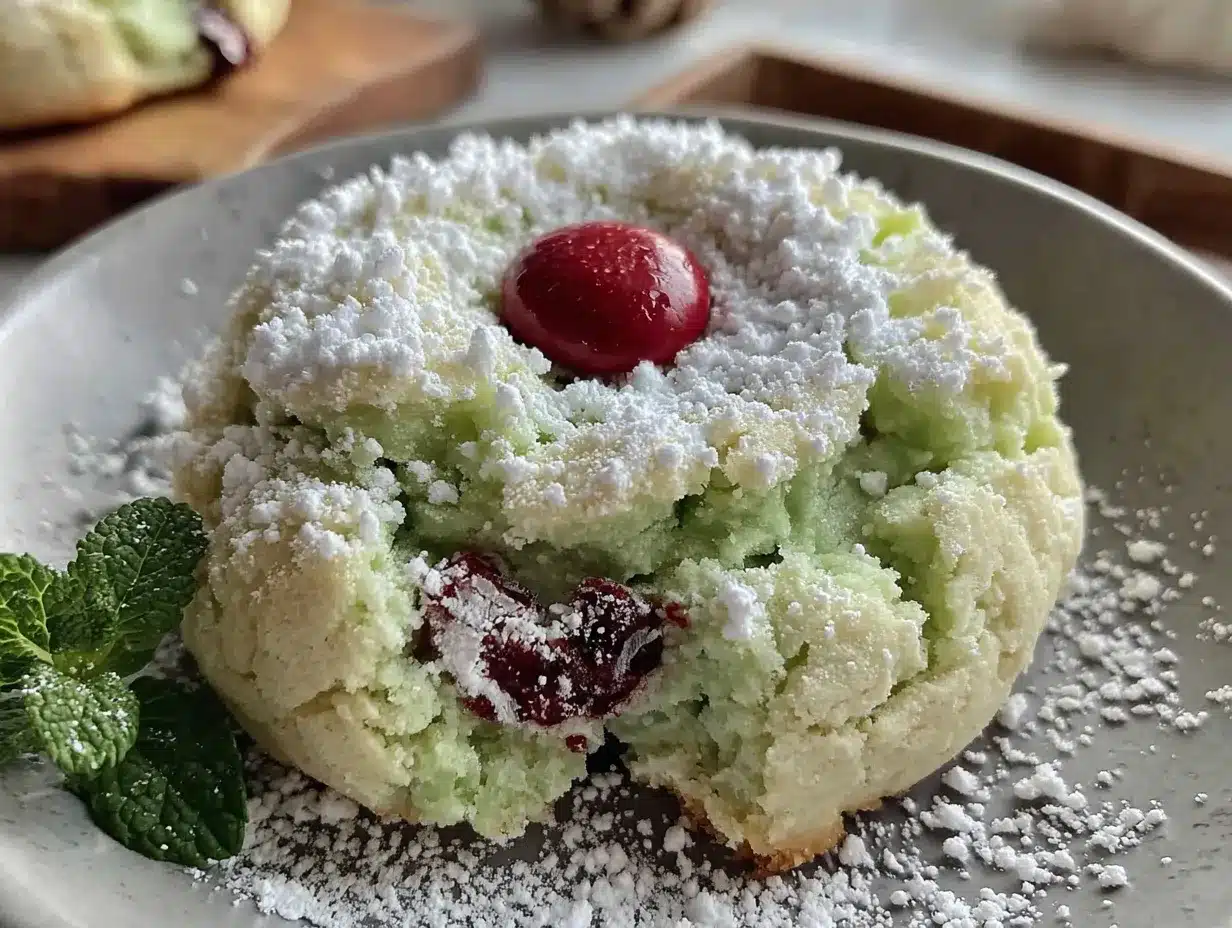
- 36-42 Red Hot cinnamon candies – These are non-negotiable. The brand I always reach for is Ferrara. They hold their shape during baking and give that perfect pop of flavor. If you can’t find Red Hots, look for any small cinnamon candy with a similar hard texture.
Substitution Guidance
- Dairy-free option: Use vegan butter sticks (I like Miyoko’s) in place of regular butter. The texture will be slightly different, but still delicious.
- Gluten-free option: Swap the all-purpose flour with a 1:1 gluten-free baking flour blend. Bob’s Red Mill works well here.
- Egg-free option: Use a flax egg (1 tablespoon ground flaxseed mixed with 3 tablespoons water, let sit for 5 minutes).
- Candy swap: If cinnamon isn’t your thing, try using a white chocolate chip or a raspberry-flavored candy in the center instead.
Equipment Needed
You don’t need a fancy kitchen to pull these off. Here’s what you’ll need:
- Electric mixer – A stand mixer or hand mixer both work. I’ve made these with my old KitchenAid and with a cheap hand mixer I bought at a garage sale. Both worked fine.
- Large mixing bowl – Any bowl will do. I use a glass one because I can see when everything’s combined.
- Baking sheets – Two standard half-sheet pans work perfectly. If you only have one, just bake in batches and let the pan cool between rounds.
- Parchment paper or silicone baking mat – This is important. Without it, the cookies can stick, and nobody wants that.
- Cookie scoop (about 1.5 tablespoons) – Not strictly necessary, but it gives you uniform cookies that bake evenly. I use a #40 scoop.
- Cooling rack – Lets air circulate so your cookies don’t get soggy bottoms.
- Measuring cups and spoons – For accuracy. I cannot stress this enough—baking is science.
If you don’t have a cookie scoop, just use two spoons to portion the dough. It’s a little messier, but the cookies will still taste the same. And if you’re baking for a crowd, consider grabbing an extra baking sheet so you can prep the next batch while the first one bakes.
Preparation Method
Alright, let’s make some cookies. I’ll walk you through every step so you don’t end up with green blobs like I did on my first try.
- Preheat your oven to 350°F (175°C). Line two baking sheets with parchment paper or silicone mats. This is your safety net—trust me, you don’t want to scrape these off a bare pan.
- Cream the butter and sugar. In your large mixing bowl, beat the softened butter and granulated sugar together on medium speed until it’s light and fluffy. This takes about 2-3 minutes. You’re looking for a pale yellow color and a texture that reminds you of soft sand. Scrape down the sides of the bowl halfway through.
- Add the egg and vanilla. Crack in your room-temperature egg and pour in the vanilla extract. Beat on low speed until everything is fully combined. Don’t overmix here—you just want it to come together. The mixture might look a little curdled at this point, and that’s perfectly normal.
- Add the green food coloring. Start with a small amount of gel food coloring—like, the tip of a toothpick. Mix it in and see where you’re at. I usually end up using about 1/4 teaspoon total, but it depends on the brand. You want a vibrant Grinch green, not a pastel. Add more gradually until you’re happy with the color. Remember: the cookies will darken slightly as they bake.
- Combine the dry ingredients. In a separate bowl, whisk together the flour, baking soda, and salt. This ensures the leavening agent is evenly distributed so your cookies rise consistently.
- Mix the dry into the wet. Add the flour mixture to the butter mixture in two additions, mixing on low speed after each addition. Stop as soon as the flour disappears—overmixing develops gluten and makes tough cookies. The dough should be soft but not sticky. If it feels too sticky, add a tablespoon more flour.
- Portion the dough. Use your cookie scoop or a spoon to scoop out rounded tablespoons of dough. Roll them into balls between your palms—about 1.5 inches in diameter. Place them on the prepared baking sheets about 2 inches apart. These cookies spread, so give them room to breathe.
- Bake for 8-10 minutes. Here’s the trick: pull them out when the edges look set but the centers still look slightly underdone and puffy. They’ll continue cooking on the hot pan. For softer cookies, go with 8 minutes. For slightly crisper edges, push it to 10. Your kitchen should smell like butter and vanilla at this point.
- Press in the red hot hearts immediately. This part is crucial. As soon as the cookies come out of the oven, gently press one red hot candy into the center of each cookie. The residual heat will soften it just enough to stick without melting into a puddle. Don’t push too hard or the cookie will crack—just a gentle press until it’s nestled in.
- Cool on the baking sheet for 5 minutes. This lets the cookies set up enough to transfer. Then move them to a wire rack to cool completely. If you try to move them too soon, they’ll fall apart. Patience, friend.
One thing I learned the hard way: if your red hots are melting into green blobs, your oven might be running hot. Try reducing the temperature by 25 degrees next time. Also, make sure you’re pressing the candy in while the cookie is still hot—if you wait too long, the cookie sets and the candy won’t stick.
Cooking Tips & Techniques
I’ve made about a hundred batches of these cookies, and I’ve collected a few tricks along the way. Here’s what I wish someone had told me before I started:
Don’t skip the parchment paper. I know it seems like an extra step, but it makes a world of difference. The cookies release cleanly, and cleanup is a breeze. Plus, you can reuse the parchment for the next batch if it’s not too greasy.
Watch your oven temperature. Every oven runs differently. My old gas oven ran hot by about 25 degrees, and I ruined two batches before I figured it out. Invest in an oven thermometer—they’re cheap and they’ll save your cookies.
Room temperature ingredients matter. I know it’s tempting to use cold butter straight from the fridge, but don’t do it. Cold butter doesn’t cream properly, and you’ll end up with dense, flat cookies. Leave your butter and egg out for at least 30 minutes before you start.
Press the candy gently. The first time I made these, I pushed the red hot all the way into the cookie, and it completely disappeared. You want it to sit right on top, just barely nestled in. Think of it as a crown on the cookie’s head.
Bake in batches. If you’re making a double batch for a party (and you should), don’t try to cram all the cookies onto one sheet. They need space to spread. Bake one sheet at a time on the middle rack for the most even results.
Cool completely before storing. If you stack these while they’re still warm, they’ll stick together and the red hots might fall off. Let them cool completely on a wire rack, then store them in an airtight container.
Variations & Adaptations
One of the best things about this recipe is how easy it is to customize. Here are a few variations I’ve tried and loved:
Peppermint Grinch Cookies
Instead of red hot candies, press a crushed peppermint candy piece into the center. The minty crunch pairs beautifully with the sweet vanilla cookie. I made these for a Christmas Eve party last year and they were gone in fifteen minutes.
Chocolate-Dipped Grinch Cookies
Once the cookies are completely cool, dip half of each cookie in melted dark chocolate and let it set on parchment paper. The bitterness of the chocolate balances the sweetness perfectly. This version feels extra fancy for holiday cookie exchanges.
Gluten-Free Version
I tested this with a 1:1 gluten-free flour blend, and honestly? My gluten-eating friends couldn’t tell the difference. Just make sure your blend contains xanthan gum for structure. The texture is slightly more tender, but the flavor is spot on.
Spiced Grinch Cookies
Add 1/2 teaspoon of cinnamon and 1/4 teaspoon of nutmeg to the flour mixture. The warm spices complement the red hot center and make the cookies taste even more festive. This is my go-to version for fall gatherings.
Vegan Adaptation
Use vegan butter and a flax egg. The cookies will be a bit softer and spread a little more, but they’re still delicious. Just make sure your red hots are vegan—most are, but it’s worth checking the label.
Serving & Storage Suggestions
These cookies are at their absolute best on the day they’re made, when the edges are still slightly crisp and the centers are soft and chewy. But they’re pretty forgiving, so don’t stress if you need to make them ahead.
Serving: Arrange them on a festive platter or tiered stand for maximum visual impact. The bright green with the red heart center is such a striking combination—they practically beg to be photographed. Serve them at room temperature with a cold glass of milk or a warm cup of hot cocoa. If you’re hosting a cookie exchange, pack them in clear cellophane bags tied with red ribbon.
Storage: Store cooled cookies in an airtight container at room temperature for up to 5 days. Layer them between sheets of wax paper to prevent sticking. Don’t refrigerate them—the fridge dries out baked goods and makes them stale faster.
Freezing: These freeze beautifully. Place the cooled cookies in a single layer on a baking sheet and freeze until solid, then transfer to a freezer-safe bag or container. They’ll keep for up to 3 months. Thaw at room temperature for about 30 minutes before serving. You can also freeze the unbaked dough balls—just scoop them, freeze on a sheet pan, then transfer to a bag. Bake from frozen, adding 2-3 minutes to the baking time.
Reheating: If you want that fresh-from-the-oven experience, pop a cookie in the microwave for 10 seconds. It softens the center and makes it taste just baked. For a bigger batch, warm them in a 300°F oven for 5 minutes.
One thing I’ve noticed: the flavors actually meld together beautifully after a day or two. The cinnamon from the red hots subtly infuses the cookie, creating a more complex flavor profile. So don’t worry if you make them a day ahead—they might even be better.
Nutritional Information & Benefits
Let’s be real—these are holiday cookies, not health food. But here’s what you should know:
Estimated per cookie (based on 36 cookies):
- Calories: 115
- Fat: 6g
- Carbohydrates: 15g
- Sugar: 9g
- Protein: 1g
- Sodium: 65mg
Dietary considerations: These cookies contain dairy, eggs, and gluten. But as I mentioned earlier, they can be adapted for vegan and gluten-free diets. The red hot candies are typically gluten-free and vegan, but always check the label to be sure.
Potential allergens: Wheat, dairy, eggs. If you’re serving a crowd, it’s always a good idea to label your baked goods with allergen information.
Health perspective: Look, I’m not going to pretend these are good for you in any traditional sense. But here’s what I will say: food is about more than nutrients. These cookies are about connection, celebration, and making memories. One cookie isn’t going to derail your health goals, and the joy they bring is its own kind of nourishment. That said, if you’re watching your sugar intake, you can reduce the sugar to 3/4 cup without affecting the texture too much.
Conclusion
These Grinch cookies have become my go-to holiday recipe for one simple reason: they make people happy. Every time I bring a plate to a party, I watch faces light up. People lean in, they take photos, they ask questions. And then they take a bite and their eyes go wide. That moment—that split second of pure, unguarded delight—is why I keep making them year after year.
Whether you’re a seasoned baker or someone who only turns on the oven during the holidays, this recipe is for you. It’s forgiving, it’s fun, and the results are genuinely impressive. Don’t be afraid to make them your own—add a sprinkle of sea salt, swap the candy, double the batch. The best recipes are the ones that evolve with you.
I’d love to hear how yours turn out. Drop a comment below and tell me about your baking adventures—did you make any substitutions? Did the kids help press in the hearts? Did your guests fight over the last one? Share your photos and tag me on social media. Let’s spread a little Grinch-inspired joy this season.
Now go preheat that oven. Your cookies are waiting.
Frequently Asked Questions
Can I use liquid food coloring instead of gel?
You can, but I don’t recommend it. Liquid food coloring adds extra moisture to the dough, which can affect the texture of your cookies. It also takes a lot more to achieve that vibrant green color, and you might end up with a weird aftertaste. Gel food coloring is concentrated and gives you better results with less product.
Why did my cookies spread too much?
This usually happens for one of three reasons: your butter was too soft or melted, your dough wasn’t chilled (though this recipe doesn’t require chilling), or your baking soda was old. Make sure your butter is softened but not greasy, and check that your baking soda is fresh—it should fizz when mixed with vinegar.
Can I use a different candy in the center?
Absolutely! While red hots are traditional for the Grinch look, you can use any small candy that holds its shape during baking. White chocolate chips, raspberry candies, or even a small Hershey’s Kiss work wonderfully. Just make sure you press it in right after baking while the cookie is still warm.
How do I get that perfect Grinch green color?
Start with a tiny amount of green gel food coloring and mix thoroughly before adding more. I like to use a combination of leaf green and a tiny drop of electric green for that vibrant, cartoonish shade. Remember, the color will darken slightly as the cookies bake, so aim for a shade that’s slightly lighter than what you want in the final cookie.
Can I make the dough ahead of time?
Yes! You can prepare the dough up to 3 days in advance and keep it covered in the refrigerator. Let it sit at room temperature for about 10 minutes before scooping and baking—it’ll be too firm to work with straight from the fridge. You can also freeze the dough balls for up to 3 months and bake them straight from frozen, adding a couple of minutes to the baking time.
Pin This Recipe!

Best Grinch Cookies: Easy Red Hot Heart Holiday Recipe

These soft, chewy Grinch cookies feature a vibrant green cookie base with a red hot cinnamon candy heart pressed into the center. They’re quick, easy, and perfect for holiday gatherings.
- Prep Time: 15 minutes
- Cook Time: 10 minutes
- Total Time: 25 minutes
- Yield: 36 cookies 1x
- Category: Dessert
- Cuisine: American
Ingredients
- 1 cup (226g) unsalted butter, softened
- 1 cup (200g) granulated sugar
- 1 large egg, room temperature
- 2 teaspoons vanilla extract
- 2 cups (250g) all-purpose flour
- 1/2 teaspoon baking soda
- 1/2 teaspoon salt
- Green gel food coloring
- 36–42 Red Hot cinnamon candies
Instructions
- Preheat your oven to 350°F (175°C). Line two baking sheets with parchment paper or silicone mats.
- In a large mixing bowl, beat the softened butter and granulated sugar together on medium speed until light and fluffy, about 2-3 minutes. Scrape down the sides halfway through.
- Add the room-temperature egg and vanilla extract. Beat on low speed until fully combined.
- Add green gel food coloring gradually, starting with a small amount, until you achieve a vibrant Grinch green. Mix thoroughly.
- In a separate bowl, whisk together the flour, baking soda, and salt.
- Add the flour mixture to the butter mixture in two additions, mixing on low speed after each addition until just combined. Do not overmix.
- Using a cookie scoop or spoon, portion rounded tablespoons of dough (about 1.5 inches in diameter) and roll into balls. Place on prepared baking sheets about 2 inches apart.
- Bake for 8-10 minutes, until edges are set but centers still look slightly underdone and puffy.
- Immediately after removing from the oven, gently press one red hot candy into the center of each cookie.
- Cool on the baking sheet for 5 minutes, then transfer to a wire rack to cool completely.
Notes
For best results, use room temperature ingredients. Press the red hot candy gently into the hot cookie—don’t push too hard or the cookie may crack. If red hots melt into blobs, your oven may be running hot; try reducing temperature by 25°F. Cookies can be stored in an airtight container at room temperature for up to 5 days or frozen for up to 3 months.
Nutrition
- Serving Size: 1 cookie
- Calories: 115
- Sugar: 9
- Sodium: 65
- Fat: 6
- Saturated Fat: 3.5
- Carbohydrates: 15
- Protein: 1
Keywords: Grinch cookies, red hot cookies, holiday cookies, Christmas cookies, cinnamon cookies, easy cookie recipe