Love this? Save it for later!
Share the inspiration with your friends
I was standing in the spice aisle of our local grocery store last October when a woman walked past me, and the air shifted. She was carrying a warm paper bag from the bakery section, and the smell—that specific, spicy, almost peppery scent of fresh ginger and molasses—hit me so hard I nearly dropped my cart. Suddenly I was seven years old at my babysitter Maggie’s kitchen table, watching her crush gingersnap cookies with a rolling pin, the cookies cracking and crumbling inside a plastic bag while she hummed along to the radio. Maggie wasn’t family, not by blood anyway, but she was the one who taught me that a crust didn’t have to be boring. She’d let me lick the butter off my fingers after she pressed the crumbs into the pan, and I remember thinking, even then, that this was the secret—the good stuff was always in the details. I haven’t seen Maggie in years, but every fall when the air gets that first real chill, I start craving those pumpkin cheesecake bars with gingersnap crust she used to make for Halloween parties. Honestly, I’ve been chasing that exact flavor combination for decades. Maybe you’ve been there—you taste something once, and nothing else ever quite measures up. This recipe is my best attempt at getting it right, and let me tell you, I think I finally nailed it. The crust has that perfect snap before it gives way to the silky, spiced pumpkin filling. It’s the kind of dessert that makes people close their eyes on the first bite, and honestly, that’s the whole point. I keep making these perfect pumpkin cheesecake bars because they bring back that feeling—the warmth of Maggie’s tiny kitchen, the sound of the rolling pin, and the quiet joy of knowing something simple could be that good.
Why You’ll Love This Recipe
Let’s be real for a second. There are a million pumpkin cheesecake recipes out there, and I’ve tried more than my fair share. Some are too dense, some are too sweet, and some have a crust that gets soggy before you even get it to the table. These perfect pumpkin cheesecake bars with gingersnap crust are none of those things. They are, without exaggeration, the version I keep coming back to year after year.
- Quick & Easy: No water bath, no fussy techniques. These bars come together in about 30 minutes of active prep time, and the oven does the rest. Perfect for busy weeknights or when you need a dessert in a hurry.
- Simple Ingredients: You likely have most of these in your pantry right now. No special trips to a fancy grocery store required. The gingersnap crust is the star, and it only needs three ingredients.
- Perfect for Fall Gatherings: Whether it’s Thanksgiving, a cozy Friendsgiving, or just a random Tuesday when you need a little comfort, these bars fit the bill. They travel well, too.
- Crowd-Pleaser: I’ve brought these to potlucks, office parties, and family dinners. They disappear fast. Kids love them, adults love them, and even people who say they’re “not really pumpkin fans” have been converted.
- Unbelievably Delicious: The texture is the real magic here. The creamy, tangy cheesecake layer meets the spiced pumpkin layer, all sitting on a crunchy, buttery gingersnap base. It’s next-level comfort food.
What makes this recipe different? It’s the ratio, honestly. I spent a long time tweaking the amount of pumpkin puree to cream cheese so the bars are firm but still melt-in-your-mouth soft. And that crust? I use a specific trick—toasting the gingersnap crumbs briefly before pressing them into the pan—that keeps them from getting mushy. This isn’t just another version of pumpkin cheesecake bars. It’s the best version. The one that makes you close your eyes after the first bite. It’s comfort food reimagined—faster, simpler, but with the same soul-soothing satisfaction. Perfect for impressing guests without stress, or turning a simple evening into something memorable.
What Ingredients You Will Need
This recipe uses simple, wholesome ingredients to deliver bold flavor and satisfying texture without the fuss. Most of these are pantry staples, especially if you do any fall baking. Let’s break down what you need and why each one matters.
For the Gingersnap Crust
- Gingersnap cookies, finely crushed (2 cups / about 230g): This is the backbone of the recipe. I recommend using a brand like Anna’s or Mi-Del for that perfect balance of ginger and molasses. Don’t use generic “snaps” that are too soft—you want a cookie that snaps when you break it. You can crush them in a food processor or by hand in a bag with a rolling pin.
- Unsalted butter, melted (6 tablespoons / 85g): This binds the crumbs together. I prefer unsalted so I can control the salt level. If you only have salted butter, just reduce the pinch of salt you add.
- Granulated sugar (2 tablespoons / 25g): Just a little extra sweetness to round out the spicy ginger. You can skip this if your gingersnaps are very sweet.
For the Cheesecake Filling
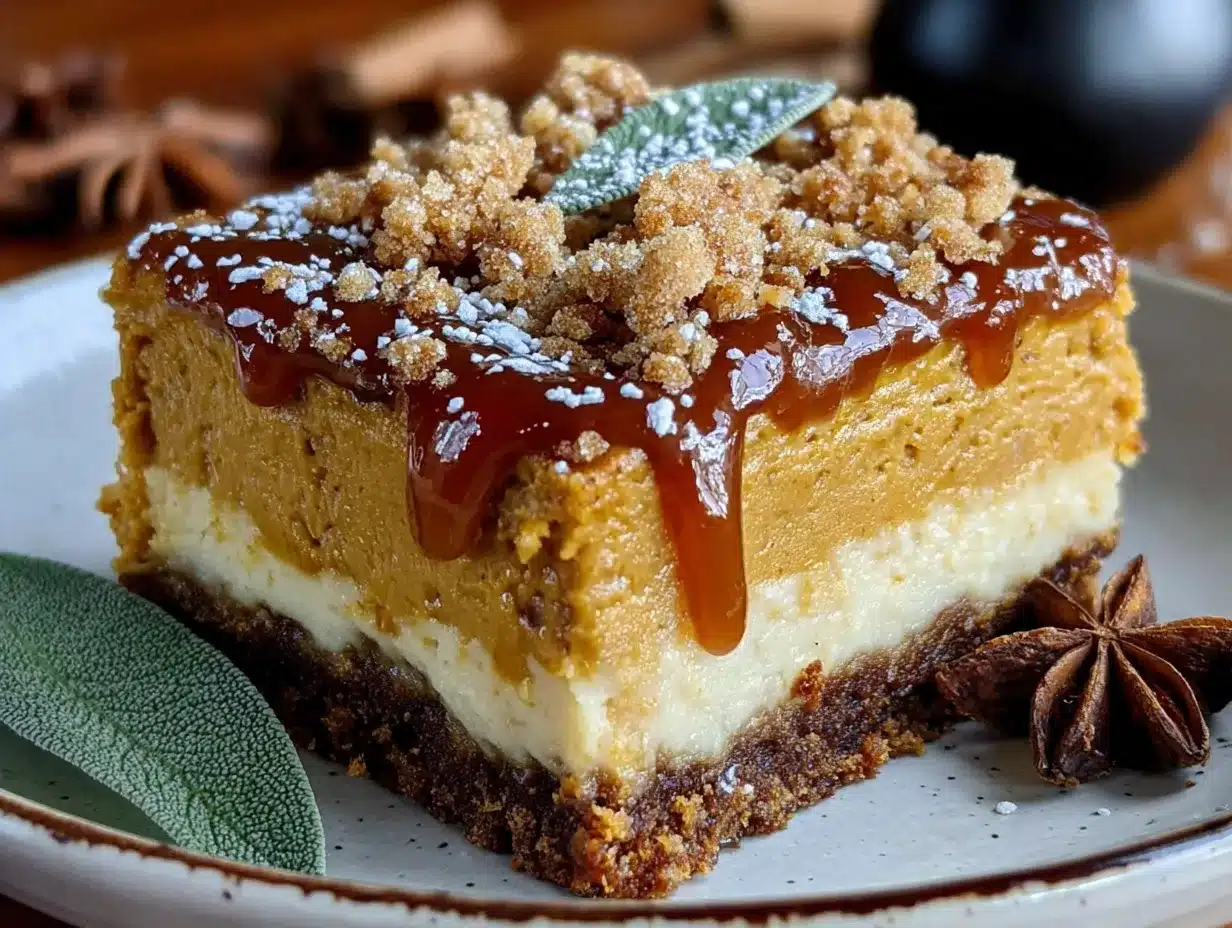
- Cream cheese, softened (16 ounces / 450g): Use full-fat blocks, not the spreadable kind in a tub. Let it sit at room temperature for at least an hour—this is non-negotiable for a smooth filling. I like Philadelphia brand for consistent results.
- Granulated sugar (3/4 cup / 150g): Sweetens the filling without overpowering the tang of the cream cheese.
- Pumpkin puree (1 cup / 240g): Make sure you’re using 100% pure pumpkin, not pumpkin pie filling. Libby’s is my go-to brand. It’s thick and consistent, which is exactly what you need.
- Large eggs (2): They help set the cheesecake. Bring them to room temperature with the cream cheese.
- Sour cream (1/4 cup / 60g): This is my secret ingredient. It adds a subtle tang and makes the texture extra creamy. Greek yogurt works as a substitute if that’s what you have.
- Vanilla extract (1 teaspoon): Pure vanilla, not imitation, if you can swing it. It adds warmth and depth.
- Pumpkin pie spice (1 teaspoon): You can use store-bought or make your own with cinnamon, nutmeg, ginger, and cloves. I actually prefer making my own—it’s fresher and you can adjust the ratios.
- Cinnamon (1/2 teaspoon): For that extra layer of warmth.
- Salt (1/4 teaspoon): Don’t skip this. Salt balances the sweetness and brings out the pumpkin flavor.
Ingredient selection tip: Look for a pumpkin puree that’s thick and dark orange. If it looks watery, drain it slightly by letting it sit in a fine-mesh strainer for 15 minutes. This prevents the cheesecake from being too loose.
Equipment Needed
You don’t need a professional kitchen to make these perfect pumpkin cheesecake bars, but having the right tools makes the process smoother. Here’s what you’ll need:
- 9×13-inch baking pan: This is the ideal size for bars. A metal pan works best for even baking. If you only have glass, reduce the oven temperature by 25°F.
- Parchment paper: Line the pan with a long sheet that hangs over the sides. This creates “handles” so you can lift the entire block of bars out cleanly for slicing.
- Food processor or rolling pin: For crushing the gingersnaps. A food processor is faster and gives you even crumbs, but a rolling pin and a zip-top bag work just fine. I’ve done it both ways, honestly.
- Electric hand mixer or stand mixer: For beating the cream cheese until smooth. A hand mixer is perfectly adequate here. You don’t need a stand mixer, but it’s nice if you have one.
- Large mixing bowls (at least 2): One for the crust ingredients and one for the filling.
- Rubber spatula: For scraping down the sides of the bowl and spreading the filling evenly.
- Measuring cups and spoons: Accuracy matters in baking, so use proper measuring tools.
- Toaster oven or oven: For toasting the crust. I use my regular oven, but a toaster oven works if you’re making a smaller batch.
Budget-friendly tip: Don’t have a food processor? No problem. Place the gingersnaps in a sturdy zip-top bag, seal it, and go to town with a rolling pin or even a heavy-bottomed skillet. It’s a little arm workout, but it works perfectly.
Preparation Method
Alright, let’s get to the fun part. Follow these steps carefully, and you’ll have a pan of the best pumpkin cheesecake bars you’ve ever made. I’ve included time estimates and sensory cues so you know exactly what to look for at each stage.
- Preheat and prep the pan (10 minutes): Preheat your oven to 350°F (175°C). Line a 9×13-inch baking pan with parchment paper, leaving a 2-inch overhang on the long sides. This is your secret weapon for clean slices later. Lightly grease the parchment with non-stick spray or a little butter.
- Toast the crust crumbs (5 minutes): This is the trick I mentioned earlier. Spread the crushed gingersnap crumbs on a baking sheet and toast them in the preheated oven for 3-4 minutes. You’ll know they’re ready when they smell intensely gingery and look slightly darker. Let them cool for 2 minutes. This step prevents the dreaded soggy bottom.
- Make the crust (5 minutes): In a medium bowl, combine the toasted gingersnap crumbs, melted butter, and sugar. Stir with a fork until every crumb is moistened and the mixture looks like wet sand. Press the mixture firmly and evenly into the bottom of the prepared pan. Use the bottom of a measuring cup to really pack it down. Bake for 8 minutes, then set aside to cool while you make the filling.
- Beat the cream cheese (3 minutes): In a large bowl, beat the softened cream cheese with an electric mixer on medium speed until completely smooth, about 2 minutes. Scrape down the sides and beaters. There should be no lumps—this is crucial for a silky texture.
- Add the sugar and wet ingredients (2 minutes): Add the granulated sugar and beat until combined, about 30 seconds. Then add the sour cream and vanilla extract, beating on low until just incorporated. Don’t overmix here.
- Add the eggs one at a time (2 minutes): Crack the first egg into the bowl and beat on low until the yolk disappears. Repeat with the second egg. Overmixing at this stage can incorporate too much air, which leads to cracks. Trust me, I learned this the hard way after a few crater-faced cheesecakes.
- Incorporate the pumpkin and spices (2 minutes): Add the pumpkin puree, pumpkin pie spice, cinnamon, and salt. Beat on low speed until everything is a uniform, beautiful orange color. The batter will be thick and luscious. Give it a final stir with a spatula to make sure nothing is stuck at the bottom.
- Assemble and bake (45-50 minutes): Pour the filling over the cooled crust and spread it evenly with a spatula. Tap the pan gently on the counter a few times to release any air bubbles. Bake at 350°F for 45-50 minutes, or until the edges are set and the center jiggles slightly when you gently shake the pan. It will look a little puffed and golden around the edges. The center should have a slight wobble—like a firm Jell-O, not a liquid.
- Cool completely (2 hours): Place the pan on a wire rack and let it cool to room temperature. This is important. Do not rush this step. Once it’s cool, cover the pan with plastic wrap and refrigerate for at least 4 hours, preferably overnight. Chilling sets the bars and makes them sliceable.
- Slice and serve (5 minutes): Use the parchment overhang to lift the entire block of cheesecake out of the pan. Place it on a cutting board. Use a sharp, clean knife to cut into bars. Wipe the knife clean between cuts for neat edges. I like to cut them into 24 squares, but you can go bigger or smaller depending on your crowd.
Cooking Tips & Techniques
I’ve made this recipe more times than I can count, and I’ve made just about every mistake in the book. Here’s what I’ve learned so you don’t have to repeat my failures.
Room temperature ingredients are not optional. I know, I know, you’re in a hurry. But cold cream cheese creates lumps that no amount of beating can fix. Take it out of the fridge an hour before you start. Same goes for the eggs. If you forget, you can cheat by placing the cream cheese (still wrapped) in a bowl of warm water for 10 minutes, but honestly, planning ahead is easier.
Don’t overmix the filling. Once you add the eggs, mix on low speed and stop as soon as everything comes together. Overmixing incorporates air, which expands during baking and then collapses, leaving you with cracks. A few cracks are fine—they add character—but a smooth top is prettier.
The jiggle test is your friend. When the cheesecake is done, the center should wobble slightly when you shake the pan. If it’s completely firm, it’s overbaked and will be dry. If it’s sloshy, it needs more time. The residual heat will finish cooking the center as it cools.
Patience with cooling is key. I once tried to speed up the cooling process by putting the hot pan directly in the fridge. The result? A cracked, sweaty mess. Let it cool on the counter first, then chill. The gradual temperature change prevents condensation from forming on the surface.
Use a hot knife for clean slices. Run your knife under hot water, dry it off, and then cut. The heat glides through the cheesecake without dragging. Wipe the blade clean between each cut. This makes a huge difference in presentation.
Variations & Adaptations
One of the best things about this recipe is how flexible it is. Here are some ways to make it your own.
Gluten-Free Version: Use gluten-free gingersnap cookies for the crust. Brands like Mi-Del make a great gluten-free version that tastes just like the real thing. The rest of the recipe is naturally gluten-free, so you’re good to go.
Dairy-Free Adaptation: Substitute the cream cheese with a high-quality dairy-free alternative like Kite Hill or Miyoko’s. Use a vegan butter or coconut oil for the crust, and swap the sour cream with a dairy-free yogurt or coconut cream. The texture will be slightly different, but still delicious.
Extra Spicy Pumpkin Bars: If you’re like me and love a serious ginger kick, add an extra 1/2 teaspoon of ground ginger to the filling. You can also mix a pinch of cayenne pepper into the crust for a subtle heat that pairs beautifully with the pumpkin.
Chocolate Drizzle: After the bars have chilled and been sliced, drizzle them with melted dark chocolate. The bitterness of the chocolate cuts through the sweetness of the cheesecake beautifully. I did this for a holiday party once, and it was the first thing to disappear.
Pecan Praline Topping: Toast 1/2 cup of chopped pecans, then mix them with 2 tablespoons of brown sugar and 1 tablespoon of melted butter. Sprinkle this over the top of the cheesecake before baking. It adds a wonderful crunch and a caramel-like flavor.
Serving & Storage Suggestions
These perfect pumpkin cheesecake bars are incredibly versatile when it comes to serving. Here’s how to get the most out of them.
Serving Temperature: I prefer these bars straight from the fridge—cold and firm. But they’re also lovely at room temperature, where the filling becomes slightly softer and more luscious. If you’re serving them at a party, let them sit out for about 15 minutes before slicing.
Presentation Ideas: A dollop of freshly whipped cream is the classic pairing. You can also dust them with a little cinnamon or nutmeg for a pretty finish. For a more decadent presentation, drizzle with caramel sauce and sprinkle with flaky sea salt.
Complementary Dishes: These bars pair beautifully with a hot cup of coffee or a spiced chai latte. For a full dessert spread, serve them alongside a simple apple crisp or a plate of fresh pears and sharp cheddar cheese.
Storage Instructions: Store the bars in an airtight container in the refrigerator for up to 5 days. Place a sheet of parchment paper between layers if you’re stacking them. The flavors actually deepen after a day or two, so don’t be afraid to make them ahead.
Freezing Tips: These bars freeze like a dream. Once they’re fully chilled and sliced, arrange them in a single layer on a baking sheet and freeze for 1 hour. Then transfer the frozen bars to a freezer-safe container or zip-top bag, separating layers with parchment. They’ll keep for up to 3 months. Thaw in the refrigerator overnight before serving.
Nutritional Information & Benefits
While these are absolutely a treat, they do offer some surprising nutritional perks. Here’s a rough estimate per bar (based on 24 servings):
- Calories: Approximately 220-250
- Fat: 14g
- Carbohydrates: 22g
- Protein: 4g
- Sugar: 16g
Health Highlights: Pumpkin is packed with vitamin A, which is great for your eyes and immune system. It’s also a good source of fiber. The cream cheese provides calcium and protein. The ginger in the crust has anti-inflammatory properties. So while I wouldn’t call these a health food, they’re certainly not empty calories.
Dietary Considerations: This recipe contains gluten (from the gingersnaps) and dairy (from the cream cheese and butter). As noted in the variations section, both can be adapted. It’s also relatively low in sugar compared to many dessert bars, thanks to the natural sweetness of the pumpkin.
Conclusion
So there you have it—my best recipe for perfect pumpkin cheesecake bars with gingersnap crust. These bars are everything I love about fall baking: warm spices, creamy texture, and that satisfying crunch from the crust. They’re the kind of dessert that makes you slow down and actually enjoy the moment.
I really hope you give these a try. Don’t be afraid to tweak the spices or add your own twist—that’s what cooking is all about. Whether you’re making them for a holiday gathering or just because it’s a Tuesday in October, I promise they’ll bring a little warmth to your kitchen.
I’d love to hear how they turn out for you! Leave a comment below and let me know if you tried any variations. And if you snap a photo, tag me—I always love seeing your creations. Happy baking, friends!
Frequently Asked Questions
Can I use a different type of cookie for the crust?
Absolutely! Graham crackers, vanilla wafers, or even shortbread cookies would work. Just keep in mind that the flavor will change. The ginger and molasses in gingersnaps complement the pumpkin so well, but feel free to experiment.
Why did my cheesecake crack?
Cracks usually happen for two reasons: overmixing the batter (which incorporates too much air) or overbaking. Make sure you mix on low speed after adding the eggs, and pull the bars out when the center still has a slight jiggle. Cooling them gradually also helps prevent cracks.
Can I make these bars ahead of time?
Yes, and I actually recommend it! These bars taste even better after a day in the fridge. You can make them up to 2 days in advance. Just keep them covered in the refrigerator.
How do I know when the pumpkin cheesecake bars are done baking?
The edges should be set and slightly puffed, while the center should jiggle gently when you shake the pan. It will look a bit underdone in the middle, but it will firm up as it cools. Overbaking is the most common mistake, so trust the jiggle test.
Can I use fresh pumpkin instead of canned?
You can, but you’ll need to cook and puree it first, and then drain it well. Fresh pumpkin has more water than canned, which can make the filling too loose. If using fresh, let the puree sit in a cheesecloth-lined strainer for an hour to remove excess moisture.
PrintBest Easy Perfect Pumpkin Cheesecake Bars
These perfect pumpkin cheesecake bars with gingersnap crust are creamy, spiced, and sit on a crunchy, buttery base. They are the ultimate fall dessert that comes together quickly without a water bath.
- Prep Time: 30 minutes
- Cook Time: 50 minutes
- Total Time: 5 hours (includes chilling time)
- Yield: 24 servings 1x
- Category: Dessert
- Cuisine: American
Ingredients
- 2 cups (about 230g) gingersnap cookies, finely crushed
- 6 tablespoons (85g) unsalted butter, melted
- 2 tablespoons (25g) granulated sugar
- 16 ounces (450g) cream cheese, softened
- 3/4 cup (150g) granulated sugar
- 1 cup (240g) pumpkin puree
- 2 large eggs
- 1/4 cup (60g) sour cream
- 1 teaspoon vanilla extract
- 1 teaspoon pumpkin pie spice
- 1/2 teaspoon cinnamon
- 1/4 teaspoon salt
Instructions
- Preheat oven to 350°F (175°C). Line a 9×13-inch baking pan with parchment paper, leaving a 2-inch overhang on the long sides. Lightly grease the parchment.
- Spread the crushed gingersnap crumbs on a baking sheet and toast in the preheated oven for 3-4 minutes until fragrant and slightly darker. Let cool for 2 minutes.
- In a medium bowl, combine the toasted gingersnap crumbs, melted butter, and sugar. Stir until every crumb is moistened and the mixture looks like wet sand. Press firmly and evenly into the bottom of the prepared pan. Bake for 8 minutes, then set aside to cool.
- In a large bowl, beat the softened cream cheese with an electric mixer on medium speed until completely smooth, about 2 minutes. Scrape down the sides and beaters.
- Add the granulated sugar and beat until combined, about 30 seconds. Add the sour cream and vanilla extract, beating on low until just incorporated.
- Add the eggs one at a time, beating on low after each addition until the yolk disappears. Do not overmix.
- Add the pumpkin puree, pumpkin pie spice, cinnamon, and salt. Beat on low speed until everything is a uniform orange color. Give a final stir with a spatula.
- Pour the filling over the cooled crust and spread evenly. Tap the pan gently on the counter a few times to release air bubbles.
- Bake at 350°F for 45-50 minutes, or until the edges are set and the center jiggles slightly when gently shaken.
- Place the pan on a wire rack and cool to room temperature. Cover with plastic wrap and refrigerate for at least 4 hours, preferably overnight.
- Use the parchment overhang to lift the entire block of cheesecake out of the pan. Place on a cutting board and cut into bars using a sharp, clean knife. Wipe the knife clean between cuts.
Notes
Room temperature ingredients are essential for a smooth filling. Do not overmix after adding eggs to prevent cracks. The jiggle test is key: the center should wobble slightly when done. Cool completely on the counter before refrigerating to avoid condensation. Use a hot knife for clean slices.
Nutrition
- Serving Size: 1 bar
- Calories: 235
- Sugar: 16
- Sodium: 180
- Fat: 14
- Saturated Fat: 8
- Carbohydrates: 22
- Fiber: 1
- Protein: 4
Keywords: pumpkin cheesecake bars, gingersnap crust, fall dessert, Thanksgiving dessert, easy cheesecake bars


