Love this? Save it for later!
Share the inspiration with your friends
The holiday potluck was in six hours and I’d completely forgotten. My sister-in-law, the one who brings those perfect, multi-layered tarts that look like they belong in a bakery window, was going to be there. My brother, who spends three days brining a single turkey. And me? I had a half-fed sourdough starter that was practically screaming for attention, a bunch of rosemary that was starting to wilt, and a sinking feeling in my stomach.
I’d meant to plan something showy. I really had. But between the kids’ school concerts and the last-minute gift wrapping, the days had just slipped away. I stood in my kitchen, staring into the pantry, hoping for a miracle. Honestly, the only thing I had in abundance was flour and olive oil. And that sourdough starter, bubbling away on the counter, looking at me with what I swear was judgment. “You forgot, didn’t it?” it seemed to say.
I grabbed the biggest sheet pan I owned and decided to just… make bread. Not just any bread, but a focaccia. It felt like a gamble. Focaccia is simple, sure, but it’s also the kind of thing that can go wrong if you rush it. I was rushing. I was also muttering. Maybe you’ve been there, that frantic, “I’ll just wing it” energy that takes over when you’re out of options. I didn’t have time for a long, slow rise, so I cheated a little, using warm water to speed things up. I dimpled the dough with more force than finesse, drizzled it with a generous amount of that good peppery olive oil, and scattered the rosemary on top like I was throwing confetti at a losing parade.
When it came out of the oven, golden and puffed and crackling with oil, I almost didn’t believe it. It looked… right. It smelled like a holiday miracle. I wrapped it in a clean tea towel, still warm, and practically sprinted to the party, feeling like a fraud carrying a bread that had taken me less than two hours to make.
The tart was beautiful. The turkey was perfect. But my focaccia? It was the first thing to disappear. People tore off pieces, dunked it in olive oil and balsamic, and kept coming back for more. My sister-in-law asked for the recipe. My brother ate half of it standing up by the kitchen counter. And I stood there, sheepish and amused, realizing that the simple, panicked, last-minute bread had won the day. That’s the thing about this best homemade rosemary sourdough focaccia—it doesn’t need a lot of fuss. It just needs a little faith, a hot oven, and the kind of hungry crowd that makes a simple loaf feel like a celebration.
Why You’ll Love This Recipe
This isn’t just another bread recipe. This is the one you’ll turn to when you need to bring something truly memorable to the table without spending your whole day in the kitchen. I’ve tested this version countless times, tweaking the hydration and the fermentation time until it was just right—crispy on the outside, impossibly airy on the inside, and packed with that tangy sourdough flavor that store-bought bread just can’t match.
- Incredibly Easy for a Sourdough Bread: No complicated shaping or scoring. You just mix, let it rise, stretch it a few times, and press it into a pan. It’s the perfect entry point for anyone nervous about working with sourdough.
- Simple, Pantry-Friendly Ingredients: Flour, water, salt, olive oil, rosemary, and your sourdough starter. That’s it. No fancy grocery trips required, especially during the busy holiday season.
- Perfect for the Holiday Table: It’s a showstopper that pairs beautifully with everything from roast turkey to creamy soups. It’s also sturdy enough to travel to a potluck and still look gorgeous on the buffet.
- A Guaranteed Crowd-Pleaser: Kids love the chewy, salty crust, and adults can’t resist tearing off another piece. It’s the kind of bread that disappears before the main course even hits the table.
- Unbelievably Delicious: The combination of fruity olive oil, fragrant rosemary, and that signature sourdough tang is pure comfort. It’s the kind of bread that makes you close your eyes after the first bite.
What makes this recipe different from all the other focaccia recipes out there? It’s the technique. Using a high-hydration dough and a series of gentle folds, we build incredible structure and those big, irregular air pockets without any kneading. The long, cold fermentation in the fridge develops a deep, complex flavor that a same-day yeast bread just can’t achieve. This isn’t just another version of focaccia—it’s the best version.
This recipe is the kind that makes you feel like a hero with very little effort. It’s comfort food reimagined for the holiday table—simpler, more forgiving, but with the same soul-soothing satisfaction. Perfect for impressing guests without the stress, or turning a simple family dinner into something memorable.
What Ingredients You Will Need
This recipe uses simple, wholesome ingredients to deliver that signature chewy texture and bold flavor. Most of these are probably already in your pantry, which is exactly what you want when the holidays get hectic.
For the Dough
- Bread flour, 500g (about 4 cups): I prefer King Arthur Bread Flour for its high protein content, which gives the focaccia that perfect chewy crumb. All-purpose flour will work in a pinch, but the texture won’t be quite as airy.
- Active sourdough starter, 200g (about 1 cup): Make sure your starter is bubbly and active—fed within the last 4-8 hours. A hungry starter won’t give you the rise you need. I keep my starter in the fridge and feed it the night before I plan to bake.
- Warm water, 375g (about 1 ½ cups): The water should be just warm to the touch, around 80-85°F. Too hot and you’ll kill the natural yeast in your starter.
- Extra-virgin olive oil, 60g (about ¼ cup), plus more for the pan: Use a good quality olive oil here—it’s a major flavor component. I love the peppery, grassy notes of a California olive oil for this.
- Fine sea salt, 10g (about 1 ½ teaspoons): I use fine sea salt because it dissolves more evenly into the dough. If you’re using kosher salt, you might need a bit more.
For the Topping
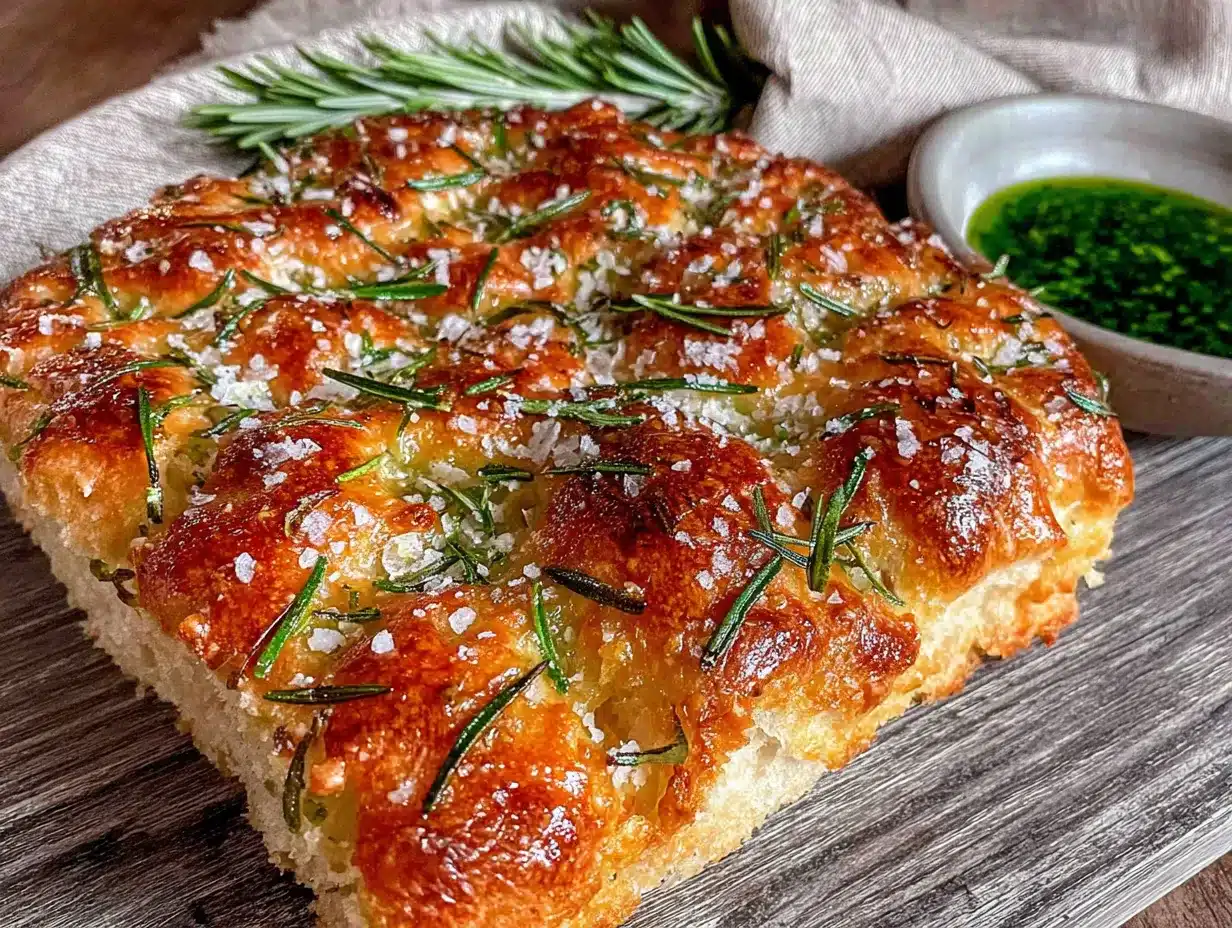
- Fresh rosemary, 2 tablespoons, roughly chopped: Fresh is non-negotiable here. Dried rosemary just doesn’t have the same aromatic punch. I like to leave some pieces a little larger for visual appeal.
- Flaky sea salt, 1 teaspoon: Maldon sea salt is my go-to for that satisfying crunch on top. It makes a real difference in the final bite.
- Extra-virgin olive oil, 2-3 tablespoons, for drizzling: This is for that final, generous drizzle before baking. Don’t skimp—it’s what creates that crispy, golden bottom.
For the best texture, make sure your water is at the right temperature and your starter is truly active. If you’re new to sourdough, don’t worry—this recipe is very forgiving. The long fermentation time in the fridge helps develop flavor and strength, even if your starter isn’t at its absolute peak.
Equipment Needed
You don’t need a lot of fancy equipment to make this focaccia, which is one of the reasons I love it. A few basic tools are all it takes.
- A large mixing bowl: Glass or ceramic works best. I use a 4-quart bowl, which gives the dough plenty of room to expand.
- A 9×13-inch baking pan: This is the ideal size for a focaccia that’s thick enough to be satisfying but not too bready. A metal pan will give you a crisper bottom than a glass one.
- A bench scraper: This is my secret weapon for handling sticky dough. It makes the folding process so much easier and cleaner.
- Plastic wrap or a reusable bowl cover: You’ll need this to cover the dough during its long rise in the fridge.
- Kitchen scale: I cannot recommend this enough for consistent results. Measuring flour by volume can be wildly inaccurate, and sourdough is all about hydration ratios.
If you don’t have a bench scraper, you can use a spatula or even lightly oiled hands for the folding. If you don’t have a 9×13 pan, a large cast-iron skillet works beautifully—just adjust the baking time slightly. The key is having a pan with sides high enough to hold the dough as it rises.
Preparation Method
This recipe requires a little patience, but the actual hands-on time is minimal. The magic happens while you’re sleeping or going about your day.
- Mix the dough (Day 1, morning or afternoon): In your large mixing bowl, combine the warm water and active sourdough starter. Whisk gently until the starter is mostly dissolved. Add the bread flour and fine sea salt. Mix with a spatula or your hands until a shaggy, sticky dough forms. It will look rough and lumpy—that’s exactly right. Cover the bowl with plastic wrap and let it rest for 30 minutes. This autolyse step allows the flour to fully hydrate and starts developing gluten.
- Perform the first set of folds (after the 30-minute rest): Wet your hands slightly to prevent sticking. Grab one side of the dough, stretch it up, and fold it over the center. Rotate the bowl 90 degrees and repeat. Do this 4-6 times until the dough feels tighter and smoother. Cover the bowl again.
- Continue folding (every 30 minutes, 3 more times): Repeat the folding process every 30 minutes for the next 1.5 hours. You’ll do a total of 4 sets of folds. After the final fold, the dough should be smooth, elastic, and holding its shape much better. Cover the bowl and let it rest at room temperature for another 1-2 hours, or until it has increased in size by about 30-50%.
- Cold ferment overnight (Day 1, evening): Generously oil your 9×13-inch baking pan with olive oil. Gently transfer the dough into the pan. It won’t fill the pan yet—that’s fine. Cover the pan tightly with plastic wrap and place it in the refrigerator overnight, or for at least 12 hours and up to 24 hours. This slow, cold fermentation is where the deep, tangy sourdough flavor develops.
- Bring the dough to room temperature (Day 2, 3-4 hours before baking): Take the pan out of the refrigerator. Leave it covered on the counter for 3-4 hours. The dough will slowly relax, spread, and start to puff up. It should eventually fill the pan and look bubbly and alive.
- Dimple the dough (30 minutes before baking): Preheat your oven to 425°F (220°C) with a rack in the middle. Drizzle the top of the dough with 2-3 tablespoons of olive oil. Using your fingertips, press straight down into the dough, creating deep dimples all over the surface. Don’t be shy—this is what creates those iconic focaccia pockets that hold the oil and rosemary. Scatter the chopped fresh rosemary evenly over the top and sprinkle with flaky sea salt.
- Bake to golden perfection (25-30 minutes): Place the pan in the preheated oven and bake for 25-30 minutes, rotating the pan halfway through. The focaccia is done when it’s deep golden brown on top and sounds hollow when you tap the bottom. If you have an instant-read thermometer, the internal temperature should be around 200°F.
- Cool and serve: Let the focaccia cool in the pan for 5 minutes, then transfer it to a wire rack. Don’t skip this step—cooling on a rack prevents the bottom from getting soggy. Serve warm or at room temperature. The texture is best the day it’s made, but it’s still wonderful the next day.
Cooking Tips & Techniques
Over the years, I’ve made this focaccia dozens of times, and I’ve learned a few things the hard way. Here are my best tips for success.
Don’t skip the folds. I know it’s tempting to just mix it and walk away, but those folds are doing the heavy lifting of gluten development. Without them, your focaccia will be dense and flat instead of light and airy. Set a timer—it’s only 30 seconds of work every half hour.
Trust the cold fermentation. The overnight rest in the fridge isn’t just for convenience. It’s where the flavor really develops. I once tried to rush this step by leaving it on the counter for the same amount of time, and the result was a bland, one-dimensional bread. The cold slows down the yeast activity while the bacteria keep working, creating that complex, tangy sourdough character.
Be generous with the olive oil. Focaccia is an oil-based bread, and skimping on the oil will leave you with a dry, sad result. The oil in the pan, the oil on top—it all matters. It’s what creates that crispy, almost fried bottom and the tender, flavorful crumb. I learned this lesson when I tried to make a “light” version with less oil. Let’s just say it was a learning experience.
Let the dough tell you when it’s ready to bake. The 3-4 hour room temperature rise is a guideline, not a rule. On a cold day, it might take longer. On a warm day, it might be ready in 2 hours. Look for a dough that’s jiggly, bubbly, and has nearly doubled in size. It should feel alive and full of air.
Dimple with confidence. Those deep dimples aren’t just for looks. They create pockets that trap the olive oil and rosemary, ensuring every bite is flavorful. Don’t just poke the surface—press down firmly until your fingertips hit the bottom of the pan.
Variations & Adaptations
One of the best things about this focaccia is how adaptable it is. Once you master the basic technique, the possibilities are endless.
- Herb and Garlic Focaccia: Swap the rosemary for a mix of fresh thyme, oregano, and sage. Add 3-4 cloves of thinly sliced garlic scattered over the top before baking. This version is especially lovely with roasted meats.
- Everything Bagel Focaccia: After dimpling and oiling, sprinkle the top with a generous amount of everything bagel seasoning (sesame seeds, poppy seeds, dried garlic, dried onion, and salt). It’s incredible served alongside a bowl of soup.
- Sun-Dried Tomato and Olive Focaccia: Press ½ cup of chopped sun-dried tomatoes and ⅓ cup of pitted, halved Kalamata olives into the dimpled dough before baking. This version is hearty enough to be a meal on its own with a side salad.
- Gluten-Free Adaptation: I’ve had success using a high-quality gluten-free bread flour blend. The dough will be wetter and stickier, and you’ll need to reduce the water by about 50g. The texture won’t be exactly the same, but it’s still delicious.
- Cheesy Rosemary Focaccia: Sprinkle ½ cup of freshly grated Parmesan or crumbled feta over the top along with the rosemary during the last 5 minutes of baking. The cheese gets all melty and browned—it’s irresistible.
I personally love the sun-dried tomato and olive variation for holiday gatherings. The briny, savory flavors feel so festive and pair beautifully with a glass of red wine.
Serving & Storage Suggestions
This focaccia is best served warm, straight from the oven, when the crust is at its crispiest and the interior is pillowy soft. But it’s also wonderful at room temperature, which makes it perfect for buffets and potlucks.
For a beautiful presentation, I like to cut the focaccia into squares or long, rustic strips and arrange them on a wooden board. Serve it alongside a small bowl of good olive oil mixed with balsamic vinegar for dipping. It’s also fantastic served alongside a bowl of hearty Tuscan wedding soup or a simple classic Caesar salad for a complete meal.
To store leftovers: Place the cooled focaccia in an airtight container or wrap it tightly in foil. It will keep at room temperature for up to 2 days. Do not refrigerate it—the fridge will dry it out and make the texture stale.
To reheat: The best way to revive day-old focaccia is to pop it in a 350°F oven for 5-7 minutes. It will crisp right back up. You can also reheat individual pieces in a toaster oven or even in a dry skillet over medium heat for a minute or two per side.
To freeze: This focaccia freezes beautifully. Wrap the cooled, unsliced focaccia tightly in plastic wrap, then in foil. Freeze for up to 3 months. To thaw, leave it at room temperature for a few hours, then reheat in a 350°F oven for 10 minutes to restore the crispy crust. The flavors actually seem to deepen after freezing.
One thing I love about this bread is that the flavors continue to develop over the first day. It’s actually even more flavorful on day two, if you can resist eating it all on day one.
Nutritional Information & Benefits
While focaccia is certainly an indulgence, it does offer some nutritional benefits, especially when made with sourdough. The fermentation process breaks down some of the gluten and phytic acid in the flour, making the nutrients more bioavailable and easier to digest. Many people with mild gluten sensitivities find they can tolerate sourdough bread better than commercially yeasted bread.
Here are the approximate nutritional values per serving (1 square, based on 12 servings):
- Calories: 280
- Total Fat: 12g
- Saturated Fat: 2g
- Carbohydrates: 36g
- Fiber: 2g
- Protein: 7g
- Sodium: 380mg
The olive oil provides heart-healthy monounsaturated fats and antioxidants, while the rosemary is a good source of iron, calcium, and vitamin B6. The sourdough fermentation also produces beneficial probiotics and prebiotics that support gut health.
This recipe can be made dairy-free and vegan as written. For a lower-sodium version, simply reduce the salt in the dough and use less flaky salt on top. For a whole-grain version, you can substitute up to 25% of the bread flour with whole wheat flour—just be aware the texture will be slightly denser.
Conclusion
This best homemade rosemary sourdough focaccia has become my go-to for every holiday gathering, and I think it will become yours too. It’s proof that you don’t need complicated techniques or exotic ingredients to create something truly special. With a little patience, a bubbly starter, and some good olive oil, you can make a bread that looks like it came from a fancy bakery but tastes like it was made with love.
I love this recipe because it’s forgiving. It doesn’t demand perfection. The dimples don’t have to be uniform. The rosemary doesn’t have to be perfectly distributed. It’s a rustic bread that embraces imperfection, and that’s exactly what makes it so beautiful. It’s the kind of bread that brings people together, that makes them reach for just one more piece, that sparks conversations and creates memories around the table.
So go ahead—give it a try. Customize it with your favorite toppings, make it your own, and watch it disappear. I’d love to hear how it turns out for you. Leave a comment below and share your variations, or tag me in your photos. And if you’re looking for more holiday inspiration, don’t miss my recipe for sourdough honey butter dinner rolls—they’re another crowd-pleaser that’s perfect for the season.
Happy baking, friends. May your holidays be warm, your table be full, and your bread be golden.
Frequently Asked Questions
Can I use active dry yeast instead of sourdough starter?
Yes, you can. To make a yeasted version, omit the sourdough starter and use 2 teaspoons of active dry yeast dissolved in the warm water. Let it sit for 5 minutes until foamy, then proceed with the recipe. The flavor will be milder and less tangy, but the texture will still be wonderful.
Why is my focaccia dense and not airy?
A dense focaccia usually means the dough didn’t ferment long enough or the gluten wasn’t developed properly. Make sure your starter is very active before you begin, and don’t skip the folding steps. Also, be patient with the final rise—it needs time to develop those big air pockets.
Can I make this recipe without a kitchen scale?
You can, but I strongly recommend using a scale for consistent results. Flour measurement by volume can vary by up to 20%, which throws off the hydration ratio. If you must measure by volume, spoon the flour into your measuring cup and level it off—don’t scoop directly from the bag.
How do I know when my sourdough starter is ready to use?
Your starter is ready when it has doubled in size, is full of bubbles, and has a pleasant, tangy smell. It should pass the “float test”—a small spoonful dropped into a glass of water should float on the surface. Feed it 4-8 hours before you plan to mix your dough for best results.
Can I add other toppings besides rosemary?
Absolutely! This recipe is very adaptable. Try caramelized onions, roasted garlic, cherry tomatoes, fresh thyme, or even a sprinkle of coarse black pepper. Just be careful not to overload the top, or the bread might not bake evenly. A light, even scattering is all you need.
Pin This Recipe!

Best Homemade Rosemary Sourdough Focaccia Recipe for Holidays

This is the one you’ll turn to when you need to bring something truly memorable to the table without spending your whole day in the kitchen. Crispy on the outside, impossibly airy on the inside, and packed with that tangy sourdough flavor that store-bought bread just can’t match.
- Prep Time: 30 minutes
- Cook Time: 25-30 minutes
- Total Time: 14-24 hours (including fermentation and rising)
- Yield: 12 servings 1x
- Category: Bread
- Cuisine: Italian
Ingredients
- 500g (about 4 cups) bread flour
- 200g (about 1 cup) active sourdough starter
- 375g (about 1 ½ cups) warm water (80-85°F)
- 60g (about ¼ cup) extra-virgin olive oil, plus more for the pan
- 10g (about 1 ½ teaspoons) fine sea salt
- 2 tablespoons fresh rosemary, roughly chopped
- 1 teaspoon flaky sea salt (e.g., Maldon)
- 2–3 tablespoons extra-virgin olive oil, for drizzling
Instructions
- Mix the dough (Day 1, morning or afternoon): In your large mixing bowl, combine the warm water and active sourdough starter. Whisk gently until the starter is mostly dissolved. Add the bread flour and fine sea salt. Mix with a spatula or your hands until a shaggy, sticky dough forms. Cover the bowl with plastic wrap and let it rest for 30 minutes.
- Perform the first set of folds (after the 30-minute rest): Wet your hands slightly to prevent sticking. Grab one side of the dough, stretch it up, and fold it over the center. Rotate the bowl 90 degrees and repeat. Do this 4-6 times until the dough feels tighter and smoother. Cover the bowl again.
- Continue folding (every 30 minutes, 3 more times): Repeat the folding process every 30 minutes for the next 1.5 hours. You’ll do a total of 4 sets of folds. After the final fold, the dough should be smooth, elastic, and holding its shape much better. Cover the bowl and let it rest at room temperature for another 1-2 hours, or until it has increased in size by about 30-50%.
- Cold ferment overnight (Day 1, evening): Generously oil your 9×13-inch baking pan with olive oil. Gently transfer the dough into the pan. Cover the pan tightly with plastic wrap and place it in the refrigerator overnight, or for at least 12 hours and up to 24 hours.
- Bring the dough to room temperature (Day 2, 3-4 hours before baking): Take the pan out of the refrigerator. Leave it covered on the counter for 3-4 hours. The dough will slowly relax, spread, and start to puff up. It should eventually fill the pan and look bubbly and alive.
- Dimple the dough (30 minutes before baking): Preheat your oven to 425°F (220°C) with a rack in the middle. Drizzle the top of the dough with 2-3 tablespoons of olive oil. Using your fingertips, press straight down into the dough, creating deep dimples all over the surface. Scatter the chopped fresh rosemary evenly over the top and sprinkle with flaky sea salt.
- Bake to golden perfection (25-30 minutes): Place the pan in the preheated oven and bake for 25-30 minutes, rotating the pan halfway through. The focaccia is done when it’s deep golden brown on top and sounds hollow when you tap the bottom. If you have an instant-read thermometer, the internal temperature should be around 200°F.
- Cool and serve: Let the focaccia cool in the pan for 5 minutes, then transfer it to a wire rack. Serve warm or at room temperature.
Notes
Don’t skip the folds—they develop gluten for an airy texture. Trust the cold fermentation for deep flavor. Be generous with olive oil for a crispy bottom. Let the dough tell you when it’s ready to bake (jiggly, bubbly, nearly doubled). Dimple with confidence until fingertips hit the pan bottom.
Nutrition
- Serving Size: 1 square
- Calories: 280
- Sodium: 380
- Fat: 12
- Saturated Fat: 2
- Carbohydrates: 36
- Fiber: 2
- Protein: 7
Keywords: sourdough focaccia, rosemary focaccia, holiday bread, homemade focaccia, sourdough bread, easy focaccia, potluck bread