Love this? Save it for later!
Share the inspiration with your friends
My niece Clara asked why I couldn’t just use a box of brownie mix for the cookies. I was mid-lecture—something about “real cocoa powder” and “the integrity of a from-scratch recipe”—when I stopped. I mean, I had a point. But she had a bigger one. We were making six dozen cookies for her school’s Halloween carnival, and I was already running late because I’d spent twenty minutes trying to find the vanilla bean paste I swore I had.
So I tried it. I grabbed a box of dark chocolate fudge brownie mix from the back of the pantry, added a few tweaks, and honest to goodness, those were the best chocolate mint cookies I’ve ever made. The texture was chewier, the mint flavor cut through perfectly, and they held up to the sandwich filling without crumbling. I stood there at the kitchen counter, spatula in hand, feeling genuinely delighted at being so thoroughly wrong. Clara, of course, just shrugged and said, “I told you.”
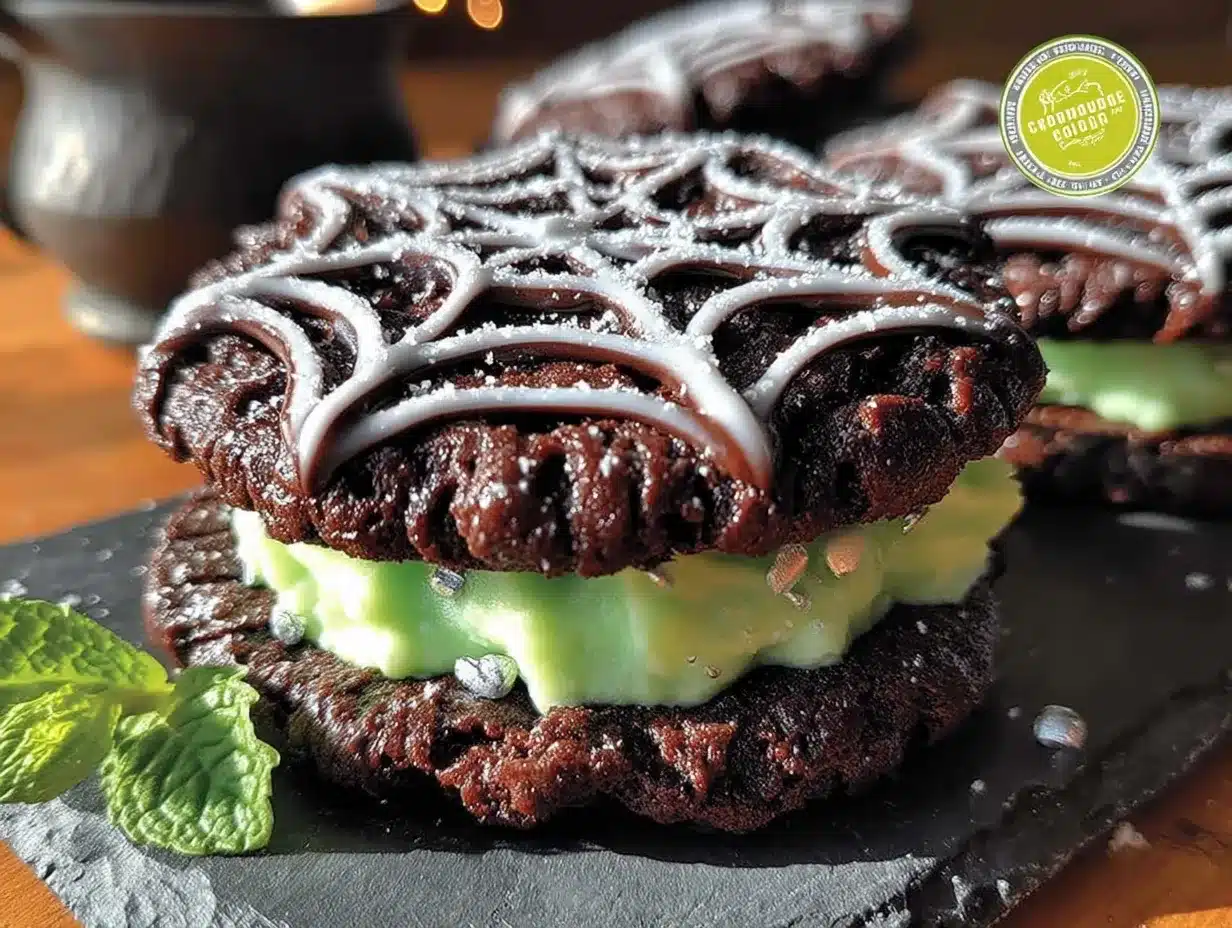
These Chocolate Mint Halloween Sandwich Cookies are now my go-to for any gathering where I need to impress without the stress. They’re rich, they’re cool, and they look absolutely spooky with a simple green-tinted filling peeking out between dark chocolate rounds. Maybe you’ve been there—staring down a recipe, convinced your way is the only way, only to have a younger, smarter cook show you a shortcut that actually works better. That’s this cookie. It’s the recipe that taught me to loosen up a little.
Why You’ll Love This Recipe
Let me tell you why these cookies have become my secret weapon for every Halloween party, potluck, and casual get-together. First off, they’re ridiculously easy. We’re talking one bowl, a few minutes of mixing, and you’re done. No chilling the dough, no fussing with multiple steps. The brownie mix shortcut saves time without sacrificing flavor—honestly, it improves the texture.
- Quick & Easy: From start to finish, these come together in under 30 minutes. Perfect for when you realize the party is tomorrow and you have nothing to bring.
- Simple Ingredients: You likely have most of these in your pantry already. A box of brownie mix, some butter, an egg, and a few pantry staples for the mint filling.
- Perfect for Halloween: The dark chocolate and mint combo feels festive without being gimmicky. Add a drop of green food coloring to the filling, and you’ve got a creepy-cool treat that kids and adults both fight over.
- Crowd-Pleaser: I’ve brought these to three different parties this fall, and every single time, someone asks for the recipe. They disappear faster than anything else on the dessert table.
- Unbelievably Delicious: The combination of fudgy chocolate cookie and creamy mint filling is next-level comfort food. It’s like an Andes mint and a brownie had a perfect little cookie baby.
What makes these different from other chocolate mint cookies? It’s the texture. The brownie mix gives you that slightly crackly top and chewy center that from-scratch recipes sometimes miss. And the filling—it’s not too sweet, with just enough peppermint extract to feel cool and refreshing against the rich chocolate. This isn’t just another version of a sandwich cookie. It’s the one you’ll actually want to make again.
What Ingredients You Will Need
This recipe uses simple, mostly pantry-stable ingredients to deliver big flavor without the fuss. Here’s what you’ll need to gather before you start.
For the Chocolate Cookies
- 1 box (15.25 oz) dark chocolate fudge brownie mix — I prefer Duncan Hines or Ghirardelli for the richest flavor. The dark chocolate version gives a deeper cocoa taste that stands up to the mint.
- 1/2 cup unsalted butter, melted — Use real butter here, not margarine. It makes the cookies tender and gives them that buttery richness you can’t fake.
- 1 large egg, room temperature — Cold eggs will seize the melted butter. Set yours out on the counter for 15 minutes before starting.
- 1 teaspoon vanilla extract — Pure vanilla, not imitation. It rounds out the chocolate flavor beautifully.
- 1/4 cup all-purpose flour — This is my secret trick. Adding a little extra flour to a brownie mix cookie recipe prevents them from spreading too thin. You get a thicker, chewier cookie.
For the Mint Filling
- 4 oz cream cheese, softened — Full-fat works best here. It gives the filling a luscious, creamy texture that doesn’t feel greasy.
- 2 cups powdered sugar — Sift it if you can. Lumps in the filling are not fun to bite into.
- 1/2 teaspoon peppermint extract — Start with this amount. You can always add more, but too much peppermint tastes like toothpaste. I learned that the hard way.
- 2-3 drops green food coloring — Optional, but highly recommended for the Halloween vibe. Gel food coloring works better than liquid—it doesn’t thin out the filling.
- 1 tablespoon milk, if needed — To adjust the consistency. You want it spreadable but not runny.
For the best results, make sure your butter is truly melted and slightly cooled, not hot. Hot butter can cook the egg when you mix it in, and nobody wants scrambled egg chunks in their cookies. Also, check your peppermint extract’s expiration date—old extract loses its punch, and you might end up adding too much trying to compensate.
Equipment Needed
You don’t need a fancy kitchen to pull these off. Here’s what you’ll want to have on hand.
- Large mixing bowl — Any medium-to-large bowl works. I use a glass one so I can see if everything is fully incorporated.
- Electric hand mixer or stand mixer — The filling comes together much faster with one. You can do it by hand with a whisk and some elbow grease, but your arm will thank you for the mixer.
- Baking sheets — Two standard half-sheet pans work perfectly. Line them with parchment paper for easy cleanup.
- Cookie scoop or tablespoon — A 1.5-tablespoon scoop gives you consistently sized cookies. If you don’t have one, use a regular tablespoon and level it off.
- Cooling rack — Essential for letting the cookies cool completely before filling. Warm cookies will melt the cream cheese filling into a puddle.
- Offset spatula or butter knife — For spreading the filling. An offset spatula makes it look professional, but a regular knife works just fine.
If you don’t have a cookie scoop, just wet your hands slightly and roll the dough into balls. It’s a little messier, but the cookies will still turn out great. I’ve done it that way plenty of times when my scoop was buried in the back of a drawer.
Preparation Method
Follow these steps carefully, and you’ll have perfect sandwich cookies every time. I’ve tested this method more times than I care to admit.
- Preheat your oven to 350°F (175°C). Line two baking sheets with parchment paper. This is non-negotiable—parchment paper prevents sticking and makes cleanup a breeze. If you use wax paper, it will melt. Ask me how I know.
- Make the cookie dough. In a large mixing bowl, combine the brownie mix, melted butter, egg, vanilla extract, and all-purpose flour. Stir with a wooden spoon or rubber spatula until just combined. The dough will be thick and slightly sticky—that’s exactly what you want. Don’t overmix, or the cookies will be tough. About 20 strokes is usually enough.
- Scoop and shape the cookies. Using your cookie scoop or a tablespoon, portion out rounded tablespoons of dough. Roll them gently between your palms to form smooth balls. Place them on the prepared baking sheets about 2 inches apart. They will spread a little, but not as much as regular drop cookies because of the extra flour.
- Bake the cookies. Bake one sheet at a time for 8-10 minutes. The edges should look set and slightly cracked, but the centers will still appear soft and puffy. That’s okay—they’ll continue cooking from the residual heat of the pan. If you overbake them, they’ll be dry and crumbly instead of chewy and fudgy. For a softer cookie, pull them at 8 minutes. For a slightly firmer cookie that holds up better to filling, go to 10 minutes.
- Cool the cookies completely. Let them rest on the baking sheet for 5 minutes. This allows them to firm up enough to transfer without breaking. Then move them to a wire cooling rack and let them cool completely—at least 20 minutes. Warm cookies will turn your filling into a melty mess. I’ve been impatient before, and I ended up with green-tinted fingers and sad, squished cookies.
- Make the mint filling. While the cookies cool, beat the softened cream cheese in a medium bowl with an electric mixer until smooth and fluffy, about 1 minute. Gradually add the powdered sugar, 1/2 cup at a time, beating on low speed to avoid a sugar cloud. Add the peppermint extract and green food coloring. Beat on medium speed until the filling is light, creamy, and evenly colored. If it seems too thick to spread, add the milk 1 teaspoon at a time until it reaches a spreadable consistency.
- Assemble the sandwich cookies. Pair up cookies that are similar in size. Using an offset spatula or butter knife, spread about 1 tablespoon of filling on the flat side of one cookie. Top with the matching cookie, flat side down, and gently press until the filling reaches the edges. Don’t press too hard, or the cookies might crack. A light, even pressure is all you need.
- Let the cookies set. Place the assembled cookies on a tray or plate and refrigerate for at least 30 minutes. This allows the filling to firm up and the flavors to meld together. The cookies are delicious right away, but they’re even better after a chill—the mint flavor becomes more pronounced, and the texture gets perfectly chewy.
Cooking Tips & Techniques
Here’s where I share the hard-won wisdom from my own kitchen disasters. Trust me on these.
Don’t skip the extra flour. I know it seems weird to add flour to a boxed mix, but that’s the difference between a flat, crispy cookie and a thick, chewy one. The brownie mix alone doesn’t have enough structure to hold its shape as a cookie. That quarter cup of flour is your insurance policy against sad, thin discs.
Watch your bake time like a hawk. Ovens vary wildly. My friend’s oven runs 25 degrees hot, and she ruined her first batch because she trusted the timer instead of her eyes. The cookies are done when the edges are set and the tops look slightly cracked, but the centers still look soft. If you wait until the centers look fully baked, they’ll be overdone. Pull them early, and trust the carryover cooking.
Room temperature ingredients matter. I know, I know—it’s annoying to wait for butter and cream cheese to soften. But cold cream cheese makes lumpy filling, and cold butter seizes up when mixed with the dry ingredients. Set everything out 30 minutes before you start. While you’re waiting, you can clean the kitchen or prep your baking sheets.
Double the batch if you’re feeding a crowd. These cookies disappear fast. I made a single batch for a Halloween movie night with four friends, and they were gone before the first jump scare. For a party, I always make at least two batches. The dough freezes beautifully—just scoop it into balls, freeze them on a baking sheet, then transfer to a freezer bag. Bake straight from frozen, adding 2 minutes to the bake time.
Use a light hand with the peppermint. I cannot stress this enough. Peppermint extract is potent. One teaspoon is usually plenty for a whole batch of filling. If you’re unsure, start with 1/4 teaspoon, taste it, and add more. You can always add, but you can’t take away. I once made a batch that tasted like a candy cane exploded in my mouth. Not pleasant.
Variations & Adaptations
One of the best things about this recipe is how flexible it is. Here are a few ways to make it your own.
Dark Chocolate Mint Sandwich Cookies: For an even more intense chocolate experience, use a dark chocolate brownie mix and add 1/4 cup of unsweetened cocoa powder to the dough. The double chocolate punch pairs beautifully with the cool mint filling. This is my personal favorite variation—it feels a little more grown-up and sophisticated.
Gluten-Free Version: Use a gluten-free brownie mix and substitute the all-purpose flour with a 1:1 gluten-free baking flour blend. I’ve tested this with the King Arthur brand, and the texture is remarkably close to the original. Just make sure your peppermint extract is certified gluten-free—some brands use alcohol derived from wheat.
Vegan Option: Replace the butter with melted coconut oil or vegan butter, use a flax egg (1 tablespoon ground flaxseed mixed with 3 tablespoons water), and substitute the cream cheese with a vegan cream cheese alternative. The cookies will be slightly more delicate, so handle them gently when assembling. Miyoko’s brand cream cheese works best for the filling—it’s thick and creamy without being greasy.
Flavor Twists: Swap the peppermint extract for orange extract and use orange food coloring for a chocolate-orange Halloween cookie. Or try almond extract with pink coloring for a cherry-chocolate vibe. The base cookie is so versatile that you can really play around with the filling flavors to match any holiday or occasion.
Crunchy Addition: Fold 1/2 cup of crushed candy canes or peppermint candies into the filling for a delightful crunch. It adds a festive touch and gives the cookies a little extra texture. Just be sure to crush the candies finely enough that they don’t tear through the cookies when you spread the filling.
Serving & Storage Suggestions
These cookies are best served chilled or at room temperature, depending on your preference. I personally love them straight from the fridge—the filling is firm and creamy, and the cookie is perfectly chewy. If you prefer a softer texture, let them sit at room temperature for 10-15 minutes before serving.
For presentation, arrange the cookies on a dark platter or cake stand to make the green filling pop. Dust them with a little powdered sugar for a “spooky snow” effect, or drizzle melted white chocolate over the tops for an extra decorative touch. If you’re bringing them to a Halloween party, arrange them in a circle on a black plate with a few plastic spiders scattered around—it’s a simple trick that always gets compliments.
These cookies pair beautifully with a cold glass of milk, a hot cup of coffee, or even a scoop of vanilla ice cream for an indulgent dessert. For a Halloween spread, serve them alongside pumpkin spice cupcakes or caramel apple bars for a complete dessert table.
Storage Instructions: Store the assembled cookies in an airtight container in the refrigerator for up to 5 days. They actually get better after a day or two—the flavors meld together, and the cookie softens slightly from the moisture in the filling. Place a sheet of wax paper between layers to prevent sticking.
Freezer Instructions: These cookies freeze beautifully. Place the assembled cookies in a single layer on a baking sheet and freeze until solid, about 1 hour. Transfer to a freezer-safe container or bag, separating layers with wax paper. They’ll keep for up to 3 months. To thaw, transfer to the refrigerator overnight or let sit at room temperature for 30 minutes.
Make-Ahead Tip: You can bake the cookies and make the filling separately up to 2 days in advance. Store the cookies at room temperature in an airtight container and keep the filling in the refrigerator. Assemble the sandwiches the day you plan to serve them for the freshest texture.
Nutritional Information & Benefits
Let’s be real—these are cookies, not health food. But I believe in enjoying treats in moderation, and knowing what’s in them helps. Here’s the approximate nutritional breakdown for one sandwich cookie (based on 24 cookies per batch).
| Nutrient | Amount Per Cookie |
|---|---|
| Calories | 185 |
| Total Fat | 9g |
| Saturated Fat | 5g |
| Cholesterol | 25mg |
| Sodium | 135mg |
| Total Carbohydrates | 26g |
| Dietary Fiber | 1g |
| Sugars | 18g |
| Protein | 2g |
The cream cheese filling does add a small amount of protein and calcium, while the cocoa in the brownie mix provides antioxidants. If you’re looking to lighten things up, you can use reduced-fat cream cheese and a low-sugar brownie mix. The texture will be slightly different, but still delicious.
These cookies contain wheat, dairy, and eggs. For those with allergies, check the gluten-free and vegan variations in the section above. Also, peppermint can be a trigger for acid reflux in some people—if that’s a concern, use just 1/4 teaspoon of extract for a milder mint flavor.
Conclusion
These Chocolate Mint Halloween Sandwich Cookies have become a staple in my kitchen, and I hope they become one in yours too. They’re the perfect balance of rich chocolate and cool mint, with a texture that’s chewy, fudgy, and completely satisfying. Whether you’re bringing them to a Halloween party, a potluck, or just making them for a cozy night in, they never fail to impress.
I love that this recipe taught me to be a little more open-minded in the kitchen. Sometimes the best ideas come from the people we least expect—like a ten-year-old who just wants to get to the carnival faster. So go ahead, give these cookies a try. Customize them, make them your own, and don’t be afraid to take a shortcut if it works. You might just surprise yourself.
I’d love to hear how yours turn out. Drop a comment below and let me know what variations you tried, or share a photo of your cookies on Pinterest and tag me. Happy baking, and happy Halloween!
Frequently Asked Questions
Can I use a different flavor of brownie mix?
Absolutely. Milk chocolate, triple chocolate, or even caramel brownie mixes all work well. Just keep in mind that the flavor of the mix will affect the final taste. Dark chocolate is my recommendation because it balances the mint perfectly, but feel free to experiment.
Why did my cookies spread too much?
This usually happens if the butter was too hot when you mixed it into the dough, or if you skipped the extra flour. Make sure your melted butter is cooled to room temperature, and don’t skip that quarter cup of all-purpose flour. Also, make sure your baking sheets are completely cool before placing raw dough on them.
Can I make the filling ahead of time?
Yes, you can make the filling up to 3 days in advance. Store it in an airtight container in the refrigerator. Let it sit at room temperature for about 15 minutes before spreading, as it will firm up when chilled. Give it a quick stir to restore its creamy texture.
How do I get perfectly round cookies every time?
Use a cookie scoop for consistent sizing, and roll the dough balls between your palms until they’re smooth. If the edges crack slightly, just pinch them back together. Also, rotate your baking sheet halfway through the bake time to ensure even spreading.
Can I freeze the unbaked cookie dough?
Definitely. Scoop the dough into balls, place them on a parchment-lined baking sheet, and freeze until solid. Transfer to a freezer bag and store for up to 3 months. When you’re ready to bake, place the frozen dough balls on a prepared baking sheet and add 2-3 minutes to the bake time. No need to thaw first.
Pin This Recipe!

Chocolate Mint Halloween Cookies: Easy Sandwich Recipe

Rich, fudgy chocolate cookies with a cool mint cream cheese filling, made easy with a brownie mix shortcut. Perfect for Halloween parties and gatherings.
- Prep Time: 15 minutes
- Cook Time: 10 minutes
- Total Time: 25 minutes
- Yield: 24 sandwich cookies 1x
- Category: Dessert
- Cuisine: American
Ingredients
- 1 box (15.25 oz) dark chocolate fudge brownie mix
- 1/2 cup unsalted butter, melted
- 1 large egg, room temperature
- 1 teaspoon vanilla extract
- 1/4 cup all-purpose flour
- 4 oz cream cheese, softened
- 2 cups powdered sugar, sifted
- 1/2 teaspoon peppermint extract
- 2–3 drops green food coloring (optional)
- 1 tablespoon milk (if needed)
Instructions
- Preheat your oven to 350°F (175°C). Line two baking sheets with parchment paper.
- In a large mixing bowl, combine the brownie mix, melted butter, egg, vanilla extract, and all-purpose flour. Stir until just combined. The dough will be thick and slightly sticky.
- Using a cookie scoop or tablespoon, portion out rounded tablespoons of dough. Roll them gently between your palms to form smooth balls. Place them on the prepared baking sheets about 2 inches apart.
- Bake one sheet at a time for 8-10 minutes. The edges should look set and slightly cracked, but the centers will still appear soft and puffy.
- Let the cookies rest on the baking sheet for 5 minutes, then transfer to a wire cooling rack and let them cool completely—at least 20 minutes.
- While the cookies cool, beat the softened cream cheese in a medium bowl with an electric mixer until smooth and fluffy, about 1 minute. Gradually add the powdered sugar, 1/2 cup at a time, beating on low speed. Add the peppermint extract and green food coloring. Beat on medium speed until the filling is light, creamy, and evenly colored. If too thick, add milk 1 teaspoon at a time until spreadable.
- Pair up cookies that are similar in size. Spread about 1 tablespoon of filling on the flat side of one cookie. Top with the matching cookie, flat side down, and gently press until the filling reaches the edges.
- Place the assembled cookies on a tray or plate and refrigerate for at least 30 minutes to allow the filling to firm up.
Notes
Don’t skip the extra flour—it prevents spreading. Watch bake time carefully; pull cookies when edges are set but centers still soft. Use room temperature ingredients for best results. Peppermint extract is potent; start with 1/4 teaspoon and add more to taste. Cookies can be stored in the refrigerator for up to 5 days or frozen for up to 3 months.
Nutrition
- Serving Size: 1 sandwich cookie
- Calories: 185
- Sugar: 18
- Sodium: 135
- Fat: 9
- Saturated Fat: 5
- Carbohydrates: 26
- Fiber: 1
- Protein: 2
Keywords: chocolate mint cookies, Halloween cookies, sandwich cookies, brownie mix cookies, easy cookie recipe, mint cream cheese cookies


