Love this? Save it for later!
Share the inspiration with your friends
“You know that moment when the scent of something baking makes you stop everything? That was last Saturday afternoon. I was helping my friend Lisa clear out her attic when I stumbled upon a dusty, handwritten recipe card tucked inside an old cookbook. It was titled ‘Classic Sour Cherry Pie.’ Funny thing is, Lisa never bakes, so this was a surprise. She told me it was her grandmother’s recipe, and honestly, I wasn’t expecting much. But that evening, with a few fresh sour cherries from the market and some butter in the fridge, I decided to give it a shot.
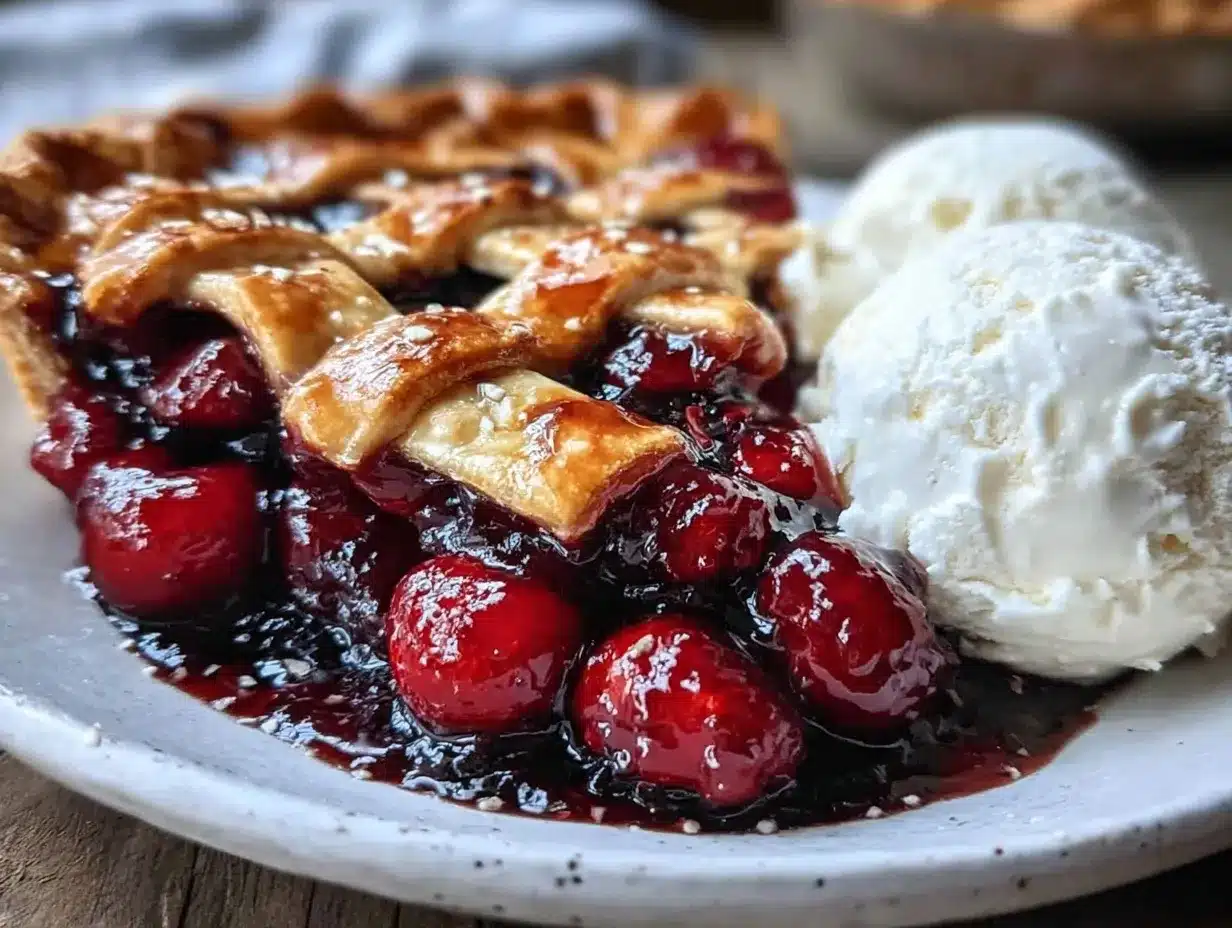
Let me tell you, the flaky lattice crust alone was worth the mess I made rolling out the dough (yes, I forgot to flour the counter properly—classic me). Paired with a scoop of creamy vanilla ice cream, it was like a little slice of summer nostalgia even though the weather was downright chilly. Maybe you’ve been there—when a simple pie turns a random night into a memory. That’s why this Classic Sour Cherry Pie with Flaky Lattice Crust and Vanilla Ice Cream stayed with me. It’s not just a dessert; it’s a story waiting to be shared at your next cozy gathering.”
Why You’ll Love This Recipe
Having tested this recipe multiple times (and yes, after a few messy attempts), I can confidently say it’s a winner for both novice and seasoned bakers. Here’s why this Classic Sour Cherry Pie stands out:
- Quick & Easy: The filling comes together in under 20 minutes, making it perfect for last-minute dessert plans or relaxing weekend baking.
- Simple Ingredients: You likely have most of these in your pantry already—no need for fancy or hard-to-find items.
- Perfect for Any Occasion: Whether it’s a holiday dinner, potluck, or just a quiet night in, this pie fits right in.
- Crowd-Pleaser: The tartness of the sour cherries balanced with the sweet lattice crust and vanilla ice cream always gets rave reviews.
- Unbelievably Delicious: The flaky crust texture combined with that juicy cherry filling is comfort food at its best.
What makes this pie different? The lattice crust isn’t just for show—it’s flaky, buttery, and has just the right crunch thanks to a little extra butter and a cool hand when rolling the dough. Plus, the filling uses fresh sour cherries with a hint of almond extract, which gives it a subtle, unexpected depth. Honestly, after my first bite, I was hooked. This recipe isn’t just another cherry pie; it’s a classic done right, with a creamy vanilla ice cream sidekick that makes every forkful sing.
What Ingredients You Will Need
This Classic Sour Cherry Pie recipe uses simple, wholesome ingredients to deliver bold flavor and that perfect flaky crust without fuss. Most are pantry staples or easy to find fresh items, so you can whip it up anytime sour cherries are in season or even with frozen cherries when needed.
- For the Pie Crust:
- 2 ½ cups all-purpose flour (I like King Arthur for consistent texture)
- 1 teaspoon salt
- 1 tablespoon granulated sugar (helps with browning)
- 1 cup (2 sticks) unsalted butter, cold and cubed (for that flaky crust)
- 4-6 tablespoons ice water (start with 4, add as needed)
- For the Cherry Filling:
- 5 cups fresh sour cherries, pitted (or frozen, thawed and drained)
- 1 cup granulated sugar (adjust to taste based on cherry tartness)
- ¼ cup cornstarch (for thickening)
- 1 tablespoon fresh lemon juice (brightens the flavor)
- ½ teaspoon almond extract (optional, but highly recommended)
- 1 tablespoon unsalted butter (to dot over filling before baking)
- Pinch of salt
- For Serving:
- Vanilla ice cream (homemade or store-bought, quality matters)
Substitution tips: For a gluten-free crust, swap the all-purpose flour with a 1-to-1 gluten-free blend. If you want a dairy-free version, try coconut oil in place of butter, but expect a slightly different texture. You can also replace cornstarch with arrowroot powder for thickening.
Equipment Needed
- 9-inch pie dish (glass or ceramic works best for even baking)
- Mixing bowls (one large for dough and one medium for filling)
- Pastry blender or food processor (for cutting butter into flour; I use a food processor for speed)
- Rolling pin (a sturdy one helps to roll out the dough evenly)
- Sharp knife or pastry cutter (for the lattice strips)
- Measuring cups and spoons (accuracy matters for baking)
- Cooling rack (to let the pie cool properly before serving)
If you don’t have a pastry blender, two forks or even your fingertips work fine, though it might take a little longer. For rolling, a silicone baking mat can help prevent sticking if your countertop is sticky or rough. Also, chilling your pie dough in the fridge between steps makes the rolling easier—trust me, a warm dough is a nightmare to work with!
Preparation Method
- Make the Pie Dough: In a large bowl or food processor, combine 2 ½ cups flour, 1 teaspoon salt, and 1 tablespoon sugar. Add the cold, cubed butter and pulse or cut in until the mixture resembles coarse crumbs with pea-sized butter bits. Slowly add the ice water, one tablespoon at a time, mixing until the dough just comes together. Avoid overworking it. Divide dough into two discs, wrap in plastic, and chill for at least 1 hour.
- Prepare the Cherry Filling: While dough chills, combine pitted sour cherries, 1 cup sugar, cornstarch, lemon juice, almond extract, and a pinch of salt in a bowl. Stir gently until well mixed. Set aside for the flavors to meld.
- Roll Out the Bottom Crust: Lightly flour your work surface and roll out one dough disc into a 12-inch circle. Transfer it to your 9-inch pie dish, easing it into place without stretching. Trim excess dough, leaving about an inch overhang.
- Add the Filling: Pour the cherry mixture into the prepared crust. Dot the filling evenly with 1 tablespoon butter. This gives a lovely richness as it melts during baking.
- Create the Lattice Top: Roll out the second dough disc into another 12-inch circle. Using a sharp knife or pastry cutter, cut into 1-inch-wide strips. Lay half the strips horizontally over the filling, then weave the remaining strips vertically, creating a lattice pattern. Trim and crimp the edges to seal the top and bottom crusts together.
- Chill the Pie: Place the assembled pie back in the fridge for 15-20 minutes. This helps prevent the crust from shrinking or becoming soggy during baking.
- Bake: Preheat your oven to 400°F (200°C). Brush the lattice crust lightly with an egg wash (1 beaten egg + 1 tablespoon water) for a golden finish. Bake for 20 minutes, then reduce heat to 350°F (175°C) and bake for another 35-40 minutes until the crust is golden and the filling bubbles through the lattice.
- Cool: Let the pie cool on a rack for at least 2 hours before serving. This allows the filling to set properly so every slice holds together.
- Serve: Slice and serve warm or room temperature with a generous scoop of vanilla ice cream.
Tip: If you notice the crust browning too quickly, tent loosely with foil halfway through baking. Also, don’t skip the chilling steps; they make a huge difference in flakiness and ease of handling.
Cooking Tips & Techniques
Making a perfect sour cherry pie requires a few little tricks that I picked up over the years. First, keeping your butter cold is key for that flaky crust. I learned the hard way that warm butter makes dough sticky and tough. Also, using a lattice crust isn’t just pretty—it helps steam escape, preventing a soggy bottom.
When pitting cherries, I like to use a straw or a chopstick to speed up the process, especially if you’re working with fresh fruit. Frozen cherries are a decent fallback, but make sure to thaw and drain them well to avoid watery filling.
Another tip is to mix the filling gently and not over-stir to avoid breaking the cherries and turning the filling too runny. When baking, placing a baking sheet under your pie can catch any drips and keep your oven clean—learned that one after a little oven mess (you know the feeling!).
Finally, don’t rush the cooling time. It’s tempting to cut right in, but the filling needs time to thicken. You can bake the night before and serve the next day for an even better flavor meld.
Variations & Adaptations
Want to switch things up with your classic sour cherry pie? Here are some ideas I’ve tried and loved:
- Mixed Berry Cherry Pie: Add blueberries or blackberries to the sour cherries for a colorful, tangy twist.
- Gluten-Free Crust: Use a gluten-free flour blend and add 1 teaspoon xanthan gum if your blend doesn’t contain it. The texture is slightly different but still delicious.
- Vegan Version: Replace butter with coconut oil or vegan butter, and use a flax egg (1 tablespoon ground flaxseed + 3 tablespoons water) for the egg wash.
- Spiced Cherry Pie: Add a pinch of cinnamon or ground ginger to the filling for a warm spice note that pairs beautifully with the tart cherries.
One personal favorite variation is swapping the vanilla ice cream for a scoop of cinnamon or almond-flavored gelato. It gives the pie a fun seasonal flair that’s perfect for fall gatherings.
Serving & Storage Suggestions
This pie is best served slightly warm with a generous scoop of vanilla ice cream melting over the lattice crust. The contrast between the flaky crust, tart cherry filling, and creamy ice cream is just unbeatable.
For a lovely presentation, garnish with a few fresh cherries or a sprinkle of powdered sugar on top. It’s perfect alongside a hot cup of coffee or a glass of chilled white wine for adults.
Store leftover pie covered loosely with foil or plastic wrap at room temperature for up to 2 days. For longer storage, refrigerate for 4-5 days, or freeze slices wrapped tightly in plastic and foil for up to 3 months.
Reheat refrigerated or frozen slices in a 350°F (175°C) oven for 15-20 minutes until warm. The flavors actually deepen after resting, so don’t be shy about making this ahead for a gathering.
Nutritional Information & Benefits
One slice (1/8 of the pie) roughly contains:
| Calories | 320 |
|---|---|
| Fat | 15g |
| Carbohydrates | 42g |
| Protein | 3g |
| Fiber | 2g |
Sour cherries are packed with antioxidants and vitamin C, making this pie not just tasty but a little health boost too (in moderation, of course). The almond extract adds a touch of healthy fats, and using real butter gives rich flavor and texture without artificial additives.
This recipe is gluten-friendly with substitutions and can be adapted for dairy-free diets, making it accessible to many. Just watch out for allergens like nuts if you add almond extract or flavors.
Conclusion
Making this Classic Sour Cherry Pie with Flaky Lattice Crust and Vanilla Ice Cream has become one of my favorite ways to celebrate simple, home-style baking. It’s approachable yet impressive, with a perfect balance of tart and sweet that feels like a hug on a plate. I encourage you to adjust the sugar to your taste or try one of the variations to make it your own.
Honestly, every time I bake this pie, I remember that rainy Saturday with Lisa, the dusty recipe card, and the joyful mess of flour everywhere. If you give it a try, I’d love to hear how it turns out or what twists you add. Share your experiences in the comments below—let’s keep this delicious tradition going! Happy baking!
FAQs
Can I use frozen cherries for this pie?
Yes! Just make sure to thaw and drain them well to avoid excess moisture in the filling.
How do I prevent the crust from getting soggy?
Chilling the dough before baking, using a lattice top, and baking the pie at a high temperature initially help keep the crust flaky and crisp.
Can I make the pie crust ahead of time?
Absolutely. You can prepare the dough up to 2 days in advance and keep it refrigerated or freeze it for up to a month.
What can I substitute for almond extract if I don’t have it?
Vanilla extract works in a pinch, though the almond adds a unique flavor complementary to cherries.
How long should I bake the pie if I use a glass dish?
Glass dishes usually require an extra 5-10 minutes of baking time; just watch the crust to avoid burning and tent with foil if needed.
Pin This Recipe!

Classic Sour Cherry Pie Recipe Easy Flaky Lattice Crust with Vanilla Ice Cream
A classic sour cherry pie featuring a flaky lattice crust paired perfectly with creamy vanilla ice cream. This recipe is easy to make and perfect for any occasion.
- Prep Time: 20 minutes
- Cook Time: 55 minutes
- Total Time: 1 hour 15 minutes
- Yield: 8 servings 1x
- Category: Dessert
- Cuisine: American
Ingredients
- 2 ½ cups all-purpose flour
- 1 teaspoon salt
- 1 tablespoon granulated sugar
- 1 cup (2 sticks) unsalted butter, cold and cubed
- 4–6 tablespoons ice water
- 5 cups fresh sour cherries, pitted (or frozen, thawed and drained)
- 1 cup granulated sugar
- ¼ cup cornstarch
- 1 tablespoon fresh lemon juice
- ½ teaspoon almond extract (optional)
- 1 tablespoon unsalted butter (to dot over filling before baking)
- Pinch of salt
- Vanilla ice cream (for serving)
Instructions
- Make the Pie Dough: In a large bowl or food processor, combine 2 ½ cups flour, 1 teaspoon salt, and 1 tablespoon sugar. Add the cold, cubed butter and pulse or cut in until the mixture resembles coarse crumbs with pea-sized butter bits. Slowly add the ice water, one tablespoon at a time, mixing until the dough just comes together. Avoid overworking it. Divide dough into two discs, wrap in plastic, and chill for at least 1 hour.
- Prepare the Cherry Filling: While dough chills, combine pitted sour cherries, 1 cup sugar, cornstarch, lemon juice, almond extract, and a pinch of salt in a bowl. Stir gently until well mixed. Set aside for the flavors to meld.
- Roll Out the Bottom Crust: Lightly flour your work surface and roll out one dough disc into a 12-inch circle. Transfer it to your 9-inch pie dish, easing it into place without stretching. Trim excess dough, leaving about an inch overhang.
- Add the Filling: Pour the cherry mixture into the prepared crust. Dot the filling evenly with 1 tablespoon butter.
- Create the Lattice Top: Roll out the second dough disc into another 12-inch circle. Using a sharp knife or pastry cutter, cut into 1-inch-wide strips. Lay half the strips horizontally over the filling, then weave the remaining strips vertically, creating a lattice pattern. Trim and crimp the edges to seal the top and bottom crusts together.
- Chill the Pie: Place the assembled pie back in the fridge for 15-20 minutes.
- Bake: Preheat oven to 400°F (200°C). Brush the lattice crust lightly with an egg wash (1 beaten egg + 1 tablespoon water). Bake for 20 minutes, then reduce heat to 350°F (175°C) and bake for another 35-40 minutes until crust is golden and filling bubbles.
- Cool: Let the pie cool on a rack for at least 2 hours before serving.
- Serve: Slice and serve warm or room temperature with a generous scoop of vanilla ice cream.
Notes
Chill dough before rolling to prevent shrinking and sogginess. Use a lattice crust to allow steam to escape. If crust browns too quickly, tent with foil. Thaw and drain frozen cherries well to avoid watery filling. Baking sheet under pie can catch drips. Let pie cool fully before slicing for best results.
Nutrition
- Serving Size: 1 slice (1/8 of pie)
- Calories: 320
- Fat: 15
- Carbohydrates: 42
- Fiber: 2
- Protein: 3
Keywords: sour cherry pie, cherry pie, lattice crust, homemade pie, dessert, baking, vanilla ice cream, flaky crust