Love this? Save it for later!
Share the inspiration with your friends
“I wasn’t even planning to bake that afternoon,” I admit, “but the power went out halfway through my usual weekend routine.” With no TV or Wi-Fi to distract me, I wandered into the kitchen, hoping to find something to keep my hands busy. That’s when I spotted a forgotten bag of mini chocolate eggs tucked away in the pantry. The idea hit me suddenly—why not make mini egg nest cupcakes with chocolate buttercream? I mean, the timing was perfect, and honestly, who can resist those little pastel eggs nestled on a fluffy cupcake?”
That afternoon became one of my favorite baking memories, even though I forgot to preheat the oven at first and ended up scrambling to get things ready. The combination of rich chocolate buttercream frosting and the whimsical mini egg nest topping felt like spring captured in a bite. Maybe you’ve been there—unexpected inspiration strikes when you least expect it, and suddenly, you’re making something you never thought you’d try.
These mini egg nest cupcakes quickly became a hit with friends and neighbors who stopped by that weekend. The texture of the moist cupcake paired with the creamy, smooth chocolate buttercream is honestly hard to beat. Plus, those adorable little candy eggs perched on top add a playful charm that’s perfect for Easter, spring celebrations, or just when you want something sweet and fun.
Why You’ll Love This Recipe
After testing many versions of chocolate cupcakes and frostings over the years, I can confidently say this recipe is a keeper. It’s easy to pull together—even when you’re short on time—and the flavor combination is just… wow.
- Quick & Easy: Ready in under 45 minutes, these cupcakes fit perfectly into busy afternoons or last-minute gatherings.
- Simple Ingredients: No need for fancy items; most are pantry staples you probably have on hand.
- Perfect for Spring & Easter: The mini egg nest design makes these cupcakes a festive treat for seasonal celebrations.
- Crowd-Pleaser: Kids love the candy eggs, and adults appreciate the rich chocolate buttercream flavor.
- Unbelievably Delicious: The buttercream’s silky texture combined with moist cupcakes delivers a satisfying, indulgent bite.
What sets this recipe apart? The chocolate buttercream is whipped just right to be fluffy but not overly sweet, giving a balanced taste that complements the cupcake perfectly. Plus, the mini egg nests aren’t just decorative—they add a fun crunch that makes each mouthful a little adventure. Honestly, after making these, I found myself closing my eyes after the very first bite, savoring that melt-in-your-mouth chocolate goodness. If you’re looking for a fun yet reliable recipe that’s perfect for impressing guests without the fuss, this one’s for you.
What Ingredients You Will Need
This recipe uses simple, wholesome ingredients to deliver bold flavor and satisfying texture without the fuss. Most of these are pantry staples, with the mini eggs adding a festive touch. Feel free to swap in your favorite brand of chocolate or buttercream ingredients for your personal taste.
- For the Cupcakes:
- All-purpose flour – 1 ¾ cups (220g)
- Granulated sugar – 1 cup (200g)
- Cocoa powder (unsweetened) – ⅓ cup (35g)
- Baking powder – 1 tsp
- Baking soda – ½ tsp
- Salt – ¼ tsp
- Large eggs – 2, room temperature
- Whole milk – ¾ cup (180ml)
- Vegetable oil – ⅓ cup (80ml)
- Vanilla extract – 1 tsp (I prefer Nielsen-Massey for its rich flavor)
- Boiling water – ½ cup (120ml) (helps intensify the chocolate flavor)
- For the Chocolate Buttercream:
- Unsalted butter – 1 cup (227g), softened
- Powdered sugar – 3 cups (360g), sifted
- Cocoa powder (unsweetened) – ¾ cup (75g)
- Heavy cream – 4 tbsp (60ml), plus more if needed
- Vanilla extract – 1 tsp
- Salt – a pinch
- For Decoration:
- Mini chocolate candy eggs – about 24 (I like Cadbury Mini Eggs for their bright colors and crunch)
- Optional: toasted shredded coconut or edible grass for extra nest effect
If you want a dairy-free version, swap the butter for a plant-based spread and use coconut milk in place of heavy cream. For gluten-free cupcakes, almond flour works well but expect a slightly different texture. The boiling water in the cupcake batter is a neat trick I picked up—it really brings out the cocoa flavor without making the batter too thin.
Equipment Needed
- Standard 12-cup cupcake/muffin pan
- Paper cupcake liners (optional, but recommended for easier cleanup)
- Mixing bowls (one large for dry ingredients, one for wet)
- Electric mixer or stand mixer (hand whisking is possible but more effort)
- Measuring cups and spoons (for precise ingredient amounts)
- Spatula for folding and scraping bowls
- Piping bag fitted with a star tip (Wilton 1M is my favorite) for frosting
- Cooling rack to let cupcakes rest after baking
If you don’t have a stand mixer, a handheld electric mixer works just fine. I once made these cupcakes with a whisk and a lot of elbow grease—definitely doable but takes longer! For the piping bag, if you’re out of disposable ones, a sturdy zip-top bag with a corner snipped off can work in a pinch. Keeping your butter softened (but not melted) makes the buttercream fluff up nicely, so a kitchen timer helps remind you to prep ahead. And trust me, a good-quality mixer makes a world of difference in smooth, lump-free frosting.
Preparation Method
- Preheat your oven to 350°F (175°C). Line your cupcake pan with paper liners or lightly grease it. This step saves you from sticky messes later.
- Mix dry ingredients: In a large bowl, sift together 1 ¾ cups flour, 1 cup sugar, ⅓ cup cocoa powder, 1 tsp baking powder, ½ tsp baking soda, and ¼ tsp salt. Sifting helps avoid lumps and gives the cupcakes a lighter crumb. Set aside.
- Combine wet ingredients: In another bowl, whisk 2 room-temperature eggs, ¾ cup milk, ⅓ cup vegetable oil, and 1 tsp vanilla extract until smooth. Room temperature eggs mix better, so if you forgot to prep, a quick 30-second soak in warm water helps.
- Blend wet and dry: Slowly add the wet mixture to the dry, stirring gently with a spatula until just combined. Don’t overmix—overworked batter can lead to dense cupcakes.
- Add boiling water: Carefully pour in ½ cup boiling water and stir until smooth. The batter will be thin; this is normal and creates a moist cupcake.
- Fill cupcake liners: Spoon batter evenly into the cupcake pan, filling each about 2/3 full. This leaves room for rising without overflow.
- Bake: Place in the oven and bake for 18-20 minutes. Check doneness by inserting a toothpick in the center—if it comes out clean or with a few moist crumbs, they’re ready.
- Cool: Remove cupcakes and let them cool in the pan for 5 minutes, then transfer to a wire rack to cool completely before frosting. This prevents the buttercream from melting.
- Prepare the chocolate buttercream: Beat 1 cup softened butter on medium speed until creamy, about 2 minutes. Gradually add 3 cups powdered sugar and ¾ cup cocoa powder, mixing on low speed to avoid a sugar cloud. Add 4 tablespoons heavy cream, 1 teaspoon vanilla extract, and a pinch of salt. Beat on high for 3 minutes until fluffy and smooth. Add more cream a teaspoon at a time if frosting feels too stiff.
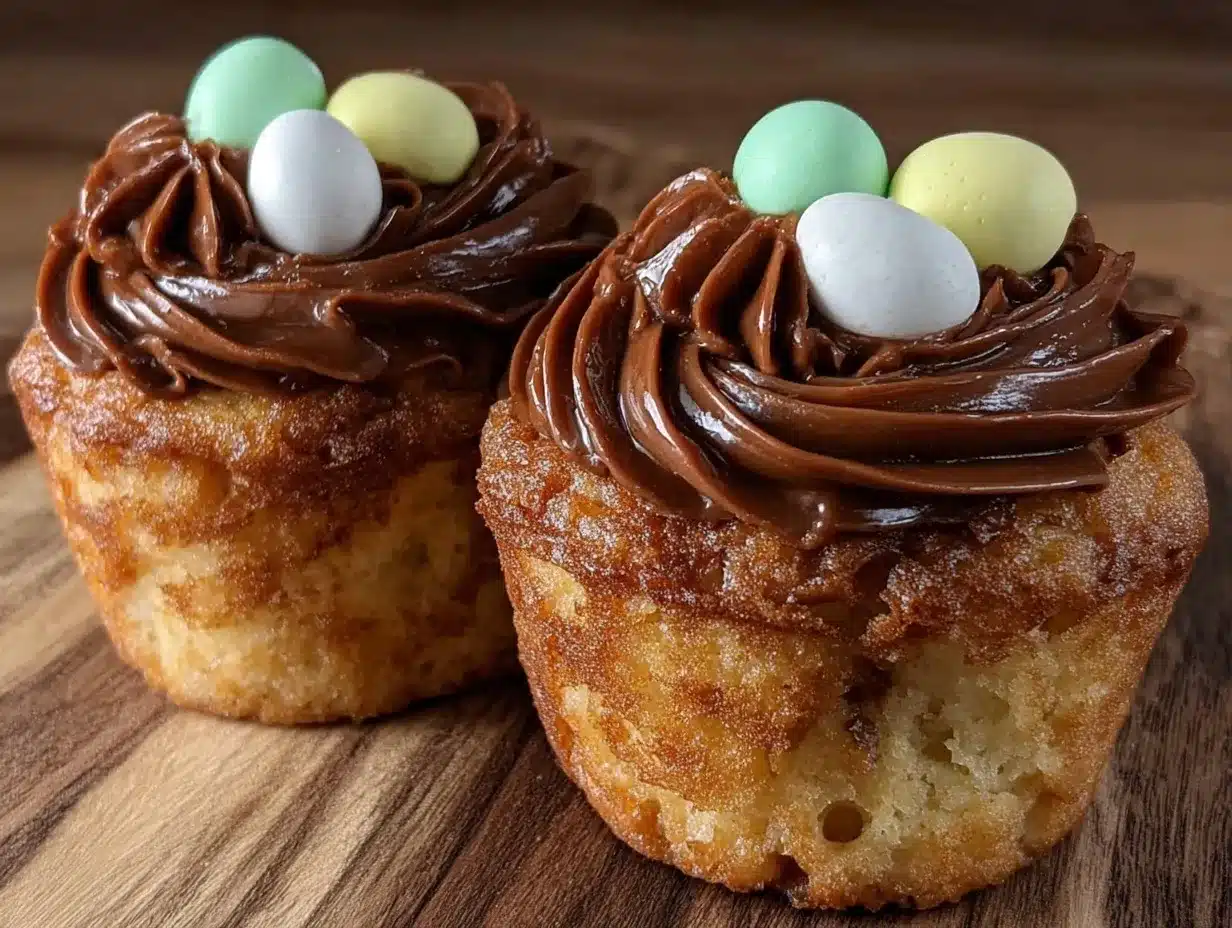
- Frost cupcakes: Using a piping bag fitted with a star tip, swirl the chocolate buttercream atop each cooled cupcake, creating a nest-like shape.
- Add mini egg nests: Carefully place 3-4 mini chocolate candy eggs on each frosted cupcake, nestling them into the buttercream. For extra fun texture, sprinkle a little toasted coconut or edible grass around the eggs.
Pro tip: If you’re short on time, the cupcake batter can be made a day ahead and refrigerated. Just bring it back to room temperature before baking. Also, don’t rush the cooling step—warm cupcakes and buttercream just don’t mix well!
Cooking Tips & Techniques
Let me tell you, I’ve made these cupcakes more times than I can count, and a few lessons stand out. First, always measure your cocoa powder carefully—too much can make the batter dry or bitter. I stick to unsweetened cocoa powder for that true chocolate kick.
When mixing the batter, folding gently is key. I learned the hard way that overmixing leads to tough cupcakes, which is the last thing you want. Also, adding the boiling water last helps the cocoa “bloom,” giving the cupcakes a deeper chocolate flavor and moist crumb.
For the buttercream, keep your butter at room temperature, not melted. Too soft, and your frosting won’t hold shape; too cold, and it will be lumpy. Beat the frosting long enough to get that fluffy texture, but keep an eye on the consistency—if it gets too soft, refrigerate for 10 minutes before piping.
When piping the nests, start from the outside and work inward with a light touch to get the classic “nest” look. And placing the mini eggs while the buttercream is still fresh helps them stick better. If you’re hosting a party, I recommend prepping the cupcakes a day ahead and assembling the nests just before serving to keep everything looking fresh.
My final tip: don’t stress if your nests aren’t perfect the first time. Each batch has its charm, and honestly, a little imperfection makes them look homemade and inviting.
Variations & Adaptations
These mini egg nest cupcakes are super versatile, so feel free to make them your own.
- Flavor Swap: Replace cocoa powder with melted white or dark chocolate in the batter for a richer, fudgier cupcake.
- Dairy-Free Version: Use coconut oil instead of butter in the batter and a dairy-free margarine for the buttercream. Substitute heavy cream with full-fat coconut milk.
- Nutty Twist: Fold in ½ cup chopped toasted hazelnuts or pecans for a crunchy surprise inside the cupcake.
- Seasonal Twist: Instead of mini chocolate eggs, top with fresh berries or candied fruit in summer for a lighter, colorful nest.
- Gluten-Free: Swap all-purpose flour with a gluten-free blend (make sure it contains xanthan gum for structure).
One personal favorite variation I tried was adding a teaspoon of espresso powder to the batter to boost the chocolate flavor without making it taste like coffee. It was a subtle but delightful change that my friends couldn’t get enough of!
Serving & Storage Suggestions
For the best experience, serve these mini egg nest cupcakes at room temperature so the buttercream is soft and creamy. They look adorable arranged on a pastel platter with a few extra mini eggs scattered around for decoration.
They pair beautifully with a cup of coffee, hot chocolate, or even a light fruity tea to balance the richness. For a festive brunch, add a side of fresh fruit salad to complement the chocolatey sweetness.
To store, keep cupcakes in an airtight container at room temperature for up to 2 days. If your kitchen is warm, refrigerate but bring them back to room temp before serving to soften the buttercream. For longer storage, freeze unfrosted cupcakes wrapped tightly in plastic wrap and foil for up to 3 months. Thaw overnight in the fridge, then frost as usual.
Reheating is generally not recommended once frosted, but if you want a warm cupcake, remove the frosting and warm the cupcake in the microwave for 10-15 seconds, then add fresh frosting or a dollop of whipped cream.
Interestingly, the flavors tend to develop and mellow a bit if you let the cupcakes rest overnight, making the chocolate even more pronounced. So, if you’re prepping ahead, you’re in luck!
Nutritional Information & Benefits
Each mini egg nest cupcake contains approximately 250-280 calories, depending on the size of your cupcakes and the amount of frosting used. They offer a good source of energy with moderate protein from eggs and fat from butter, balanced by carbohydrates in the flour and sugar.
Cocoa powder is rich in antioxidants and contains minerals like magnesium and iron, which can support overall health. Using real butter and whole milk adds calcium and vitamins A and D.
For those watching allergens, this recipe contains gluten, dairy, and eggs. However, with simple substitutions, you can make it gluten-free or dairy-free to accommodate dietary needs without losing flavor.
From my perspective, these cupcakes are a lovely treat to enjoy mindfully—perfect for special occasions or when you want a little chocolate comfort without going overboard. A reminder that indulgence can be part of a balanced lifestyle!
Conclusion
These delicious mini egg nest cupcakes with chocolate buttercream are more than just a cute dessert—they’re a tasty way to brighten any gathering or brighten a weekday snack time. I love how easy they come together and how the simple ingredients combine to create something special and memorable.
Feel free to tweak the recipe to your liking—whether that’s adding a splash of espresso, swapping in dairy-free ingredients, or decorating with your favorite candy. I’m confident you’ll find this recipe as satisfying and fun as I do.
Give it a try, share your versions, and let me know how your mini egg nests turn out. Your comments and stories always make my day! Remember, baking is about joy and sharing—and these cupcakes capture both perfectly.
Happy baking!
FAQs
Can I make these cupcakes ahead of time?
Yes! You can bake the cupcakes up to 2 days in advance and store them in an airtight container at room temperature. Frost just before serving for the freshest look and taste.
What can I use if I don’t have mini chocolate eggs?
Substitute with any small candy like jelly beans, chocolate chips, or even small fruit pieces. Edible sugar pearls or sprinkles also work for a festive touch.
How do I keep the buttercream from melting?
Keep the cupcakes in a cool place and avoid frosting warm cupcakes. If your kitchen is warm, refrigerate after frosting and bring to room temperature before serving.
Can I freeze these cupcakes?
You can freeze unfrosted cupcakes wrapped tightly for up to 3 months. Thaw in the fridge overnight, then frost fresh before serving.
Is there a way to make these cupcakes less sweet?
Try reducing the sugar in the buttercream by ¼ cup or using a less sweet cocoa powder. Adding a pinch of salt in the frosting also balances sweetness nicely.
Pin This Recipe!
Delicious Mini Egg Nest Cupcakes Easy Homemade Chocolate Buttercream Recipe
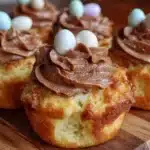
These mini egg nest cupcakes feature moist chocolate cupcakes topped with a fluffy homemade chocolate buttercream and decorated with mini chocolate candy eggs, perfect for spring and Easter celebrations.
- Prep Time: 15 minutes
- Cook Time: 20 minutes
- Total Time: 35 minutes
- Yield: 12 cupcakes
- Category: Dessert
- Cuisine: American
Ingredients
- All-purpose flour – 1 ¾ cups (220g)
- Granulated sugar – 1 cup (200g)
- Cocoa powder (unsweetened) – ⅓ cup (35g)
- Baking powder – 1 tsp
- Baking soda – ½ tsp
- Salt – ¼ tsp
- Large eggs – 2, room temperature
- Whole milk – ¾ cup (180ml)
- Vegetable oil – ⅓ cup (80ml)
- Vanilla extract – 1 tsp
- Boiling water – ½ cup (120ml)
- Unsalted butter – 1 cup (227g), softened
- Powdered sugar – 3 cups (360g), sifted
- Cocoa powder (unsweetened) – ¾ cup (75g)
- Heavy cream – 4 tbsp (60ml), plus more if needed
- Vanilla extract – 1 tsp
- Salt – a pinch
- Mini chocolate candy eggs – about 24
- Optional: toasted shredded coconut or edible grass for extra nest effect
Instructions
- Preheat your oven to 350°F (175°C). Line your cupcake pan with paper liners or lightly grease it.
- In a large bowl, sift together 1 ¾ cups flour, 1 cup sugar, ⅓ cup cocoa powder, 1 tsp baking powder, ½ tsp baking soda, and ¼ tsp salt. Set aside.
- In another bowl, whisk 2 room-temperature eggs, ¾ cup milk, ⅓ cup vegetable oil, and 1 tsp vanilla extract until smooth.
- Slowly add the wet mixture to the dry, stirring gently with a spatula until just combined. Do not overmix.
- Carefully pour in ½ cup boiling water and stir until smooth. The batter will be thin.
- Spoon batter evenly into the cupcake pan, filling each about 2/3 full.
- Bake for 18-20 minutes. Check doneness by inserting a toothpick in the center; it should come out clean or with a few moist crumbs.
- Remove cupcakes and let them cool in the pan for 5 minutes, then transfer to a wire rack to cool completely before frosting.
- To prepare the chocolate buttercream, beat 1 cup softened butter on medium speed until creamy, about 2 minutes.
- Gradually add 3 cups powdered sugar and ¾ cup cocoa powder, mixing on low speed to avoid a sugar cloud.
- Add 4 tablespoons heavy cream, 1 teaspoon vanilla extract, and a pinch of salt. Beat on high for 3 minutes until fluffy and smooth. Add more cream if frosting feels too stiff.
- Using a piping bag fitted with a star tip, swirl the chocolate buttercream atop each cooled cupcake, creating a nest-like shape.
- Carefully place 3-4 mini chocolate candy eggs on each frosted cupcake, nestling them into the buttercream. Optionally, sprinkle toasted coconut or edible grass around the eggs.
Notes
Do not overmix the batter to avoid dense cupcakes. Add boiling water last to intensify chocolate flavor and create moist texture. Keep butter at room temperature for best buttercream texture. If frosting is too soft, refrigerate for 10 minutes before piping. Cupcake batter can be made a day ahead and refrigerated. Frost just before serving for best appearance. Store cupcakes in airtight container at room temperature for up to 2 days or freeze unfrosted for up to 3 months.
Nutrition
- Serving Size: 1 cupcake
- Calories: 265
- Sugar: 25
- Sodium: 150
- Fat: 14
- Saturated Fat: 8
- Carbohydrates: 34
- Fiber: 2
- Protein: 3
Keywords: mini egg nest cupcakes, chocolate cupcakes, chocolate buttercream, Easter cupcakes, spring dessert, homemade cupcakes, festive cupcakes