Love this? Save it for later!
Share the inspiration with your friends
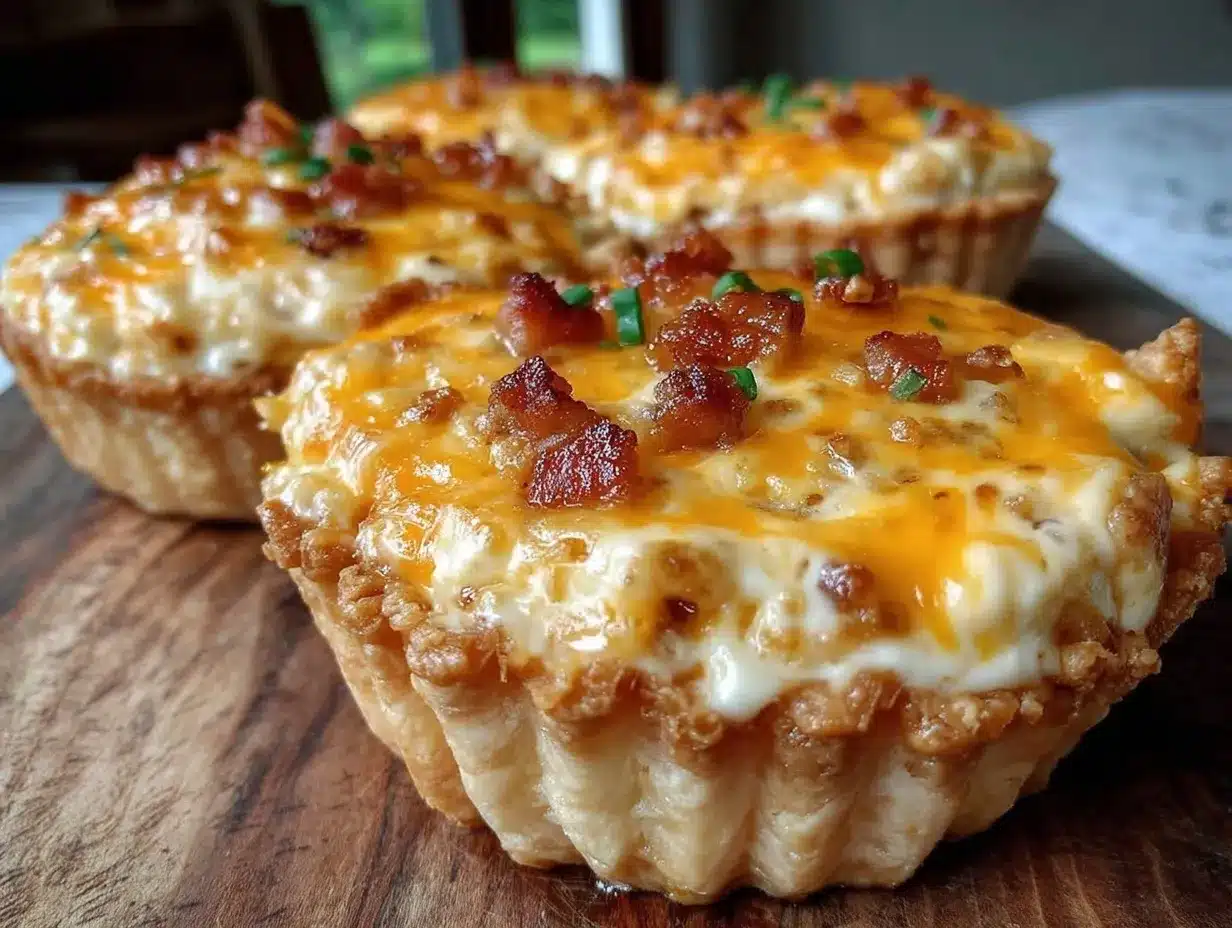
“I wasn’t expecting much when my neighbor, Mrs. Patel, handed me a tiny, steaming cup at our block party last summer. Honestly, I thought it’d be some fancy hors d’oeuvre I’d struggle to identify. But that first bite of her Easy Mini Quiche Lorraine Cups for Quick Homemade Bites completely changed my mind. The buttery crust crumbled just right, and the savory custard filling, dotted with smoky bacon and sharp cheese, was like a little party in my mouth.”
It was a warm Saturday afternoon, and the sun was lazily dipping behind the maple trees lining our street. I remember standing there, juggling my drink and a plate full of snacks, when Mrs. Patel disappeared into her kitchen and reappeared with these perfectly portioned delights. I swear, the way the quiche cups balanced that rich, creamy filling with the crisp crust was unlike anything I’d made before. Maybe it was the pinch of nutmeg she swore by or the way she folded the ingredients together without fuss.
Since that day, I’ve made these mini quiche cups a staple in my own kitchen—perfect for brunch, quick lunches, or even casual dinners when I don’t want to slave over the stove. Let me tell you, the ease of whipping up a batch that feeds a crowd (or just me, honestly) is a game-changer. If you’ve ever found yourself scrambling for a quick homemade bite that feels both cozy and a little fancy, this recipe is exactly what you need.
Why You’ll Love This Recipe
Having tested countless quiche recipes over the years, I can confidently say this Easy Mini Quiche Lorraine Cups recipe stands out for so many reasons. I mean, it’s tried, true, and absolutely family-approved. Here’s what makes it unforgettable:
- Quick & Easy: Comes together in under 30 minutes, making it perfect for busy mornings or unexpected guests.
- Simple Ingredients: No hunting for obscure items here—you likely have everything in your pantry already.
- Perfect for Brunch or Parties: These bite-sized treats are a hit at potlucks, baby showers, or even cozy weekend breakfasts.
- Crowd-Pleaser: Kids and adults alike can’t get enough of the creamy filling and crisp bacon bites.
- Unbelievably Delicious: The balance of smoky bacon, sharp cheese, and that silky custard is just next-level comfort food.
This isn’t just another quiche recipe—it’s the one where the pastry shell is tender but sturdy, and the filling is custardy without being heavy. I trust the method because I’ve tweaked it to avoid sogginess, and the mini size means you get all the flavor without leftovers hanging around forever. Honestly, every time I make these, I find myself closing my eyes after the first bite, savoring the simple goodness. Whether you’re impressing guests or just treating yourself, these mini quiches deliver every single time.
What Ingredients You Will Need
This recipe uses simple, wholesome ingredients to deliver big flavor without fuss. Most are pantry staples, and substitutions are easy if needed.
- For the crust:
- 1 sheet of store-bought puff pastry, thawed (I prefer Pepperidge Farm for best flakiness)
- All-purpose flour, for dusting (to prevent sticking)
- For the filling:
- 4 large eggs, room temperature (makes for smooth custard)
- 1 cup (240 ml) heavy cream or half-and-half (for a lighter option, use whole milk)
- 6 slices of bacon, cooked and chopped (smoky and crispy)
- 1 cup (100 g) grated Gruyère cheese (or substitute Swiss cheese)
- 1 small onion, finely chopped and sautéed (adds sweetness)
- Salt and freshly ground black pepper, to taste
- A pinch of freshly grated nutmeg (optional but adds warmth)
- Optional garnishes:
- Fresh chopped chives or parsley for color
- A light dusting of paprika for a hint of spice
If you want a gluten-free option, you can swap the puff pastry for gluten-free pie crusts or even use phyllo dough for extra crispiness. For a vegetarian twist, leave out the bacon and add sautéed mushrooms or spinach instead. I’ve even made these with dairy-free cream and cheese alternatives when hosting friends with dietary restrictions—it works surprisingly well!
Equipment Needed
- Mini muffin tin (12-cup size) – essential for getting those perfect bite-sized quiches
- Mixing bowls – one large for the custard, one for prepping ingredients
- Whisk or fork – to beat eggs and cream together smoothly
- Non-stick skillet – for sautéing onions and cooking bacon
- Rolling pin – to roll out the puff pastry evenly
- Measuring cups and spoons – for precise ingredient amounts
- Pastry brush (optional) – to brush a little egg wash on the pastry edges for extra golden color
If you don’t have a mini muffin tin, small ramekins or a regular muffin pan can work too, but the baking time and portion sizes will vary. I’ve found that a silicone mini muffin pan helps release the quiches easily without greasing, but a standard metal pan works just fine if you grease it well. For rolling pastry, a clean glass bottle can substitute in a pinch—don’t worry if it’s a bit uneven; the rustic look adds charm!
Preparation Method
- Preheat your oven to 375°F (190°C). This usually takes about 15 minutes, so use this time to prep your ingredients.
- Cook the bacon: Chop the bacon into small pieces and cook in a skillet over medium heat until crispy, about 6–8 minutes. Drain on paper towels and set aside. Save a little bacon fat if you want to sauté the onions in it for extra flavor.
- Sauté the onions: In the same skillet, add the chopped onions and cook over medium heat until soft and translucent, about 4–5 minutes. Remove from heat and let cool slightly.
- Prepare the puff pastry: Lightly flour your work surface and roll out the thawed puff pastry to smooth any creases. Using a round cookie cutter or a glass about 3 inches (7.5 cm) in diameter, cut 12 circles. Gently press each circle into the cups of your mini muffin tin, forming a small shell. Trim any excess pastry if needed.
- Blind bake the shells: To avoid soggy bottoms, prick the pastry with a fork and bake for 8 minutes until lightly golden. Remove from the oven and set aside.
- Mix the filling: In a large bowl, whisk together the eggs, heavy cream, salt, pepper, and nutmeg until smooth. Stir in the bacon, sautéed onions, and grated cheese until evenly combined.
- Fill the pastry shells: Pour the egg mixture evenly into each pre-baked shell, filling about 3/4 full to allow room for rising.
- Bake the quiche cups: Return the tin to the oven and bake for 18–22 minutes, or until the filling is set and slightly golden on top. You’ll know they’re done when a toothpick inserted in the center comes out clean.
- Cool and serve: Let the mini quiche cups cool in the pan for 5 minutes before carefully removing them. Garnish with chopped chives or parsley if desired.
Pro tip: If you notice the edges of the pastry browning too fast, cover them loosely with foil halfway through baking to prevent burning. Also, don’t overfill the cups or the filling might spill over, making a mess in your oven (been there, done that!).
Cooking Tips & Techniques
One key to perfect mini quiche cups is managing moisture. Too wet, and the crust gets soggy; too dry, and the filling turns rubbery. That’s why I always pre-bake the pastry shells slightly before adding the custard. It creates a barrier and keeps the crust crisp. Also, letting your eggs and cream come to room temperature really helps create a silky custard instead of a curdled mess.
When cooking bacon, crispiness is king. I like to cook mine until it’s just before too crunchy—this way it adds texture without drying out the filling. And sautéed onions add a gentle sweetness that balances the smoky bacon nicely.
Don’t rush the baking time. Mini quiches can look done before they really are, so using the toothpick test is a must. If you want to speed things up, you can prepare the filling the night before and store it in the fridge—just give it a good whisk before pouring.
Lastly, multitasking is your friend here. While the shells bake, you can cook bacon and onions, then mix the filling so everything comes together smoothly. Trust me, having it all ready before filling makes the whole process feel effortless.
Variations & Adaptations
These mini quiche cups are a fantastic base for customization. Here are a few ideas I’ve played with:
- Vegetarian Version: Swap bacon for sautéed mushrooms, spinach, or sun-dried tomatoes. Add a bit of goat cheese for tang.
- Seasonal Flavors: In spring, try adding fresh asparagus tips or peas. In fall, roasted butternut squash cubes add a sweet contrast.
- Spicy Twist: Add a pinch of cayenne or some chopped jalapeños to the filling for a kick.
- Crust Alternatives: Use phyllo dough for extra crispiness or gluten-free pie crusts to accommodate dietary needs.
- Dairy-Free Option: Use coconut cream instead of heavy cream and dairy-free cheese substitutes.
Personally, I once tried these with shredded smoked turkey instead of bacon—turned out surprisingly good and perfect for a lighter bite. Feel free to experiment with cheeses too; cheddar adds sharpness, feta gives a briny punch.
Serving & Storage Suggestions
Mini quiche cups are best served warm or at room temperature. I like to plate them with a simple mixed green salad dressed in lemon vinaigrette for a light lunch. For brunch, pair with fresh fruit and a glass of sparkling water or champagne if you’re feeling fancy.
Leftovers store beautifully in an airtight container in the fridge for up to 3 days. To reheat, pop them in a 350°F (175°C) oven for about 8 minutes to bring back that crisp crust. Avoid microwaving if you can, because the crust tends to get soggy.
These little bites also freeze well. After baking and cooling completely, place them in a single layer on a baking sheet and freeze until firm. Transfer to a freezer bag and store up to 2 months. Reheat straight from frozen in the oven for about 15 minutes.
Over time, the flavors marry and deepen, so if you make these ahead for a party, they often taste even better the next day.
Nutritional Information & Benefits
Each mini quiche cup contains approximately:
| Calories | 150 |
|---|---|
| Protein | 7g |
| Fat | 12g |
| Carbohydrates | 6g |
| Fiber | 0.5g |
Thanks to the eggs and cheese, these quiches provide a solid protein boost and are rich in calcium. The bacon adds flavor but also saturated fat, so moderate enjoyment is key. Using heavy cream lends a creamy texture, though swapping for half-and-half or milk lightens the fat content.
Gluten-free adaptations make this recipe suitable for those with gluten intolerance, and dairy-free substitutions are possible for lactose-sensitive eaters. Overall, these mini quiche cups are a satisfying way to enjoy comfort food with some nutritional benefits.
Conclusion
So, why try these Easy Mini Quiche Lorraine Cups for Quick Homemade Bites? Because they’re simple, delicious, and fit perfectly into busy lives without sacrificing flavor or charm. Whether you’re hosting a brunch, packing snacks, or just craving a cozy homemade bite, this recipe has your back.
I love this recipe because it’s forgiving and flexible—perfect for tweaking with whatever ingredients you have on hand. Honestly, it never fails to impress and makes me feel like a kitchen pro, even on hectic days. Give it a shot, and please share how you customized your version or any tips you picked up along the way. I’m always excited to hear from fellow quiche fans!
Happy baking and bon appétit!
FAQs About Easy Mini Quiche Lorraine Cups
Can I make the mini quiches ahead of time?
Absolutely! You can prepare and bake them a day in advance. Store in the fridge and reheat in the oven before serving for best results.
Can I freeze these mini quiche cups?
Yes, they freeze very well. Freeze after baking and cooling, then reheat in the oven straight from frozen.
What can I use instead of puff pastry?
Phyllo dough or pie crusts work great. For gluten-free options, look for gluten-free pie crusts or make crustless mini quiches.
Can I make these dairy-free?
Definitely. Use coconut cream or other non-dairy milk and dairy-free cheese alternatives. The texture will be slightly different but still tasty.
How do I prevent soggy bottoms?
Blind baking the pastry shells for a few minutes before adding the filling helps keep the crust crisp and prevents sogginess.
For more simple savory bites that impress, you might enjoy my recipes for crispy garlic chicken or roasted vegetable tart, which share that perfect balance of ease and flavor.
Pin This Recipe!

Easy Mini Quiche Lorraine Cups

These bite-sized quiche cups feature a tender puff pastry crust filled with a savory custard of eggs, cream, smoky bacon, sautéed onions, and Gruyère cheese. Perfect for quick brunches, parties, or cozy homemade bites.
- Prep Time: 15 minutes
- Cook Time: 30 minutes
- Total Time: 45 minutes
- Yield: 12 mini quiche cups 1x
- Category: Brunch
- Cuisine: French
Ingredients
- 1 sheet store-bought puff pastry, thawed
- All-purpose flour, for dusting
- 4 large eggs, room temperature
- 1 cup (240 ml) heavy cream or half-and-half (or whole milk for lighter option)
- 6 slices bacon, cooked and chopped
- 1 cup (100 g) grated Gruyère cheese (or Swiss cheese)
- 1 small onion, finely chopped and sautéed
- Salt and freshly ground black pepper, to taste
- A pinch of freshly grated nutmeg (optional)
- Optional garnishes: fresh chopped chives or parsley, light dusting of paprika
Instructions
- Preheat oven to 375°F (190°C).
- Cook bacon in a skillet over medium heat until crispy, about 6–8 minutes. Drain and set aside, reserving some bacon fat if desired.
- Sauté chopped onions in the same skillet over medium heat until soft and translucent, about 4–5 minutes. Remove from heat and cool slightly.
- Lightly flour work surface and roll out thawed puff pastry to smooth creases. Cut 12 circles about 3 inches (7.5 cm) in diameter using a cookie cutter or glass.
- Press each pastry circle into mini muffin tin cups to form shells. Trim excess pastry if needed.
- Prick pastry shells with a fork and blind bake for 8 minutes until lightly golden. Remove from oven.
- In a large bowl, whisk together eggs, heavy cream, salt, pepper, and nutmeg until smooth.
- Stir in cooked bacon, sautéed onions, and grated cheese until evenly combined.
- Pour filling evenly into pre-baked pastry shells, filling about 3/4 full.
- Bake quiche cups for 18–22 minutes until filling is set and slightly golden. Test doneness with a toothpick.
- Cool in pan for 5 minutes before removing. Garnish with chopped chives or parsley if desired.
Notes
Blind baking the pastry shells prevents soggy bottoms. Use room temperature eggs and cream for a silky custard. Cover pastry edges with foil if browning too fast. Don’t overfill to avoid spills. Can prepare filling ahead and refrigerate. Freeze baked quiches for up to 2 months and reheat from frozen.
Nutrition
- Serving Size: 1 mini quiche cup
- Calories: 150
- Sugar: 1
- Sodium: 250
- Fat: 12
- Saturated Fat: 5
- Carbohydrates: 6
- Fiber: 0.5
- Protein: 7
Keywords: mini quiche, quiche lorraine, puff pastry, bacon, brunch recipe, easy quiche, savory bites, party appetizers