Best Homemade Elderberry Gummies for Immunity
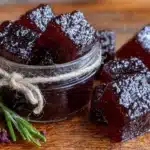
These homemade elderberry gummies are a delicious and easy way to support your immune system during cold season. Made with simple ingredients like elderberry syrup, gelatin, and honey, they have a perfect bouncy chew and a sweet-tart flavor that both kids and adults love.
- Prep Time: 15 minutes
- Cook Time: 0 minutes
- Total Time: 2 hours 15 minutes (includes setting time)
- Yield: 4 servings 1x
- Category: Snack
- Cuisine: American
Ingredients
- 1 cup (240 ml) elderberry syrup (store-bought or homemade)
- 3 tablespoons (about 28 grams) high-quality grass-fed gelatin (e.g., Great Lakes Gelatin or Vital Proteins)
- 2–3 tablespoons (30–45 ml) honey (raw, local, or Manuka preferred)
- 1 tablespoon (15 ml) fresh lemon juice
- 1 teaspoon (about 5 grams) vitamin C powder (optional)
Instructions
- Prepare your workspace: Place silicone gummy molds on a baking sheet or flat tray that fits in your fridge. Wash and dry the molds.
- Gently warm the elderberry syrup: Pour 1 cup of elderberry syrup into a small saucepan. Heat over low heat until warm to the touch (about 100°F / 38°C). Do not let it steam or boil.
- Add honey and lemon juice: Stir in 2-3 tablespoons of honey and 1 tablespoon of lemon juice. Whisk until the honey dissolves completely. Taste and adjust sweetness if needed.
- Sprinkle in the gelatin: Remove the saucepan from the heat. Sprinkle 3 tablespoons of gelatin evenly over the surface of the warm liquid. Let it sit for about 2 minutes without stirring to allow the gelatin to bloom.
- Whisk gently: After the gelatin has bloomed, whisk it into the liquid using slow, gentle strokes to avoid creating bubbles. If bubbles form, let the mixture sit for 30 seconds.
- Add vitamin C powder (optional): If using, whisk in 1 teaspoon of vitamin C powder until completely dissolved. Strain through a fine-mesh sieve if clumps form.
- Transfer to a measuring cup: Pour the mixture into a liquid measuring cup with a pour spout. Let it cool for 2-3 minutes until it is still liquid but not hot.
- Fill the molds: Use a dropper or small spoon to fill each cavity in the silicone molds. Do not overfill. Work quickly as the mixture will start to thicken.
- Refrigerate: Place the tray of filled molds in the refrigerator. Let them set for at least 2 hours, or overnight for best results.
- Unmold and store: Once set, pop the gummies out of the molds. If they stick, place the mold in the freezer for 5 minutes. Store in an airtight container in the refrigerator.
Notes
Temperature control is key: keep the syrup warm but not hot to preserve immune-boosting compounds and ensure proper gelatin setting. Let the gelatin bloom for 2 minutes before whisking. Avoid bubbles by whisking gently. The gummies taste less sweet when warm, so do not over-sweeten. If the mixture starts to set while filling molds, gently reheat on low for 30 seconds. For best texture, serve cold straight from the fridge. Gummies will last 2-3 weeks in an airtight container in the refrigerator, or up to 3 months in the freezer.
Nutrition
- Serving Size: 5 gummies
- Calories: 4560
- Sugar: 810
- Sodium: 5
- Carbohydrates: 1012
- Protein: 23
Keywords: elderberry gummies, homemade gummies, immune support, elderberry recipe, healthy snacks, gelatin gummies, honey gummies, cold season remedy